Focus-Points
Focus Points – User Manual
Content
Troubleshooting / FAQ
Scope and Limitations
Overview and Basic Operation
Display of Focus Points
- Camera-maker specific sections for:
Canon, Nikon, Sony, Fuji, Olympus, OM System, Panasonic, Pentax, Ricoh, Apple
Special Topics
1. Scope and Limitations
A plugin for Lightroom Classic1 on Windows and macOS:
- Show which focus point was active when the picture was taken 2
- Display user-selected autofocus points/area 3,4
- Visualize faces and subjects detected by the camera 3,5
- Tagging (flagging, rating and coloring) of photos within the plugin UI 7
- Display and search (EXIF) metadata of the selected image
- Straightening images by applying compensation for camera roll angle3,6,7
1 LR5.7 and LR6 perpetual licenses and LrC subscriptions.
2 For Canon, Nikon, Sony, Fuji, Olympus/OM, Panasonic, Pentax, Ricoh, Apple. See full list of supported cameras.
3 Depending on the presence of metadata.
4 Currently supported for Pentax and OM System.
5 Currently supported for Fuji, OM System (subjects, faces) and Sony, Olympus, Pentax (faces).
6 Currently supported for Canon, Nikon, Fuji, Olympus/OM, Panasonic, Pentax, Ricoh.
7 Not for LR5.
To understand the principles of this plugin, how to use it and how to interpret the results, it is recommended that you read chapters 1, 2 and the part of chapter 3 that applies to your camera.
Principle of operation
The plugin uses ExifTool to retrieve metadata from the image file. Autofocus related information is extracted from the metadata and processed to detect and visualize focus points, faces and subjects. For this to work, the plugin needs an image file that contains camera manufacturer specific metadata information (makernotes) as written by the camera to each JPG or RAW file.
The plugin will not be able to show focus points for image files that do not contain makernotes.
Note: ExifTool is part of the plugin package and does not need to be installed separately.
Because the plugin works inside Lightroom, it is important to understand that Lightroom does not read makernotes information when importing files. When the plugin is run on a selected photo, it calls ExifTool to process the underlying image file on disk. When Lightroom exports a photo as JPG or TIFF to pass to an external application for editing, it creates a new image file without the makernotes metadata. The re-imported result from that application will not have this information, which is essential for the plugin to work.
Examples of when focus points are not displayed:
- Original image edited in Photoshop and returned as PSD or TIF
- Original image transferred as TIFF/JPG to a 3rd party editor (Photo → Edit In) and returned as TIF,
e.g. Topaz, NIK, Photomatix - Photos exported to disk
- Smart Preview but the original image file is not present
For external applications launched from within Lightroom that take a RAW file as input (typically invoked from the ‘Plug-in Extras’ menu), the plugin may work on the resulting file imported into Lightroom if the application leaves the original file’s makernotes intact. This is because in this case Lightroom does not physically pass on the file to the external application but only the name of the image file.
Examples, for which focus point display may work on image files created based on original files:
- DNG files created by DxO PhotoLab, Luminar Neo, Topaz Photo AI
- DNG files created by LrC Enhance, e.g. AI Denoise (prior to LrC 14.4)
Note that this may depend on the specific camera make/model.
E.g. for Fuji DNG files the plugin will not be able to display focus points.
Cases where the Focus Points plugin may not be able to display meaningful information:
- Focus and Pan: The shot was taken by focusing on the main subject and then panning the camera to get the desired composition. The focus point recorded by the camera does not
movewith the focused subject during recomposition, but maintains its original position. - Back button Focus: This is similar to Focus and Pan because the underlying principle is the same. In addition, the camera may not even record a focus point (depending on the make/model).
2. Overview and Basic Operation
This section will explain how to install, configure, and use the plugin.
2.1 Installation
-
Download the latest release of the plugin package.
A file namedFocus-Points-[plugin_version].zipwill be downloaded to your computer. -
Unzip the downloaded file. Inside the extracted content locate the plugin folder
focuspoints.lrplugin.
MAC users: According to your macOS preferences the zip file will be automatically unzipped. -
Find the folder where you keep your Lightroom plugins.
If you don’t know where this is, open Lightroom, go toFile → Plug-in Managerand clickAdd. This will open a “Select Folder” dialog in Lightroom’s default folder for plugins. -
To update an existing installation, first remove the folder containing the version of the plugin you want to update. You can delete the folder or rename it, for example,
to focuspoints.lrplugin.303(for version 3.03). This allows you to easily revert to the previous version if the update causes issues.
Note: It is necessary to remove the plugin folder at OS level because deleting a plugin in Lightroom’s Plug-in Manager only removes it from Lightroom’s list of known plugins. The plugin folder and its contents on disk remain as they are.
Important: Copying the downloaded files over those in the existing folder is not recommended! -
Move the downloaded plugin folder
focuspoints.lrpluginto the folder where you keep your Lightroom plugins.
MAC users: if you have to navigate into the content of theadobe lightroom classic.app, use the control-click and chooseshow package content. -
Open Lightroom and go to
File → Plug-in Manager.
New installation:
Windows: Click theAddbutton and select the plugin.
MAC: In case of you’d copied the plugin to the default LR-plugin location, the new plugin is already listed - activate it. Otherwise, click on theAddbutton and select the plugin.
Update installation:
Select the plug-in and clickReload plug-in(only applies if Lightroom is open during the installation of the update.)
Once the plugin has been installed, choose one or more photos and select:
Library → Plug-in Extras → Show Focus Point, orFile → Plug-in Extras → Show Focus Point
See How to use a keyboard shortcut to run the plugin to learn how to invoke the plugin using a hotkey.
If you have never used Lightroom plugins before and are looking for some basic information, a video tutorial would be a good place to start. For example, Plugin Installation (5:16) or How to Install & Remove Lightroom Plug-ins (11:30).
2.2 Focus Point Viewer
Once the plugin is installed, you can run it with one or more photos selected:
Library module:
Library → Plug-in Extras → Focus Point
Develop module:
File → Plug-in Extras → Focus Point
In V3.2, you no longer need to select the corresponding photos before starting the plugin to display the focus point for multiple photos. The plugin now supports next and previous function when run on a single image (the current one in Lightroom filmstrip). Next image will advance to the next photo in the filmstrip, and Previous image will advance to the previous photo in the filmstrip. Unlike with a set of selected photos, there is no wrap-around when the beginning or end of the film strip is reached.
To run the plugin on a specific series of photos, select those photos in Lightroom before running the plugin.
Note: Filmstrip navigation uses the ‘LrSelection’ namespace, which is only available in SDK version 6.0 and above. Therefore, this feature is not available on LR5.7.
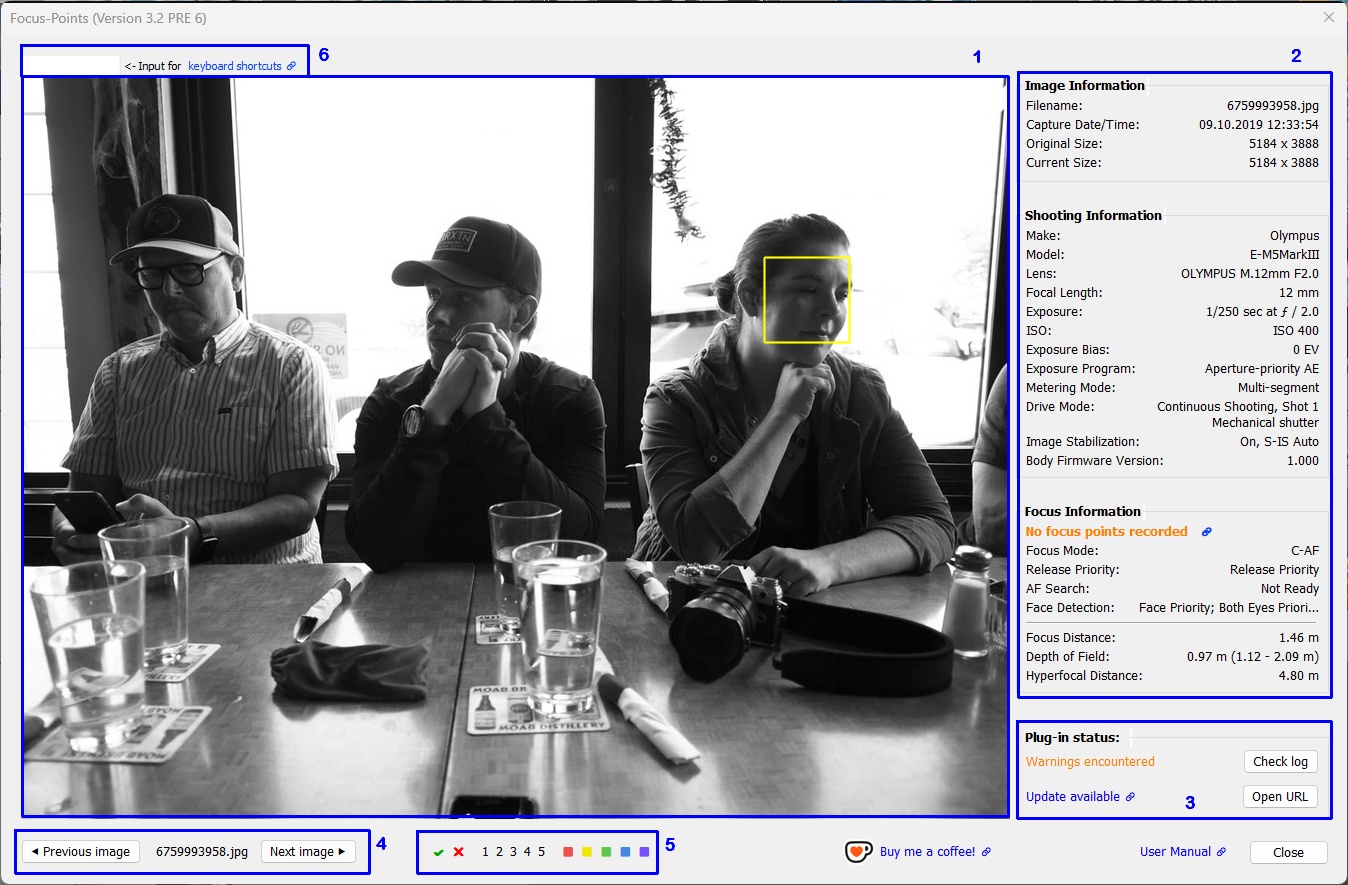
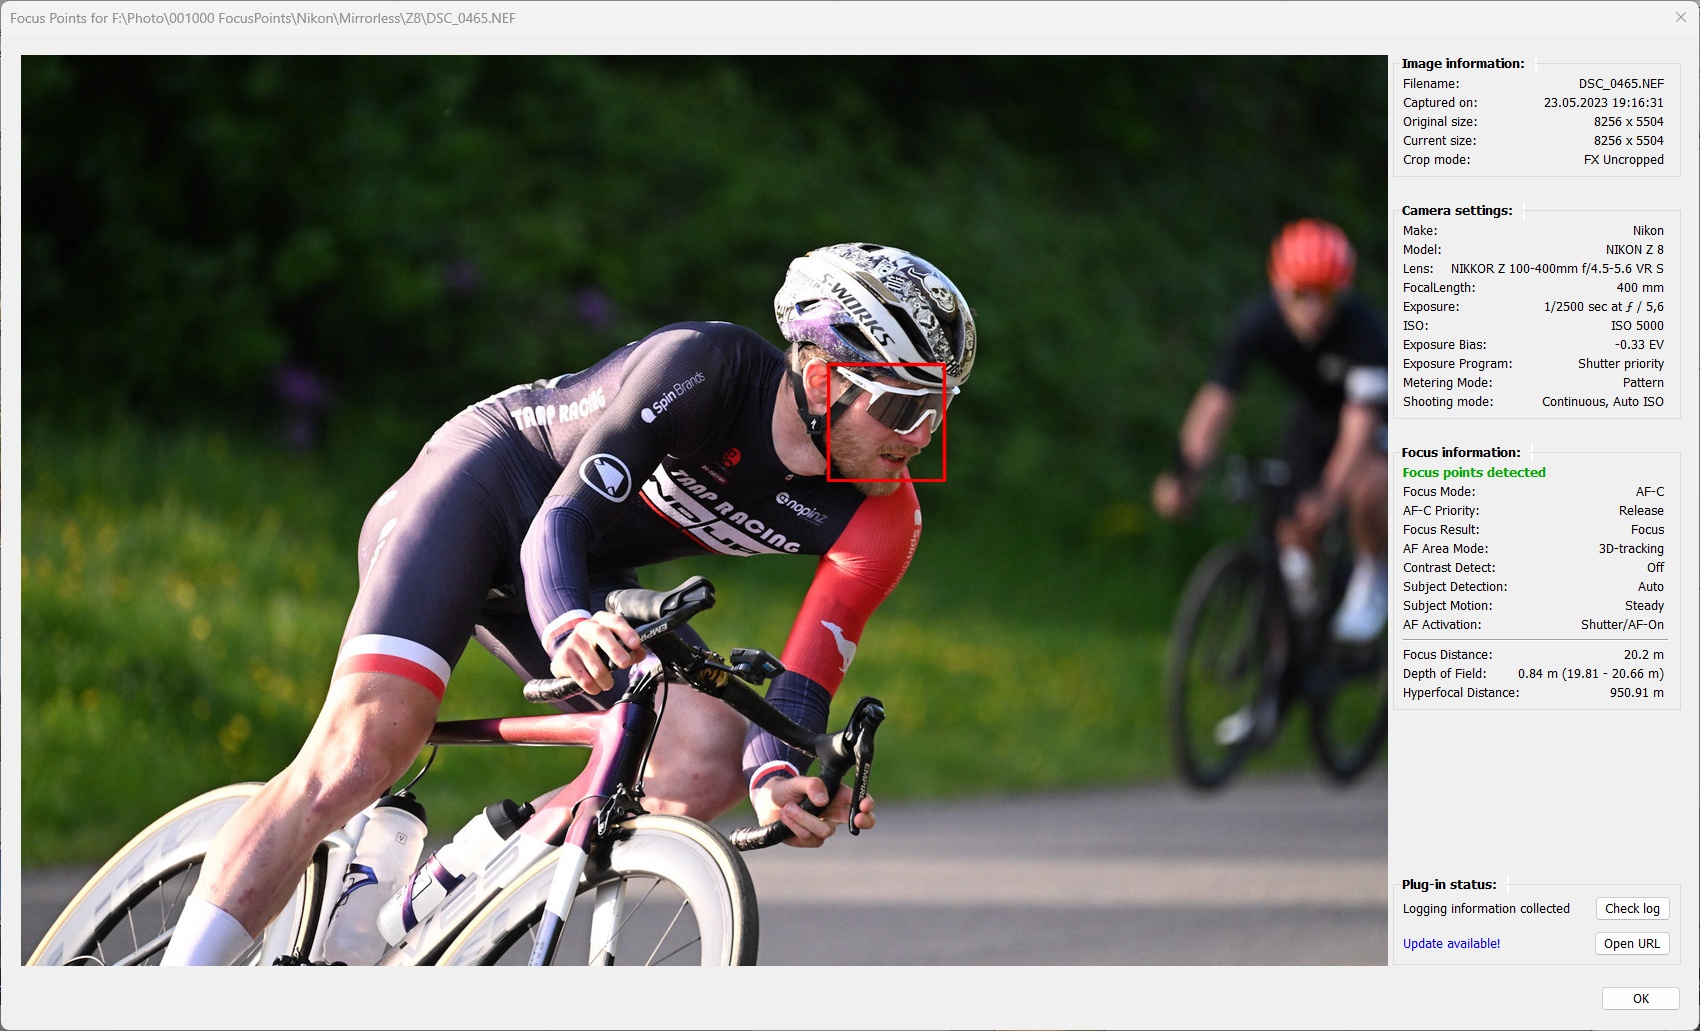
User Interface
The user interface is divided into three main areas. On the left is the Photo View, which shows visualized focus points and detected elements. On the right is the Info View, a side-by-side view of information that may be useful for evaluating the photo in terms of focus results. The controls for navigating and flagging images are located at the bottom of the window.
The Focus Point Viewer window is not dynamically resizable. However, V3.2 introduces a Size of plugin window setting that allows you to customize the size of the plugin window. You can choose from five options ranging from XXL to S. This setting corresponds to 80% (XXL) downto 40% (S), in increments of 10%, of the size of the Lightroom application window and it refers to the dimensions of the photo view. The info view and the bottom row of user controls are not included in this percentage. The space allocated to these areas is in addition to the size setting.
Click on the following links for more detailed information:
- Photo View
- Info View
- Plugin Status
- Navigation Controls
- Flagging Controls
- Keyboard Shortcuts
- Buy me a coffee
Photo View
The plugin uses colors to visualize autofocus points, detected faces, subjects and details. This means that the respective area is highlighted by a rectangular marker:
This overview shows which elements are supported by the plugin, and the shapes and colors used to visualize them. On Windows, the rectangular marker is a solid frame. On macOS, the frame is indicated by corner symbols*.
| MAC | WIN | Color | Meaning |
|---|---|---|---|
 |
 |
red1 | Active AF point. Focus area, dimensions reported by the camera |
 |
 |
red1,2 | Active AF point. Focus location3, pixel coordinates reported by the camera |
 |
 |
white | User-selected AF point |
 |
 |
gray | Inactive AF point. Part of DSLR AF points but not used for the image3 |
 |
 |
yellow | Face or subject detected by the camera in this area |
 |
 |
black | Part of the image that is used by the camera in ‘crop mode’ |
1 AF point color can be chosen from red, green, blue in Viewing Options.
2 ‘Focus-pixel’ shape and size can be chosen from different options (small box or medium/large with center dot) in Viewing Options.
3 The meaning may vary depending on the camera manufacturer. See the camera-specific chapters for a detailed explanation.
* Tech Note: Windows and macOS use different rendering implementations, so the display of focus points and other elements looks different on each operating system. On macOS, focus points and face/object detection and cropping frames are indicated only by the corners, while on Windows, all frames have solid lines. This is due to the fact that the Lightroom SDK methods for overlaying information (frame corners and center points) on an image work on macOS but not on Windows. On Windows, this is done by ImageMagick (mogrify), which draws rectangles with solid lines.
Availability of the same method(s) on both platforms (ideally chosen by the user) would be desirable, but this is challenging and requires significant effort.
Info View
The text pane right to the photo view comprises three groups:
- Image Information
- Shooting Information
- Focus Information
Image information and Shooting information are largely taken from the Lightroom catalog, so this information is available for every photo. Depending on the availability of information in the makernotes, these two sections may be expanded to include various camera-specific information such as crop mode, drive mode, shot number, etc., which may be useful in the context of evaluating focus results.
Focus information is only available for photos for which the corresponding image file contains complete metadata. See Scope and Limitations for more detailed information.
Two buttons at the bottom of the window allow you to move forward and backward through a series of photos, if more than one was selected in Lightroom when the plugin was launched. In case the plugin was launched on a single photo, the buttons are inactive.
A link to the User Guide (this document) provides quick and easy access to the operating instructions.
The window can be closed by clicking Exit or pressing <Enter> or <Esc> or <Space>.
Focus Distance, Depth of Field, Hyperfocal Distance
Most camera makers include subject or focus distance information in makernotes. Sony, Fuji and Pentax do not, so this section is not relevant to images taken with their cameras.
ExifTool uses the focus distance information to calculate the depth of field (DoF), which can be helpful in assessing whether the lens is stopped down enough to capture a subject “acceptably sharp”, i.e. whether the desired portion of the subject is “in focus”. ExifTool also calculates the hyperfocal distance, which can be helpful in determining if the autofocus is set at the correct distance for photos that should be sharp from front to back (e.g. landscapes).
Note that the accuracy of focus distance values is limited. Cameras are not designed to measure distances. The values given in the EXIF data are byproducts of the focusing process, derived from control information to move the lens to a certain distance. Such focus step counts can be approximated as a distance. The degree of inaccuracy, and therefore the usefulness of this data, depends on several aspects. Typically, focus distance values are less accurate at short focal lengths. Also, this information is likely to be inaccurate under extreme conditions (macro or infinity). Finally, the equipment also plays a role.
Technical note: ExifTool creates pseudo tags DepthOfField and HyperfocalDistance which can be seen in ExifTool output. For calculation of DoF it uses the standard circle of confusion parameter for the respective sensor. In this context, the term “sharpness” refers to the ability of the human eye to recognize and resolve details when an image is viewed at full size, i.e. not enlarged, also known as “pixel peeping”.
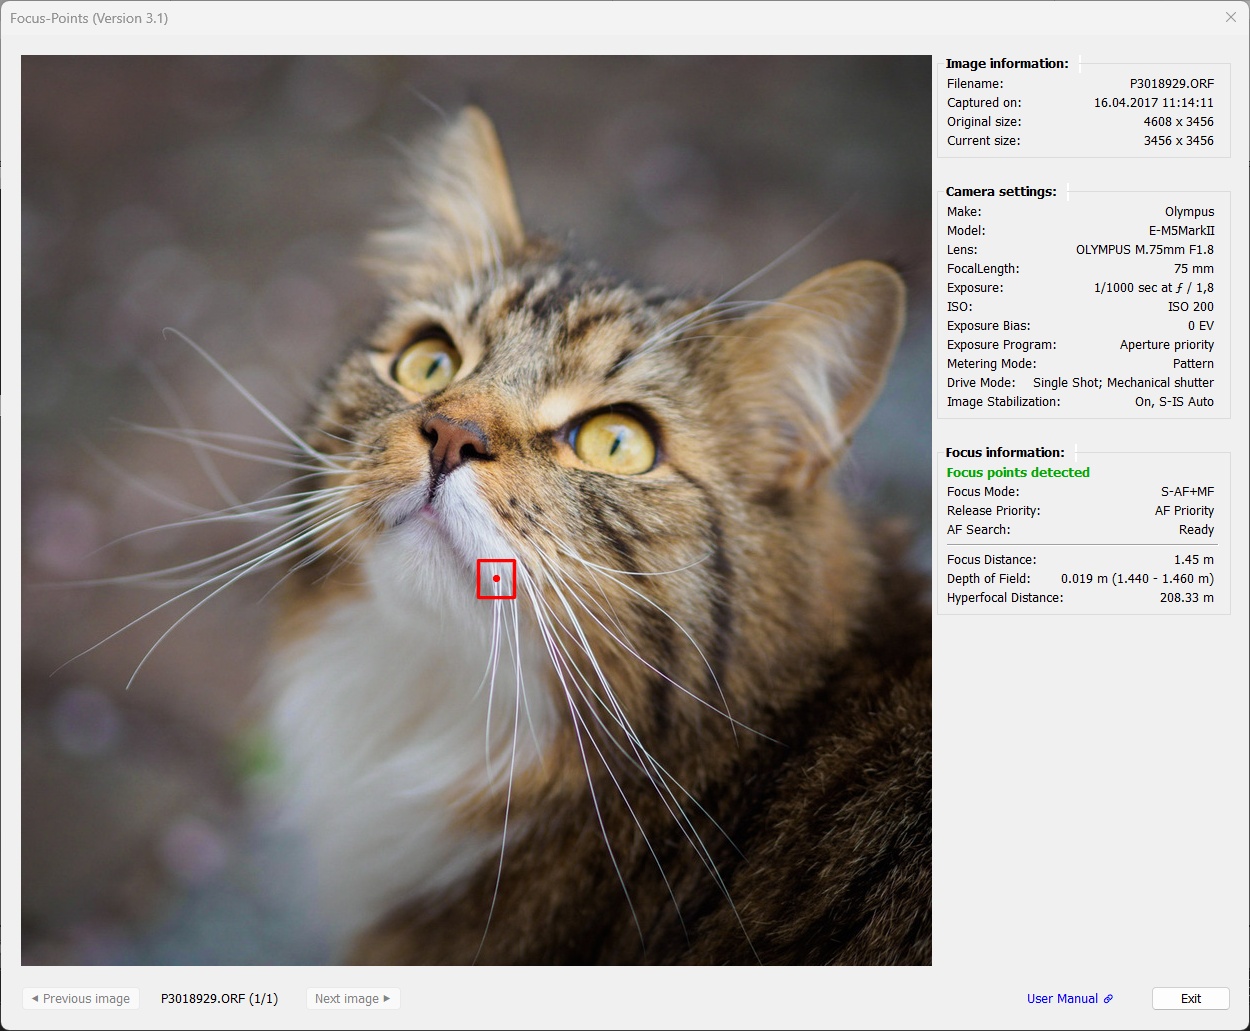
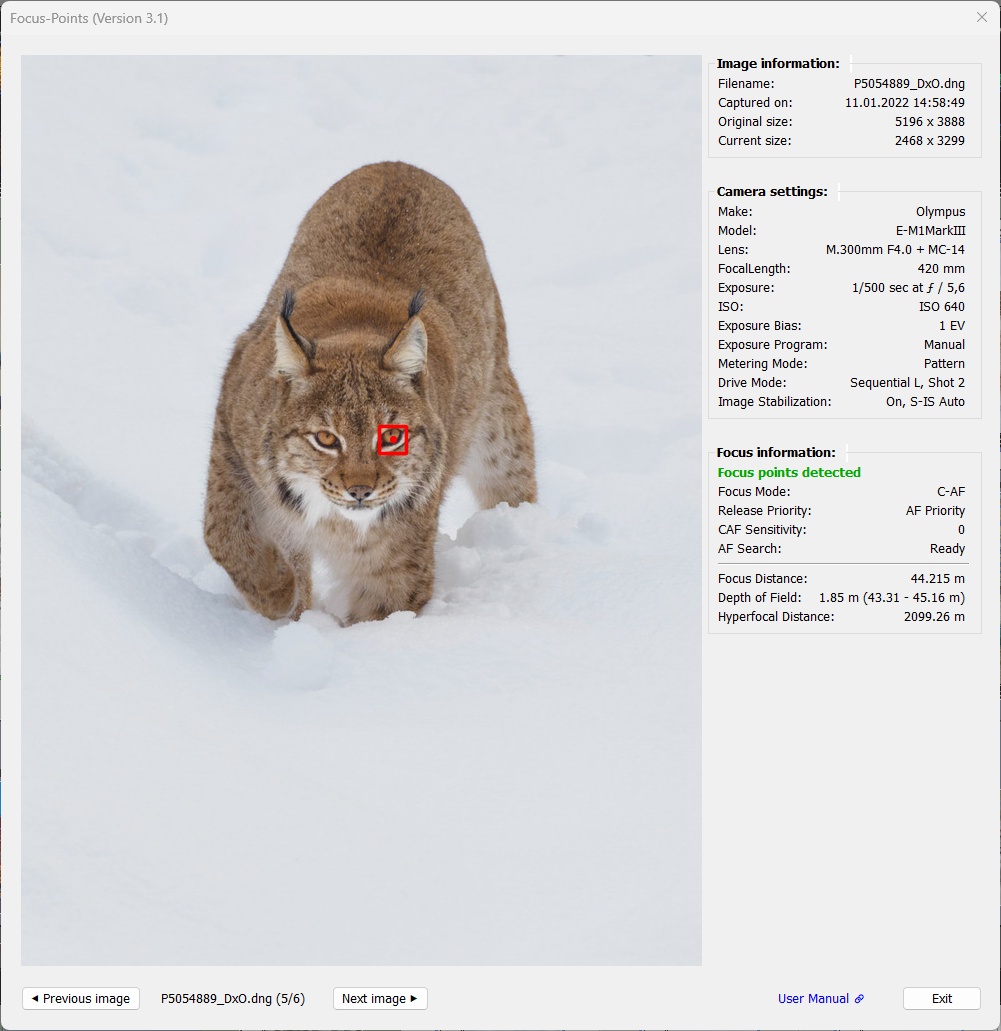
Example: DoF in this capture is only ~2 cm, so with the chosen aperture of f/1.8 the eyes will be outside the sharp zone if the shot is focused on the front whiskers.
User Messages
The first line of text in the Focus Information section contains a message summarizing whether the plugin was successful in its task to detect and visualize focus points. This can be a success message (in green letters), a warning (orange) or an error message (red):
| Type | Message |
|---|---|
| Success | Focus points detected |
| Warning | No focus points recorded |
| Warning | Focus point recorded in manual focus mode |
| Warning | Manual focus, no AF points recorded |
| Error | Focus info missing from file |
| Error | Camera model not supported |
| Error | Camera maker not supported |
| Error | No camera-specific metadata found |
| Error | Severe error encountered |
Click on the message to learn what it means and how to deal with it in case of an error or warning.
You can also access this information from the plugin window by clicking the link icon 🔗 next to the message:

Plugin Status
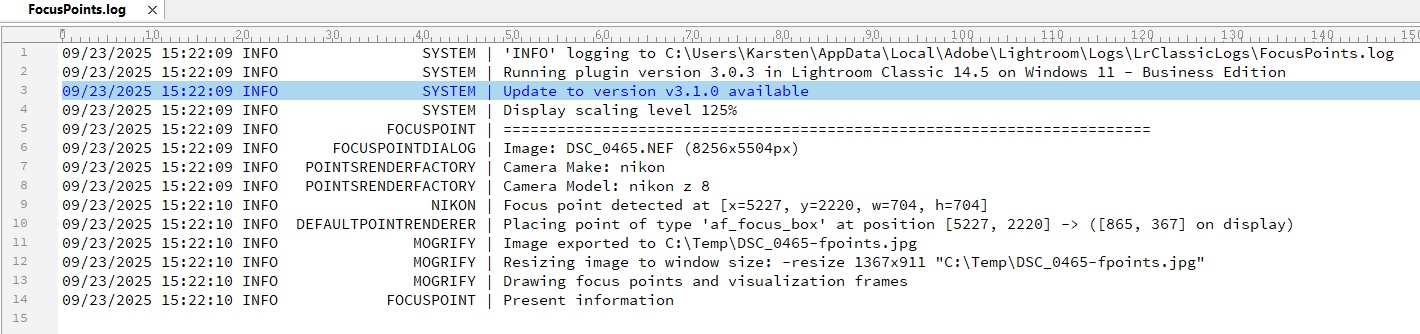
If errors or warnings were encountered while processing the autofocus metadata, a status message is displayed at the bottom of the text pane. To the right of this message, you can click the Check log button to open the logfile for more details. The logfile contains detailed information about the metadata processing, such as relevant tags found (or not found).
See Logging how to set up and customize logging.
For the image above, where focus info is said to be “missing from file”, the logfile looks like this:
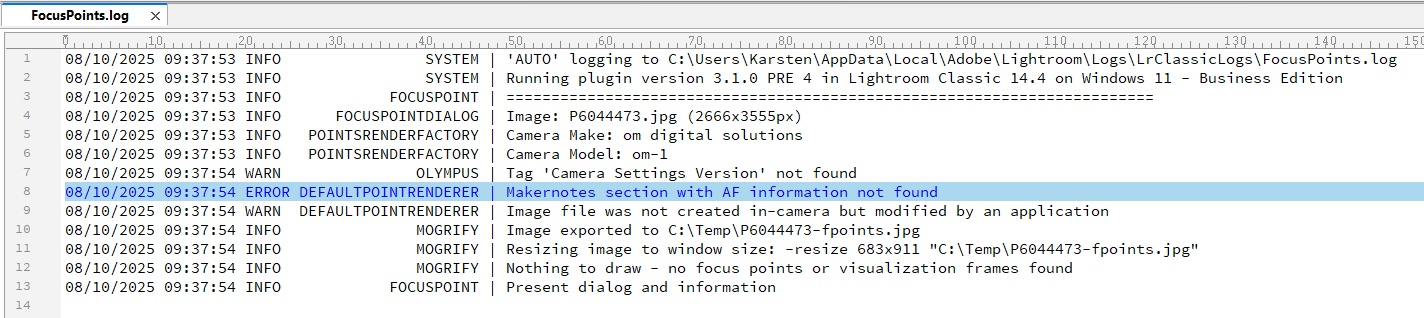
There are two warnings and one error:
The tag CameraSettingsVersion has not been found which means that this file does not contain a makernotes section with AF information (which is required for the plugin to work). The image file was not created in-camera but by an application. In this case, it is a JPG file exported from (and created! by) Lightroom.
Navigation Controls
In V3.2, you no longer need to select the corresponding photos before starting the plugin to display the focus point for multiple photos. The plugin now supports next and previous function when run on a single image (the current one in Lightroom filmstrip). Next image will advance to the next photo in the filmstrip, and Previous image will advance to the previous photo in the filmstrip. Unlike with a set of selected photos, there is no wrap-around when the beginning or end of the film strip is reached.
To run the plugin on a specific series of photos, select those photos in Lightroom before running the plugin.
Note: Filmstrip navigation uses the ‘LrSelection’ namespace, which is only available in SDK version 6.0 and above. Therefore, this feature is not available on LR5.7.
Flagging Controls
Users for whom focus point accuracy is critical when selecting shots now have the ability to flag, reject, rate or color images directly within the plugin. The user interface has been updated to include the relevant controls:
 Windows
 macOS
macOS
Tagging can be performed using the same logic and keyboard shortcuts as in Lightroom. Pressing the Shift key during tagging moves the plugin to the next photo.
Notes / Restrictions:
-
Although the plugin allows you to set the flag status, rating and color label of a photo, these settings are not reflected in the plugin’s user interface. Any changes to the flag status, rating or color will be acknowledged immediately with a standard message in Lightroom, and these changes will be reflected in the filmstrip for the selected photo. It is recommended that you adjust the sizes of the plugin window and Lightroom’s filmstrip when using tagging, so that both are visible at the same time.
-
Use of
Shift+0-9keyboard shortcuts require that the plugin is aware which international keyboard layout is currently used. This is necessary because the plugin cannot recognize key codes; it can only work with text input. See Keyboard Shortcuts.
The keyboard layout in use can be configured in the plugin preferences, under theUser Interface’ section, Keyboard Layout setting. -
The LR SDK does not support clickable images, so all control elements must be text or text buttons. As the plugin UI displays all Unicode ‘star symbol’ characters as small, hardly recognizable stars, the rating controls are represented by numbers 1–5 instead.
-
The display of tagging controls and related keyboard shortcut operation can be disabled in the plugin preferences, under section
User Interface. -
Note: Tagging features use the ‘LrSelection’ namespace, which is only available in SDK version 6.0 and above. Therefore, these features is not available on LR5.7 (which is still in use by a few plugin users!).
Keyboard Shortcuts
To simplify the operation of the plugin, keyboard shortcuts are supported. These shortcuts can be used to perform all actions associated with the user interface, so the plugin can be controlled entirely by the keyboard, without the need to touch the mouse.
Some shortcuts in V3.1 have been changed to avoid collision with Lightroom tagging shortcuts. Previously, ‘p’ was used for ‘previous’, ‘x’ for ‘exit’, and ‘u’ for ‘user manual’. Instead of ‘Exit’, the plugin will now close using the ‘Close’ button (shortcut ‘C’).
| Action | Keyboard shortcuts |
|---|---|
| Navigation | |
| Previous image | -, < |
| Next image | +, Spacebar |
| Flagging | |
| Flag photo as a pick | P |
| Flag photo as a pick and go to next photo | Shift+P |
| Flag photo as a reject | X |
| Flag photo as a reject and go to next photo | Shift+X |
| Unflag photo | U |
| Unflag photo and go to next photo | Shift+U |
| Rating | |
| Set star rating | 1-5 |
| Set star rating and go to next photo | Shift+1-5 |
| Color | |
| Assign a red label | 6 |
| Assign a yellow label | 7 |
| Assign a green label | 8 |
| Assign a blue label | 9 |
| Assign a color label and go to next photo | Shift+6-9 |
| Miscelleanous | |
| Open User Manual | M |
| Open Troubleshooting Information (Help) | ?, H |
| Check Log | L |
| Close | C |
IMPORTANT Technical Note:
The Lightroom SDK does not support the native handling of keyboard events in modal dialogs, so the plugin uses a “trick” to implement keyboard shortcuts. This approach has certain limitations, which are described here for a better understanding.
Due to limitations in the LR SDK, the plugin can only work with text input and cannot recognize key codes. Keyboard shortcuts entered by the user, such as ‘P’ for ‘Set as Pick’ or ‘+’ for ‘Next Image’, are collected as text in a designated input field. If the character entered corresponds to a defined shortcut, the related action is performed.
Arrow keys, Function keys, Esc, Return, etc. do not change text input, so the choice of hotkeys is limited to text (i.e. printable ASCII characters).
This approach works well as long as the focus remains on the input field.
In Windows, only pressing the Tab key or clicking on the photo will remove the focus from the input field. As a result, further keyboard input will not be recognized. Mouse operation does not remove the focus.
On macOS, clicking on any control (button, link text or tagging icon) takes focus away from the input field. With the large number of new controls in V3.2, it is not possible to perform operations using keyboard shortcuts and the mouse simultaneously for the same image.
n V3.1, the text input field for keyboard shortcuts was invisible. The user could not understand why keyboard shortcuts stopped working when focus was removed from the input field by mouse operation. As the LR SDK offers no option to focus on a specific control, the input field must be refocused by the userto continue working with keyboard shortcuts.
To make this procedure more transparent and intuitive, the text input field is now visible by default.
You can configure the size of the text input field, including the labelling, in the plugin preferences.
Buy me a coffee
Several of you have asked how you can show your appreciation for the work I have done to significantly improve the plugin over the past year and months. If you care about this issue, you can now show your support via Ko-fi*. Simply click the link next to the coffee cup.
*Ko-fi is a well-established service that enables users to support creators through voluntary donations. Payments are processed securely via PayPal or credit/debit card, and no account or subscription is required.
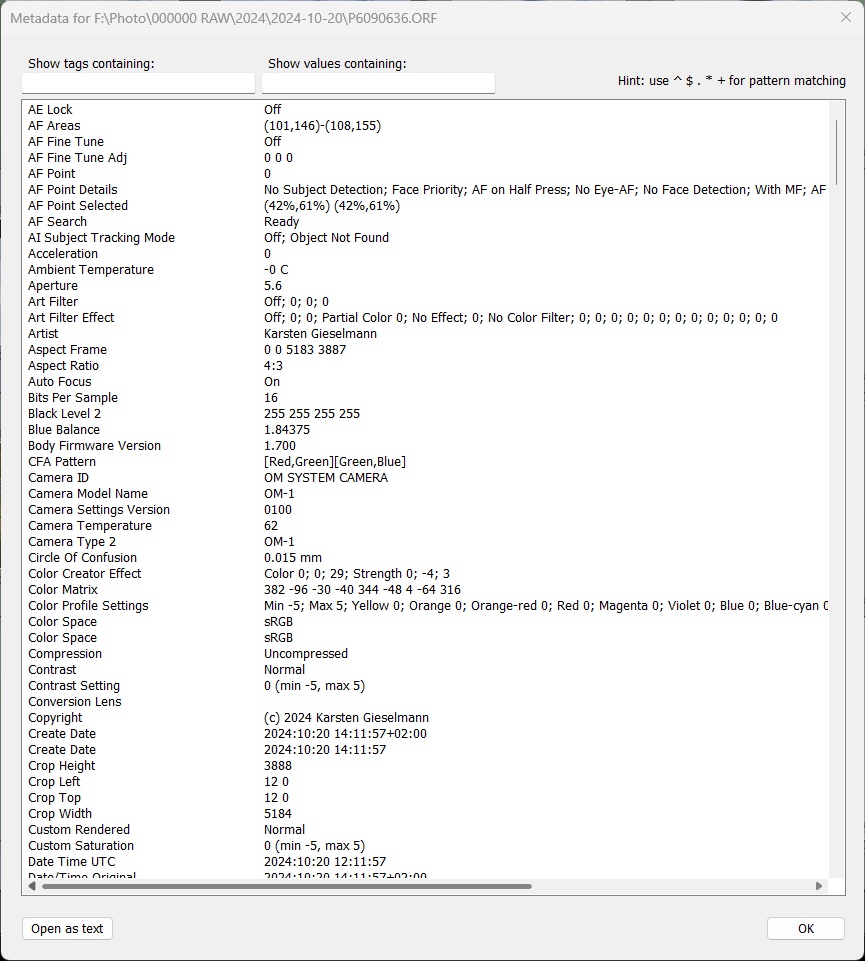
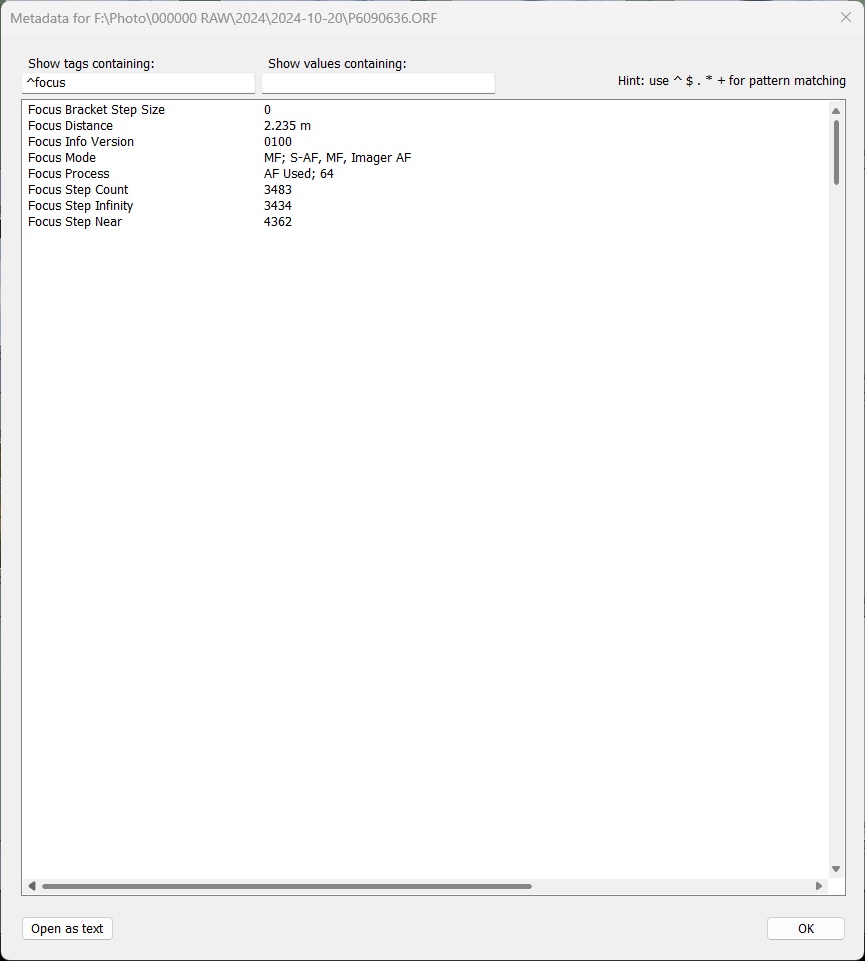
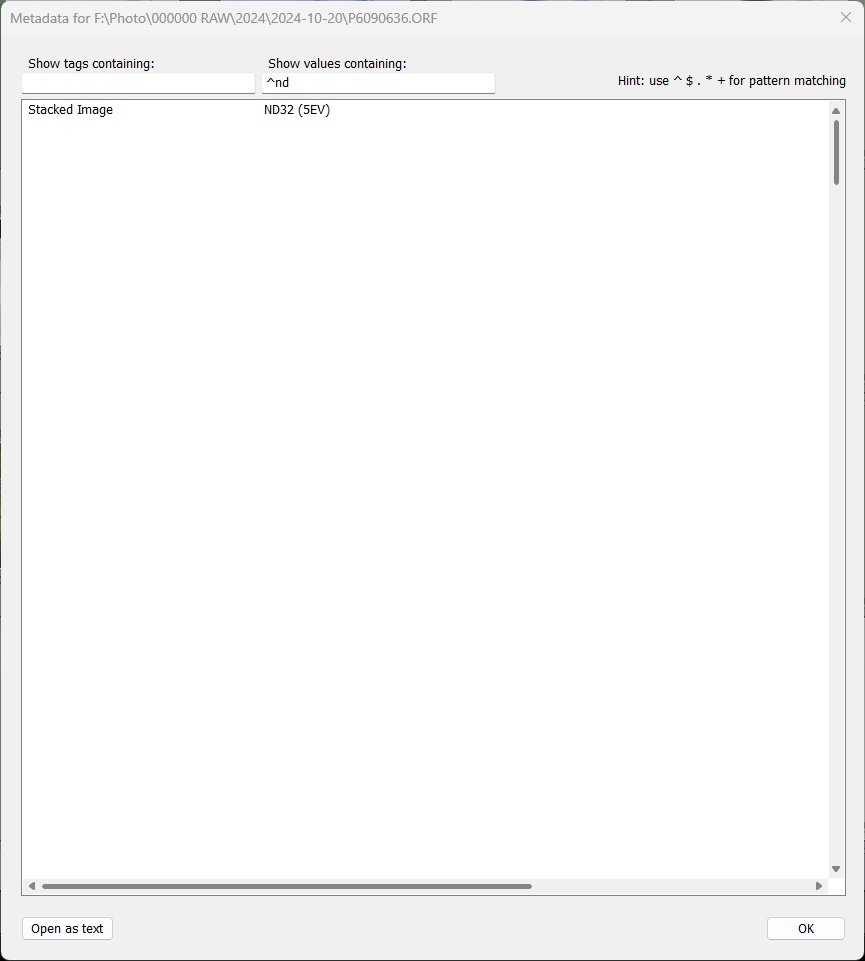
2.3 Metadata Viewer
The plugin also features a Metadata Viewer with live search:
- Library → Plug-in Extras → Show Metadata, or
- File → Plug-in Extras → Show Metadata
This is useful for viewing information that is not visible in the info sections of the focus point window. The data is retrieved by ExifTool directly from the image file on disk, so it gives a complete picture of the metadata written by the camera. Metadata can be filtered by key or value search terms. The filter accepts pattern matching with the well-known “magic characters”:
| Char | Meaning |
|---|---|
| . | any character |
| + | one or more repetitions of previous character |
| * | zero or more repetitions of previous character |
| ^ | start of string |
| $ | end of string |
Note: The plugin is written in the Lua programming language and uses Lua string.find() for filtering. This function supports “Lua patterns”, so you can use even more sophisticated pattern matching. However, for filtering a simple EXIF data output, basic pattern matching should be more than sufficient.
For further processing as text, the full metadata (retrieved via ‘exiftool -a -u -sort
Sizing of the Metadata Viewer window
In V3.1, tag names that were significantly longer than 40 characters could result in an unusual display in the metadata viewer.
This has been improved in V3.2:
- The maximum length of tags displayed is limited to 32 characters.
- The maximum length of values displayed is limited to 128 characters.
- Truncated strings are indicated by an ellipsis symbol ‘…’.
If the truncated part contains relevant information, it can still be reviewed by opening the metadata as text. - The edit fields for the ‘Tag’ and ‘Value’ filters are the same size as in point 1.
- The height of the metadata window is given by the Size of plugin window setting S .. XXL
- The width of the metadata window is chosen so that the head line (filter entry fields, hint) fits in but is minimum 70% of the window height.
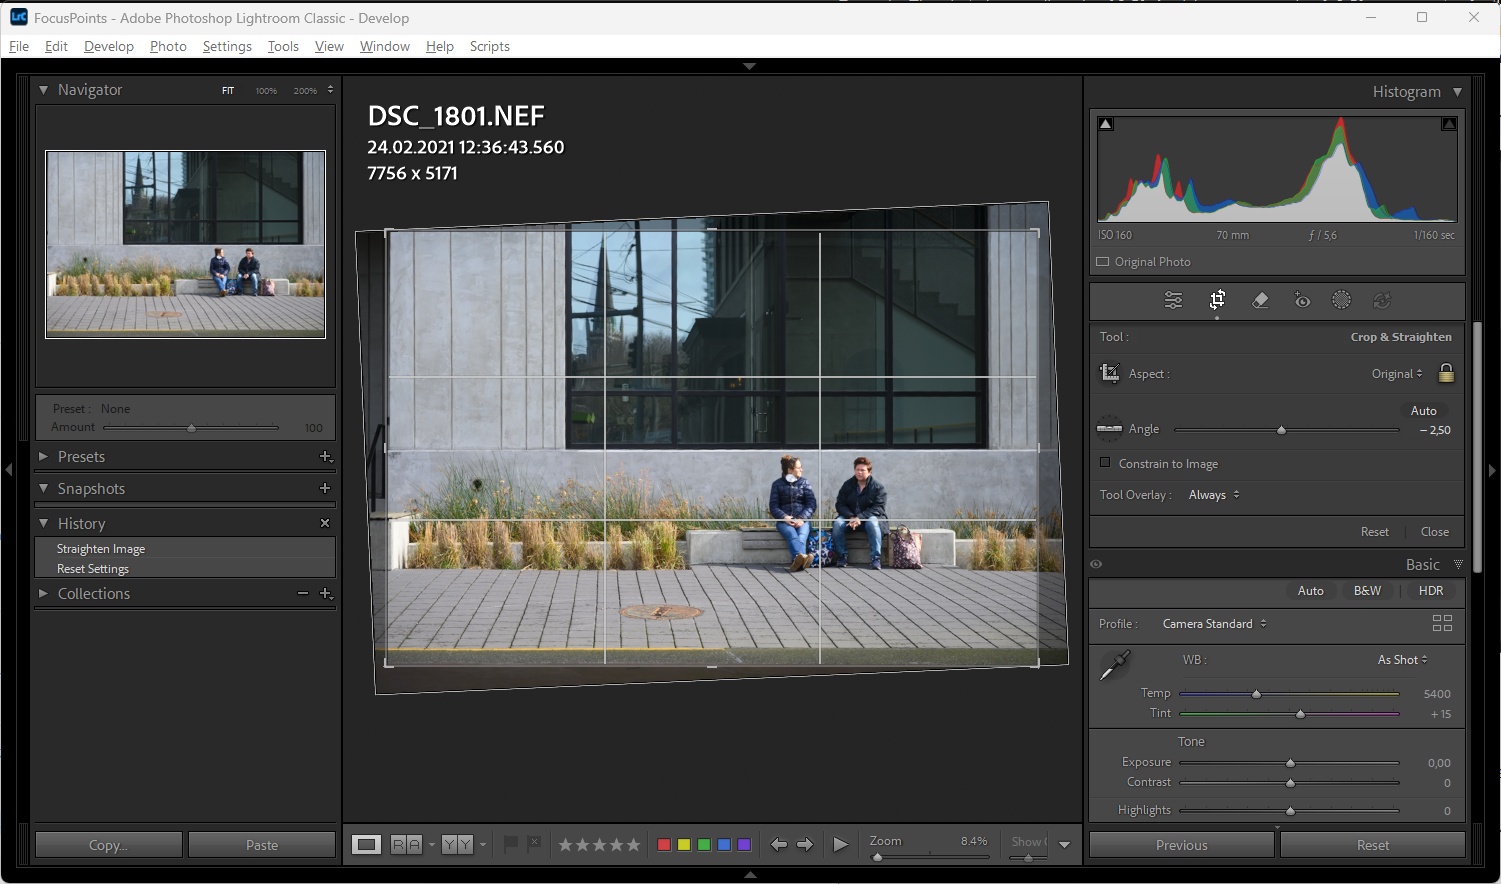
2.4 Straighten Images
Straighten Images is a new plugin function in V3.3:
- Library → Plug-in Extras → Straighten Images, or
- File → Plug-in Extras → Straighten Images
This function reads the camera roll angle from the metadata of the selected photos, one by one, and applies compensation by rotating the photos accordingly.
Straightening individual images manually is not difficult, and Lightroom also supports automatic straightening using the Transform tool. However, the Straighten Image feature can come in handy for straightening a series of photos taken in burst mode, such as wildlife, sports or action shots. This is particularly useful when the captured scenes lack clear reference information to help you (or the Transform tool) straighten the images.
As this function relies on the presence of the RollAngle tag in metadata, its application is currently limited to
- Canon (R5 (FW 1.5), R5m2, R6m2, R7)
- Nikon (D5, D500 and later models)
- Fuji (XT-5 and later models)1
- Olympus/OM (EM-1/5/10 III and later models)
- Panasonic (Lumix G6 and later models)
- Pentax (K-7 and later models)2
- Ricoh (GR III and later models)2
1 Fuji represents roll angle information within the range of -1° to +1° as RollAngle=0.
2 Pentax and Ricoh also record roll angle information for the specified models. However, when used to straighten photos, the results are typically not as precise as those provided by other brands.
- The value’s numeric precision is 0.5°, so you will see roll angle values of 0, 0.5, 1.0, 1.5, and so on.
- The recorded roll angle value does not always seem to correspond reasonably to the actual tilt angle. Consequently, images aligned based on the RollAngle tag do not always appear straight.
- With older Pentax models in particular, a Roll Angle of -45/+45° is sometimes recorded, despite this value bearing no relation to the captured image.
Nevertheless, the plugin will support the straightening of photos taken with Pentax and Ricoh cameras. Whether this feature is useful for straightening images is up to the individual user to decide.
Unfortunately, it seems that Sony does not record roll angle information in photo metadata. Even a deep analysis of a series of custom-made A7RV test images did not reveal any evidence of its presence.
Straighten Images is not available for LR5, since version 5.x of the Lightroom SDK does not yet supported the required functionality.
Example
The photo has a roll angle of 2.5°. Applying a crop angle of -2.5° compensates for the tilt. Please note that a non-zero crop angle will change the crop of the photo. Straightening the photo will result in the corners being lost.
Using the ‘Straighten Images’ tool produces the same result as entering the roll angle compensation manually in Lightroom’s ‘Crop & Straighten’ tool. You can then modify or even revert the compensation as desired.
Operation
To use the Straighten Images plugin, select the photos you want to straighten and open Plug-in Extras > Straighten Images.
The plugin then processes all the selected photos, retrieving ‘RollAngle’ information from their metadata if available, and applies the relevant correction by adjusting the crop angle of each photo. The standard progress bar in the top-left corner of Lightroom shows the progress of the operation. You can interrupt the process by clicking the ‘x’ icon to the right of the progress bar.
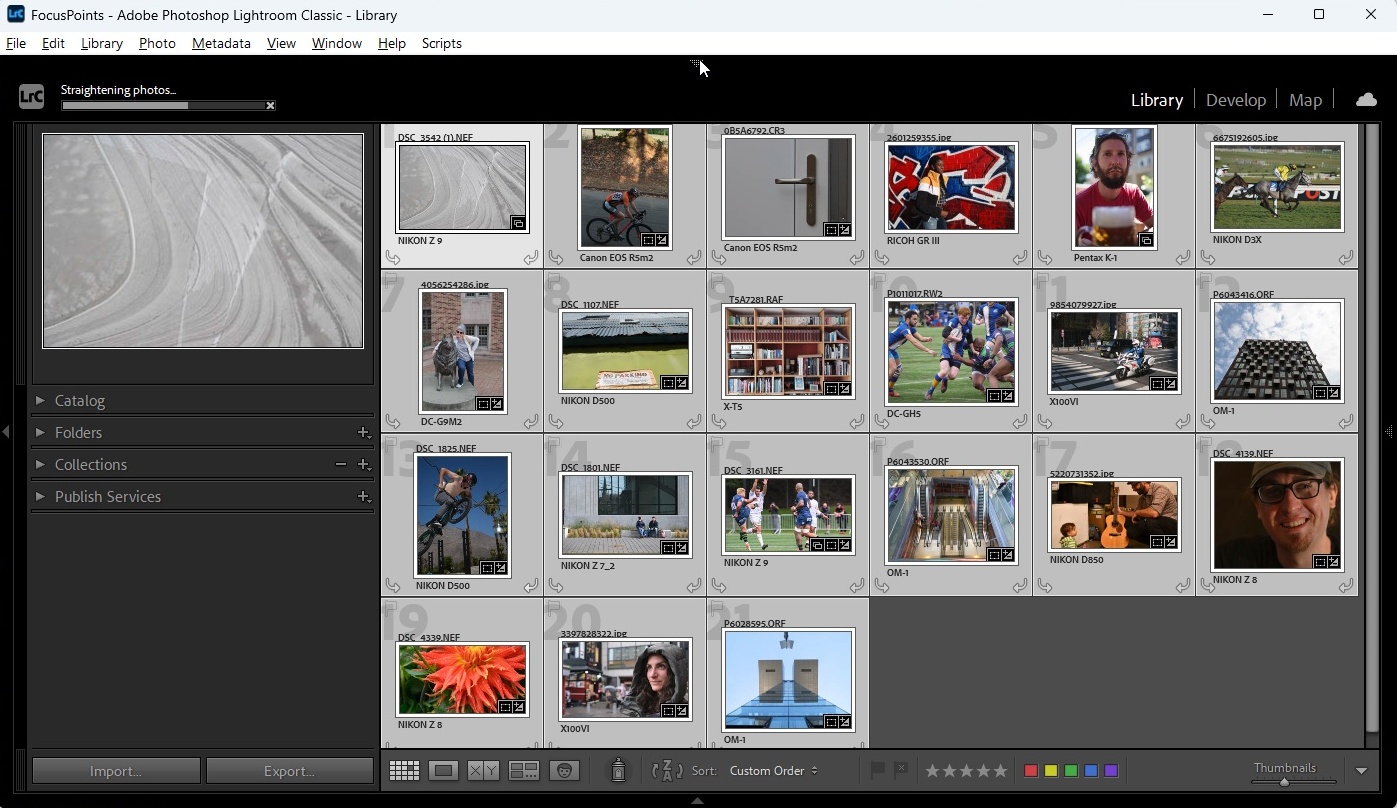
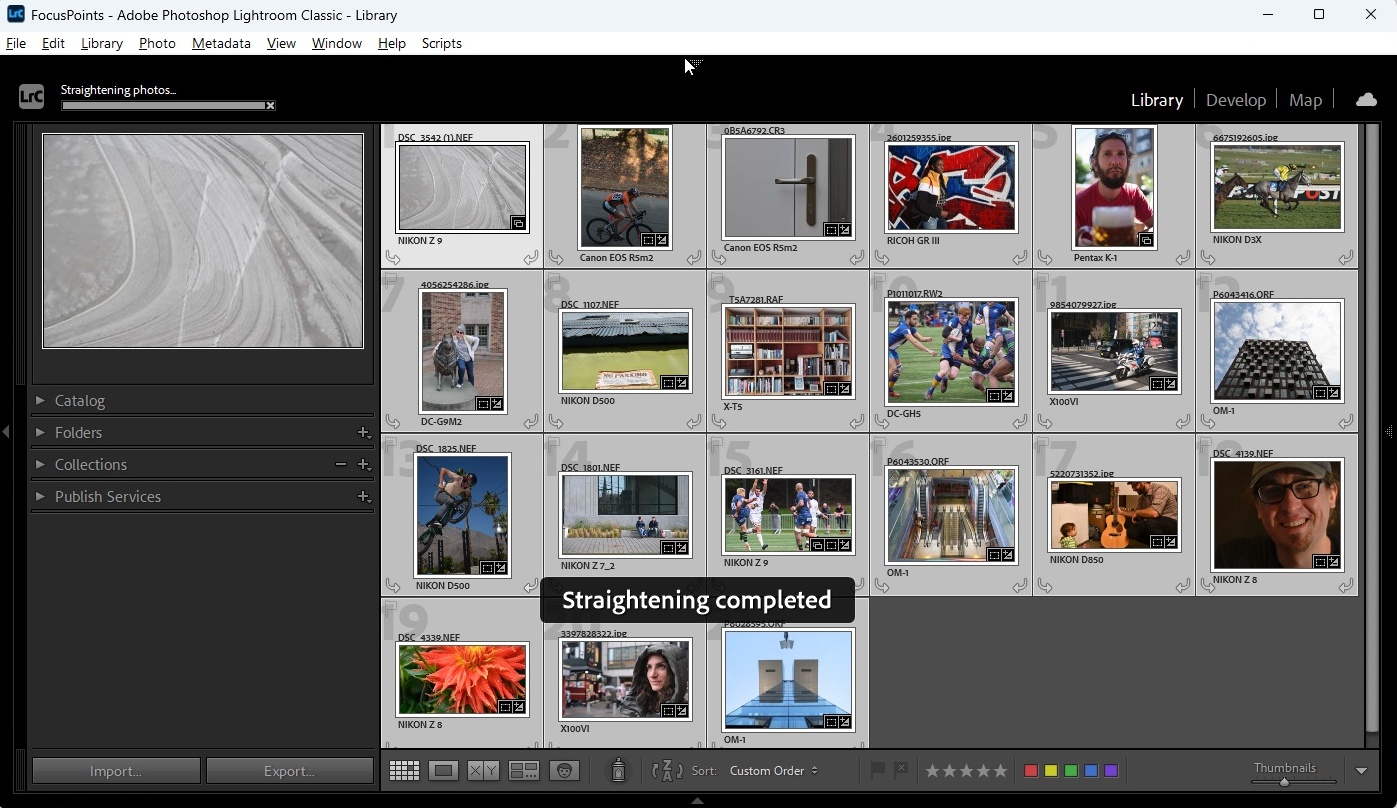
By default, the plugin notifies you of successful completion of the process with a ‘bezel’ — a brief pop-up window — upon completion.
If any of the selected photos cannot be straightened, a dialog box will provide a summary. You can configure the conditions that trigger this window.
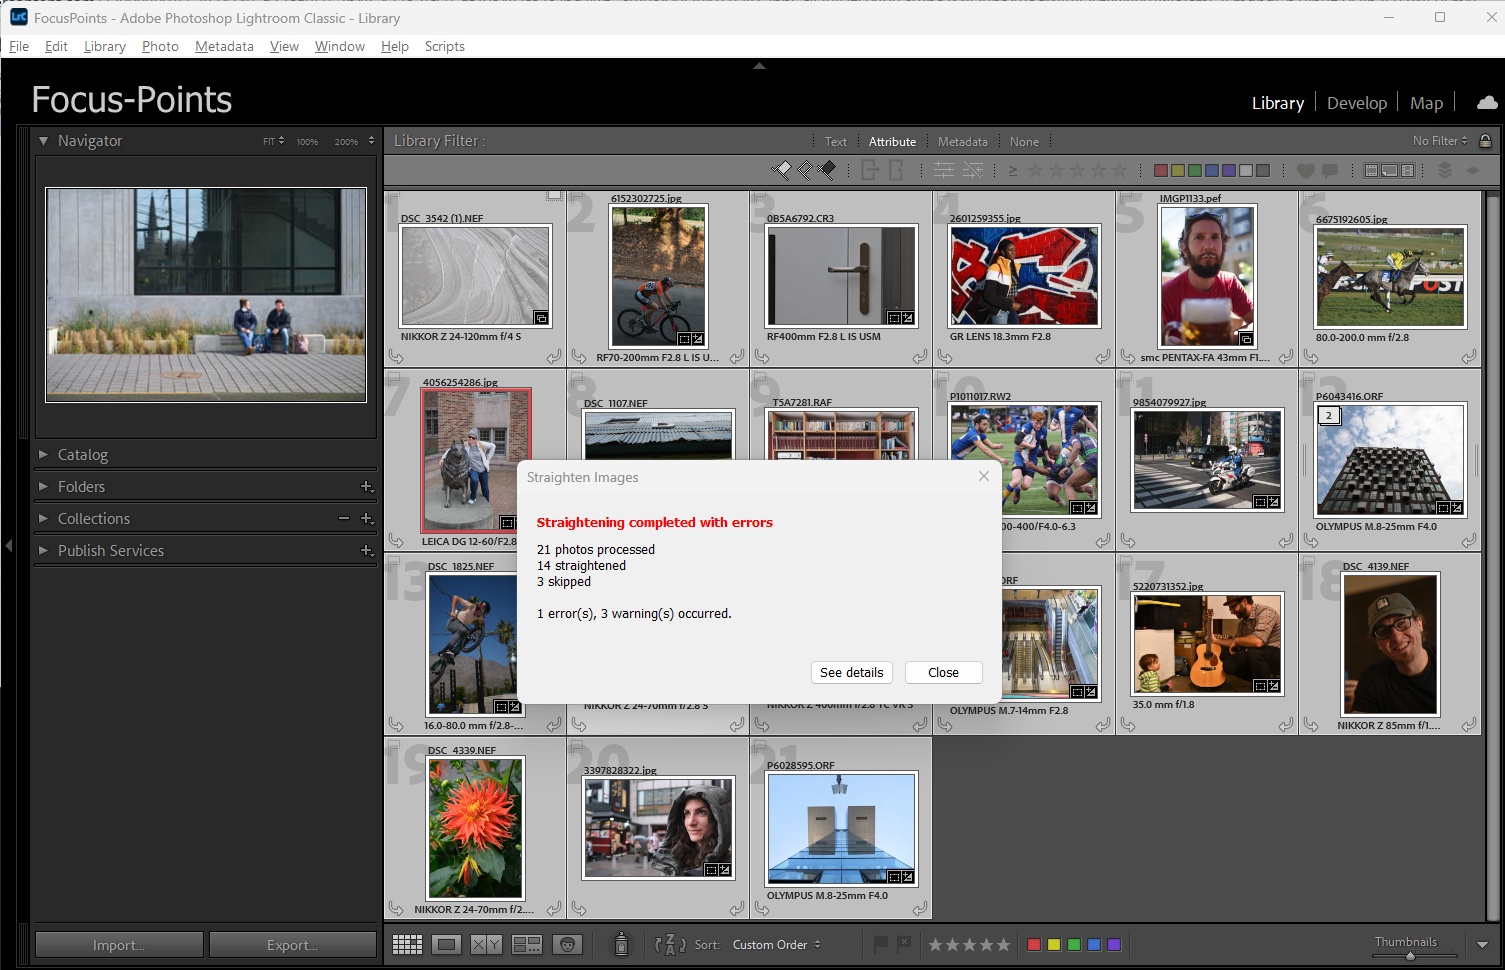
If you require more detailed information, you can access it by clicking ‘See details’, which opens the log file.

Customization
Various options allow you to customize and fine-tune the process of straightening images:
For a detailed explanation of these settings, see Straightening Options
Keyboard Shortcut
The FocusPointsHotkey script files and precompiled executables have been extented by a third keyboard shortcut Ctrl NumpadSub.
General Remarks
The quality of the result of straightening depends essentially on two factors:
- Precision of roll angle measurement by the camera
- Accuracy of the camera’s level gauge adjustment
The benefits of straightening photos of man-made structures can be limited. In such cases, great precision is often desired, as well as compensation for vertical tilt.
Conversely, the Straighten Images feature is extremely useful for genres such as nature, wildlife, sports and action photography. It is not uncommon to find that there is no clear reference information to help you straighten images manually. This feature is also useful for burst shoots, such as photographing birds in flight, when it is easy to tilt the camera while tracking your subject.
The plugin generally produces better and more reliable level correction results than Lightroom’s Auto Transform feature. This is because it responds directly to horizontal camera imbalance. Auto Transform looks for straight lines in a photo and uses them as a reference point to straighten the image. However, if there are structures in an image that are not actually straight, the result will be incorrect.
Lightroom Auto Transform (‘Level’):
This plugin’s Straighten Image function:
2.5 Configuration and Settings
Selecting ‘Focus Point Viewer’ from the list of installed plugins (Library → File → Plug-in Manager) opens the plugin’s settings page:
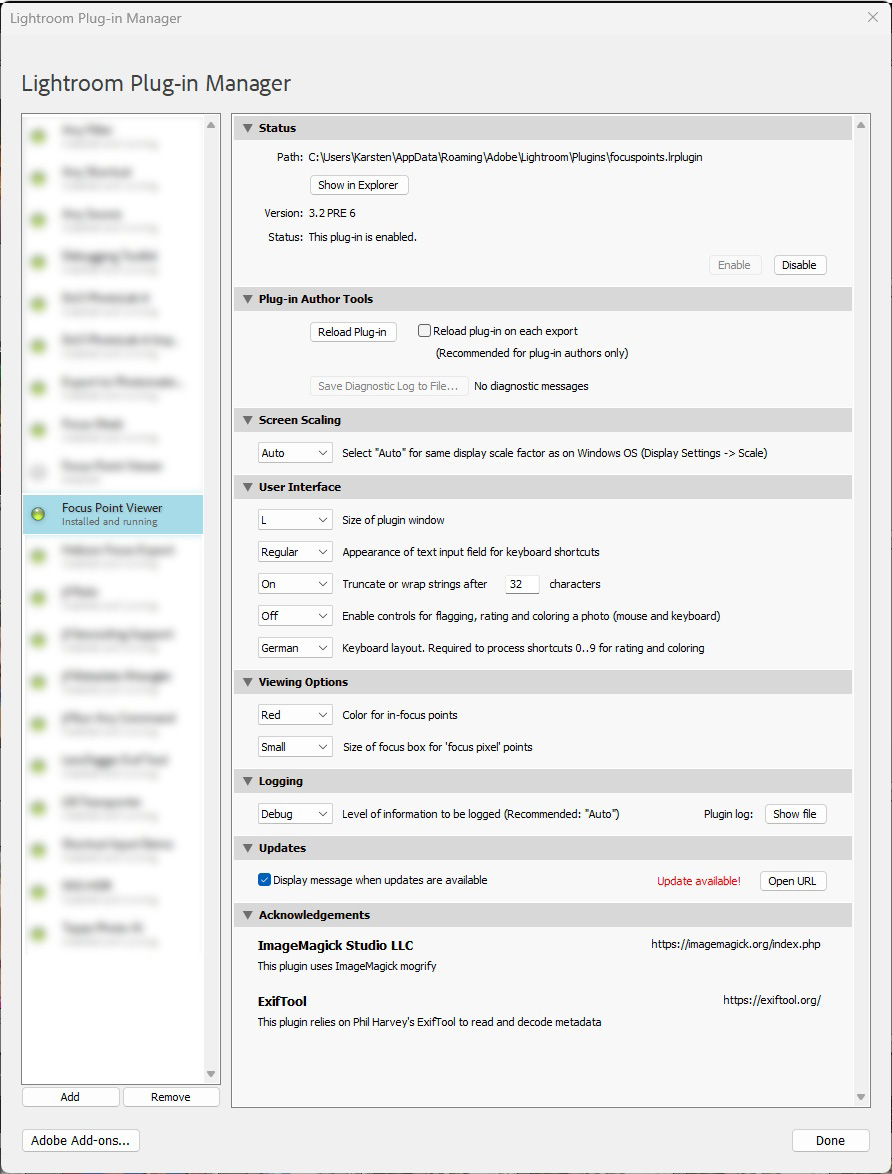
Screen Scaling
Display scale factor. Windows only. Default setting: Auto
The drawing routines used on Windows are not aware of any display scale factor that may have been applied to the Windows configuration (Settings → Display → Scale). In order to avoid that the plugin window gets bigger than the screen size, the plugin has to reverse this scaling when calculating the size of the dialog window.
The Auto setting causes the plugin to scale its windows in sync with a system scale factor. Optionally, a predefined fixed scale value can be selected, which avoids a registry access via an external command (REG.EXE) on each call of the plugin. The meaning of the predefined values 100%, 125%, 150%, etc. is the same as in the Windows Settings dialog. I.e. to undo a system-wide zoom of 150%, the same value ‘150%’ must be selected from the drop-down list.
User Interface Settings
This section is new in version 3.2. It contains several settings that can be used to customize the appearance and functionality of the plugin’s user interface.
Size of plugin window. Default setting: L
This setting allows you to customize the size of the plugin window. You can choose from five options ranging from XXL to S.
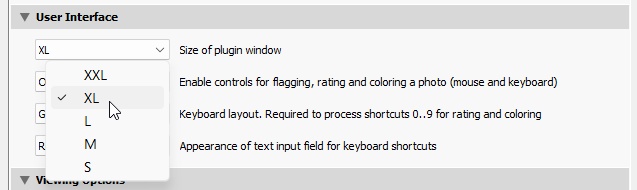
In the Focus Point dialog, this setting corresponds to 80% (XXL) to 40% (S), in increments of 10%, of the size of the Lightroom application window used to display the photo. Please note that the text pane to the right of the photo and the bottom row of user controls are not included in this percentage.
In the Metadata Viewer, this setting determines the height of the dialog box. The width is determined by the header line, which includes the two filter entry fields and the hint text.
Note: Windows users already had the option to adjust the size of the focus points window using the screen scaling option specific to Windows. This setting remains as it is.
Appearance of text input field for keyboard shortcuts. Default setting: Regular
To make keyboard shortcuts more transparent and intuitive to use, the text input field that captures them is now visible by default. For a more detailed explanation, see xxx.
This setting can be used to customize the appearance of the input field:
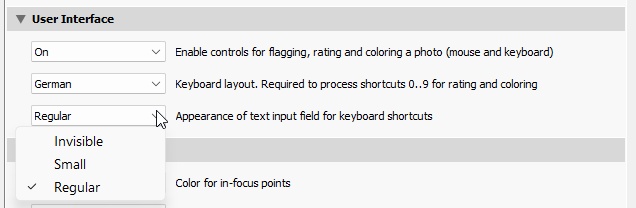
- Invisible. This is self-explaining
- Small. A narrow input field without labelling
- Regular. An input field that can display a minimum of 10 characters, along with a label containing a link to the ‘Keyboard Shortcuts’ section of the user manual.
Truncate or wrap long strings. Default setting: On, 32 characters
This setting enables you to specify whether long strings, such as metadata values or file names, should be truncated in the display. You can choose the truncation limit, which can be set between 10 and 100 characters. A truncated string is marked with the symbol ‘…’ at the end. The full text can be seen in the tooltip that appears when you hover over a truncated string with the mouse.
Enable controls for flagging. Default setting: On
If you don’t need the controls for flagging, rating or coloring photos in the Focus Point viewer, and you want to avoid overloading the navigation bar, use this setting to hide the tagging controls and disable the related keyboard shortcuts.
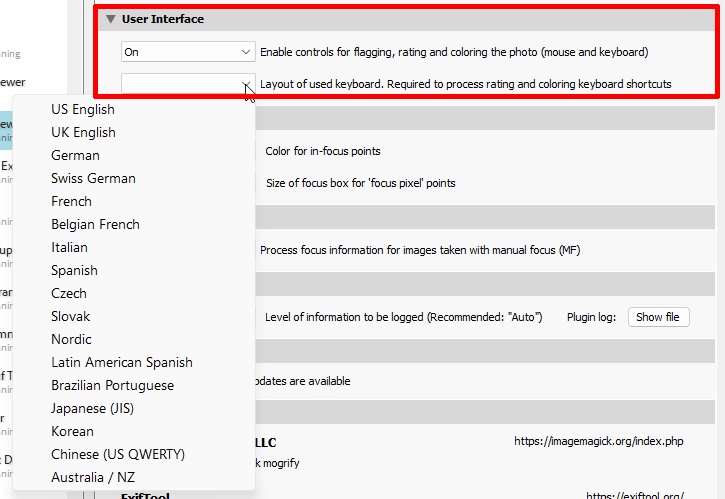
Keyboard layout. Default setting: empty
The keyboard shortcuts for flagging, rating and coloring are the same as those used in Lightroom, including the Shift combinations that perform an action and advance to the next photo. Since the plugin cannot recognize key codes and can only work with text input, using the Shift + 0-9 keyboard shortcuts requires the plugin to be aware of the currently used international keyboard layout.
The predefined options cover a large percentage of the available layouts, and more can be added on request. In this specific context, it is important to note that the term ‘layout’ refers only to the codes produced by the 0–9 keys in the top row, and not to the entire keyboard.
Viewing Options
Size of focus box for ‘focus pixel’ points. Default setting: Red
Depending on the camera maker and model, focus points may have a dimension (width and height) or they may be represented by a ‘focus pixel’. For focus points that have a dimension, a box with the specified width and height is displayed. For ‘focus pixel’ points you can choose how to display them: small box or medium/large with a center dot.
Color of in-focus points. Default setting: Medium
You can choose between three different colors for the presentation of focus point boxes: red, green and blue.
Logging
Level of information to be logged. Default setting: Auto
The logging feature serves two purposes:
- Gather information to explain why focus points are not displayed
- Gather information to help the developer figure out what went wrong if the plugin does not work as expected.
For 1. Auto is the recommended setting, because it logs relevant information that can help to understand why, for example, the plugin is not able to correctly determine the focus point(s) for a given image. If the plugin encounters any errors or warnings during its operation, it will provide a link to view the log for additional information. See example in “User Messages” below.
The logging mechanism provides a fine-grained hierarchy of levels at which information should be logged. Setting a certain logging level in the plugin preferences will cause all messages of that level to be written, including those at lower levels. description, from lower to higher levels:
| Level | Information logged |
|---|---|
| None | No logging output. No logfile created. |
| Error | Only error messages. |
| Warning | + warnings |
| Info | + information on progress and intermediate results |
| Debug | + important debug information. No noticeable slow down. |
| Full | Full debug information, including entire EXIF data. Slow down. |
| Auto | Same as ‘Info’. Recommended setting. No noticeable slow down of plugin. |
Hint: Autologging will start on an empty log file for each image. When you open such a log file, it will immediately focus on the most recent image. The log file will be emptied when the plugin starts for all other logging levels.
Straightening Options
These settings control the process of straightening images:
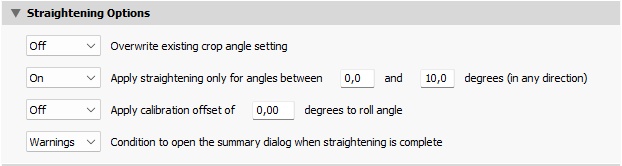
Overwrite existing crop angle setting. Default setting: Off
Roll angle compensation will be applied regardless of whether the photo has already been rotated. The straightening angle will replace the existing crop angle, rather than being added to it.
Apply straightening only for angles between x and y. Default setting: Off
Roll angle compensation will only be applied for angles within the range of x to y degrees.
You can use this option to define a deadband to prevent small, often invisible, corrections from triggering Lightroom cropping. You can also set an upper limit for straightening angles. For example, if a photo has been taken with the camera tilted 25° horizontally, this is likely to be a deliberate creative choice rather than an unintended tilt. The lower and upper limits apply to both camera directions. (In Lightroom’s Crop & Straighten tool, positive values rotate the image clockwise and negative values rotate it counterclockwise).
Example:
Applying straightening only for angles between 0.2° and 10° means that no straightening (and cropping) will occur for angles between -0.2° and 0.2°, or for angles outside the range of -10° to 10°.
Apply calibration offset. Default setting: Off
If you are straightening photos captured using an improperly calibrated level gauge, you can specify a calibration offset in degrees here. This offset will be added to the roll angle compensation to compensate for the incorrect calibration of the level gauge.
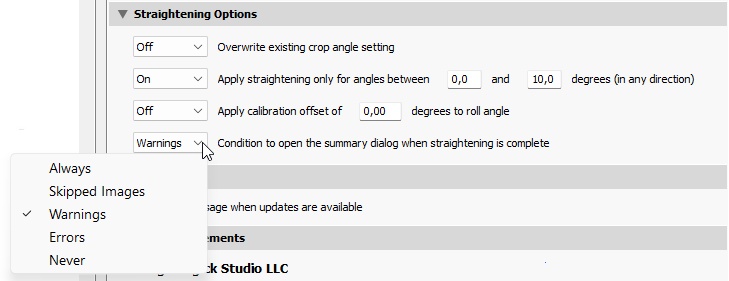
Condition to open the summary dialog when straightening is complete. Default setting: Skipped Images
Specify the least critical condition that will trigger the summary window to open at the end of the straightening process. The dropdown list shows the available conditions in ascending order of criticality.
Example:
The default setting, ‘Skipped Images’, will trigger the summary to show for skipped images, as well as warnings and errors that occurred during the process. Selecting the ‘Errors’ setting will only show the summary for errors that occurred, but not for warnings or skipped images.
Update Check
The plugin checks for an updated version that is available to download.
If so, this will be highlighted, and you can click the Open URL button to access the latest version’s release notice. Follow the installation instructions to install the update.
The availability of an update will be indicated:
- on the plugin’s settings page (see above)
- in the ‘Plug-in status’ section of the text pane (provided the
Display messagecheckbox is selected) - in the log file
3. Display of Focus Points
The subchapters in this section describe in more detail which features are supported by the plugin for individual camera makers and specific lines or models. In this context, “feature” means visualization of:
- User-selected focus points/areas
- Focus point(s) used by the camera to produce a sharp image
- Detected faces
- Detected subjects (animals, airplanes, cars, trains, etc.)
- Inactive AF points (to visualize the complete AF layout of DSLRs)
The plugin uses different colors to visualize these elements (see User Interface).
The extent to which these features can be supported for a given camera model ultimately depends on a) the availability of the corresponding data in the EXIF makernotes and b) the fact whether this information is known to ExifTool.
Even if certain data is recorded by a camera manufacturer, this does not mean that it is “available”. Makernotes is a proprietary metadata section that contains manufacturer-specific information that is not standardized across different brands. Camera makers can use this information to diagnose camera issues, for instance.
The Focus Points plugin fully relies on what ExifTool is able to decode and display. Which in turn doesn’t fall from the sky, but it’s a collaborative effort by camera owners worlwide that are willing to contribute and go where no man has gone before and decode the unknown.
3.1 Nikon
Supported features:
| MAC | WIN | Color | Meaning |
|---|---|---|---|
|
|
red1 | Active AF point. Focus area, dimensions reported by the camera |
|
|
red1,2 | Primary AF-Point |
|
|
gray | Inactive AF point. Part of DSLR AF points but not used for the image |
1 AF point color can be chosen from red, green, blue in Viewing Options.
The logic for interpreting Nikon-specific autofocus data has been adapted to match the focus point display of NX Studio and Capture NX-D. While this is not rocket science for the Nikon Z, it has been a challenge for Nikon DSLRs. Nikon stores different types of focus point information in different places, making it difficult to find the relevant information and name it consistently. I would like to take this opportunity to thank Warren Hatch for his great support in deciphering and correctly interpreting the Nikon AF information!
Nikon focus point information in EXIF metadata always refers to an area within the frame. For CAF results, this is the coordinates (x,y, height, width). For PDAF results it’s the name(s) of the focus points (e.g. A1, C6, E4) that the plugin maps to the corresponding pixel coordinates. Thus, for Nikon focus points, you can select the color of the box but not its size.
Nikon metadata does not include face or subject detection data, so you won’t see any corresponding detection frames. This does not mean that this information is not present in the file - it just has not yet been decoded by the maintainers and active supporters of ExifTool.
3.1.1 Nikon DSLR
Nikon DSLRs typically have two autofocus systems. A high-performance phase-detection autofocus (PDAF) and a slower contrast autofocus when using Live View.
The position and size of the PDAF focus points are determined by the camera model’s individual sensor AF layout. PDAF points cover only a portion of the frame. For DSLRs with limited focus coverage, the full matrix of focus points is displayed along with the in-focus point.
Examples:
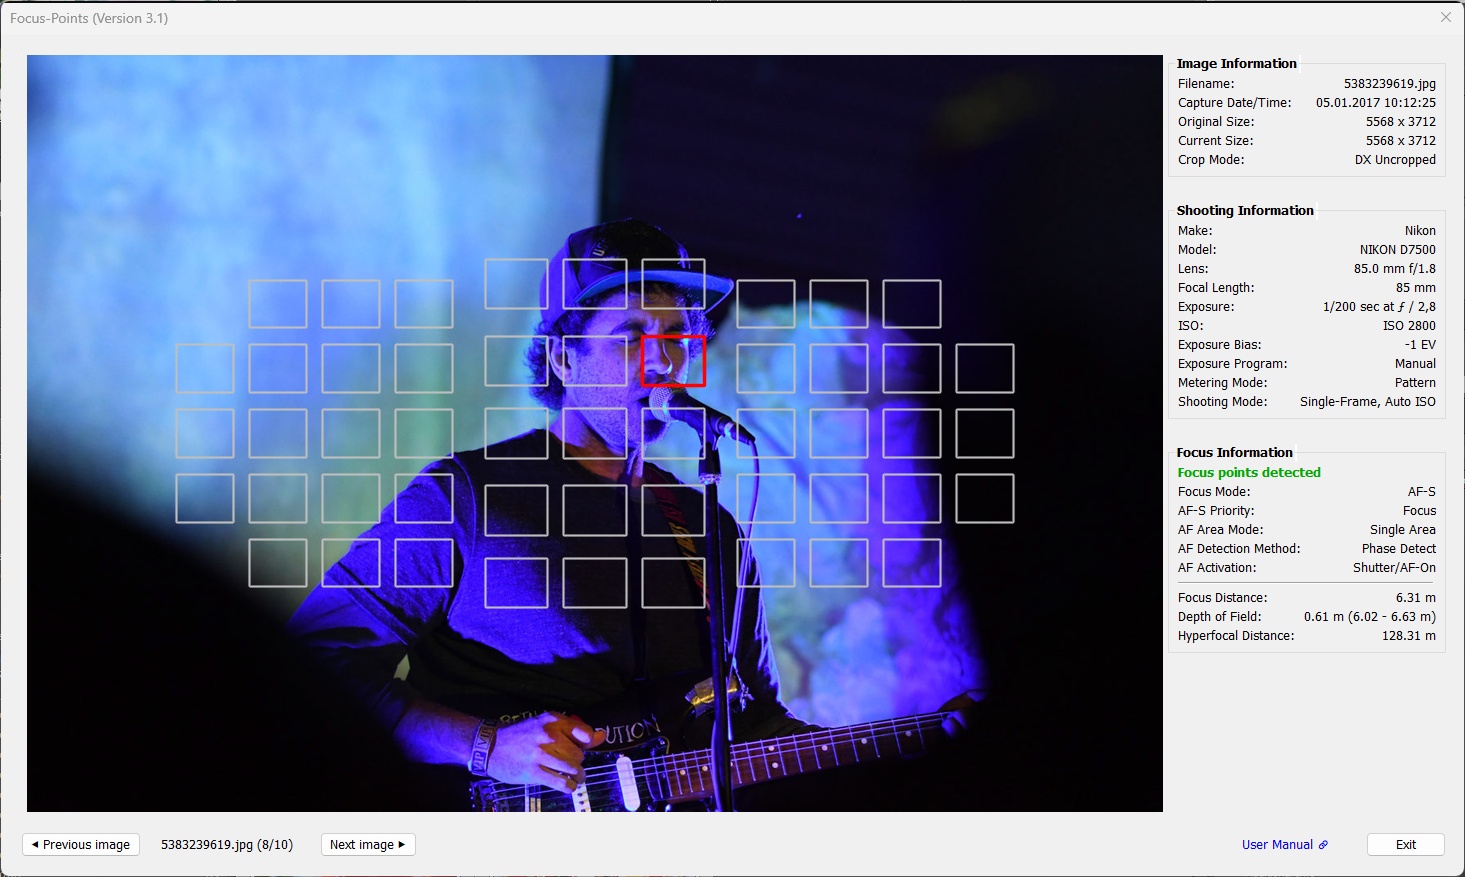
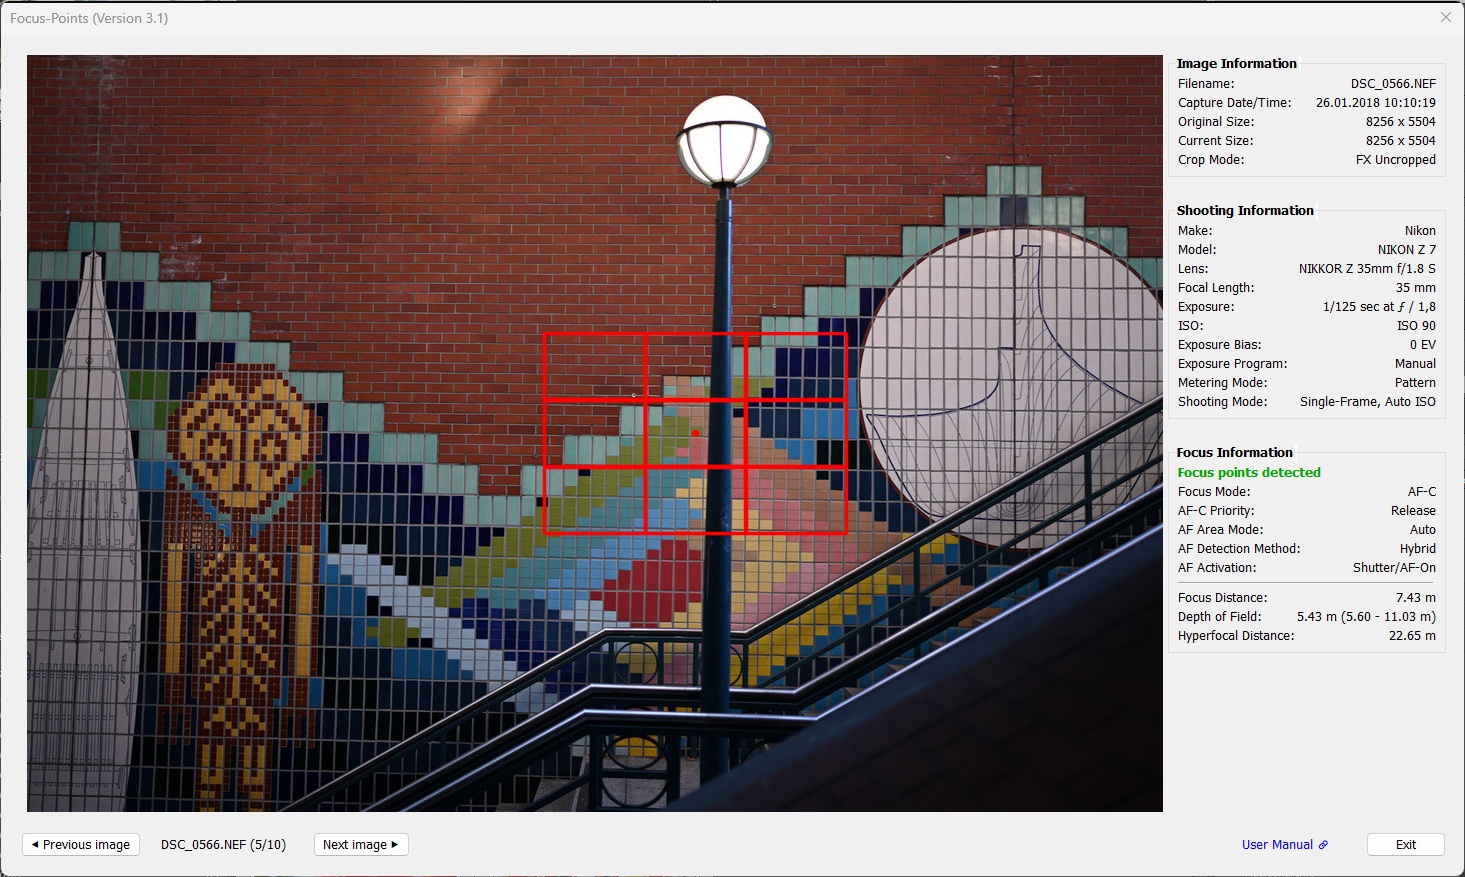
D7500, Single Area shot. The AF point in focus is highlighted within the matrix of 51 AF points.
D850, Single Area shot. The AF point in focus is highlighted within the matrix of 55 user-selectable AF points (out of a total of 153).

D850, Group Area shot.
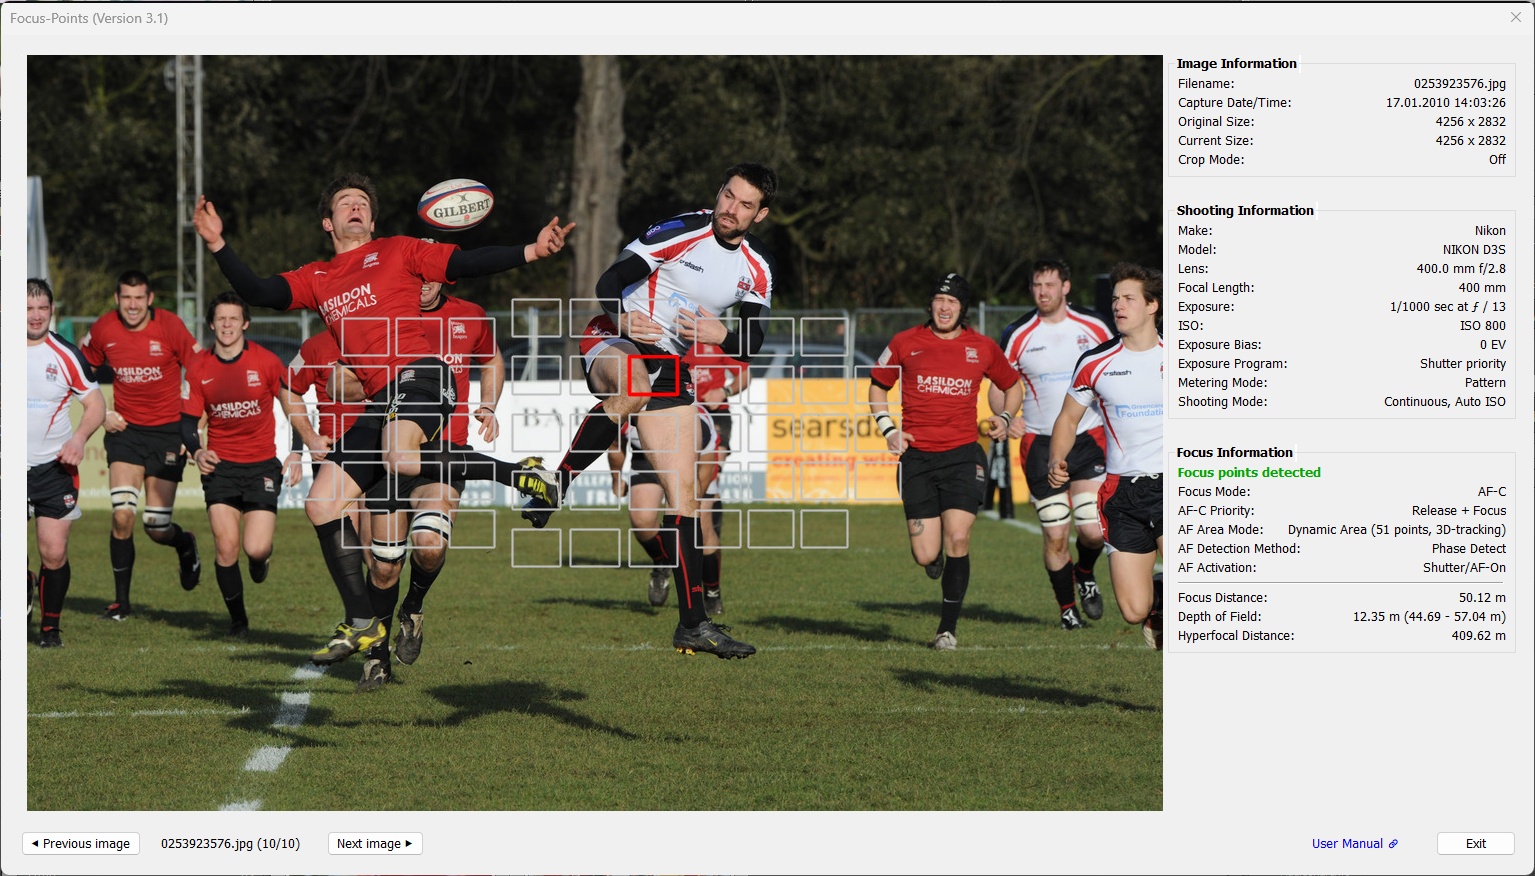
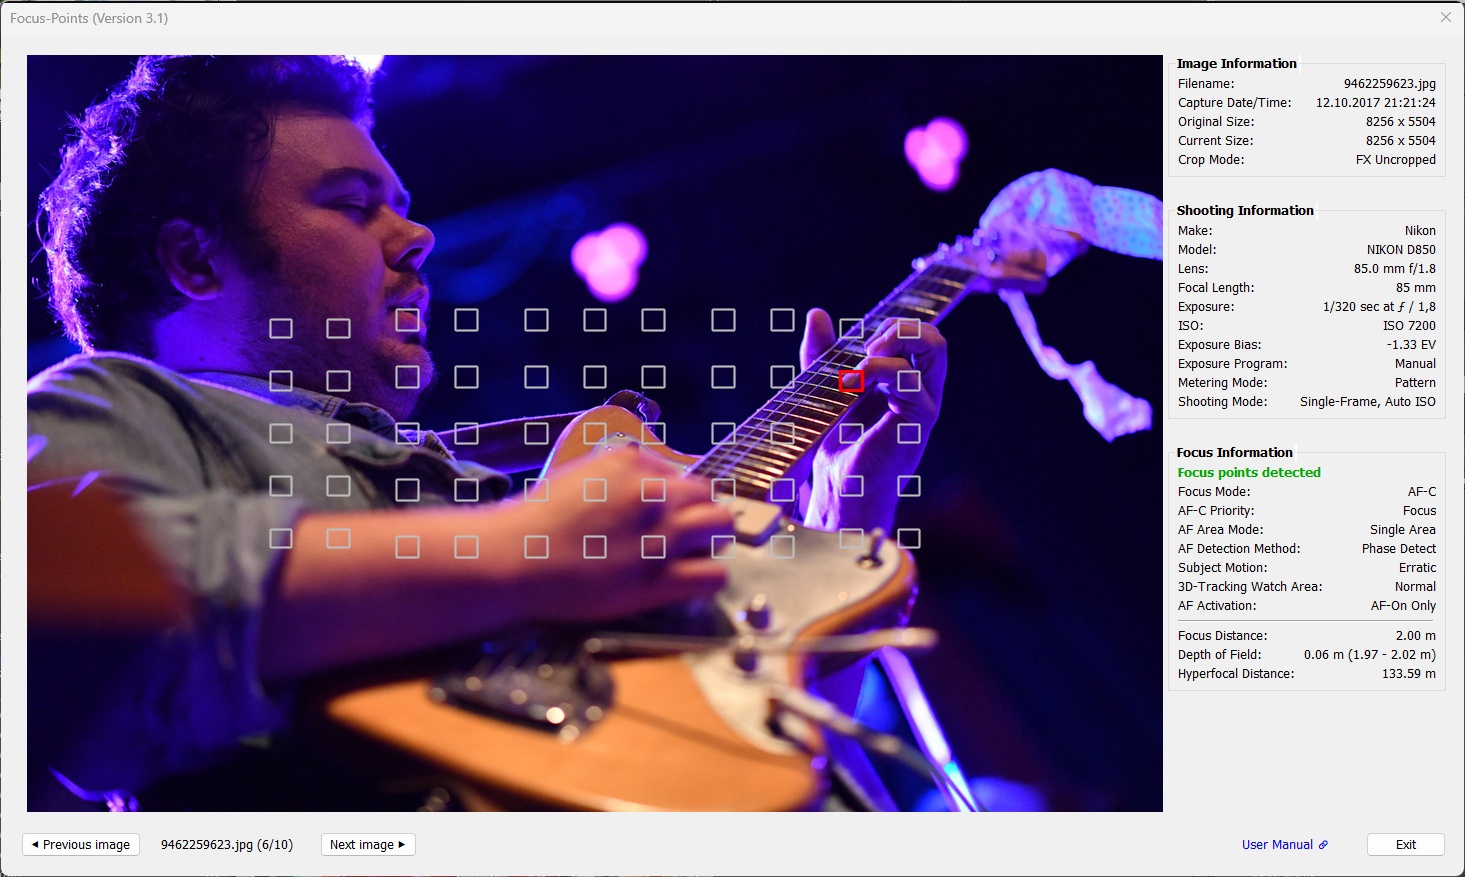
D3S, Dynamic Area (3D tracking) shot.
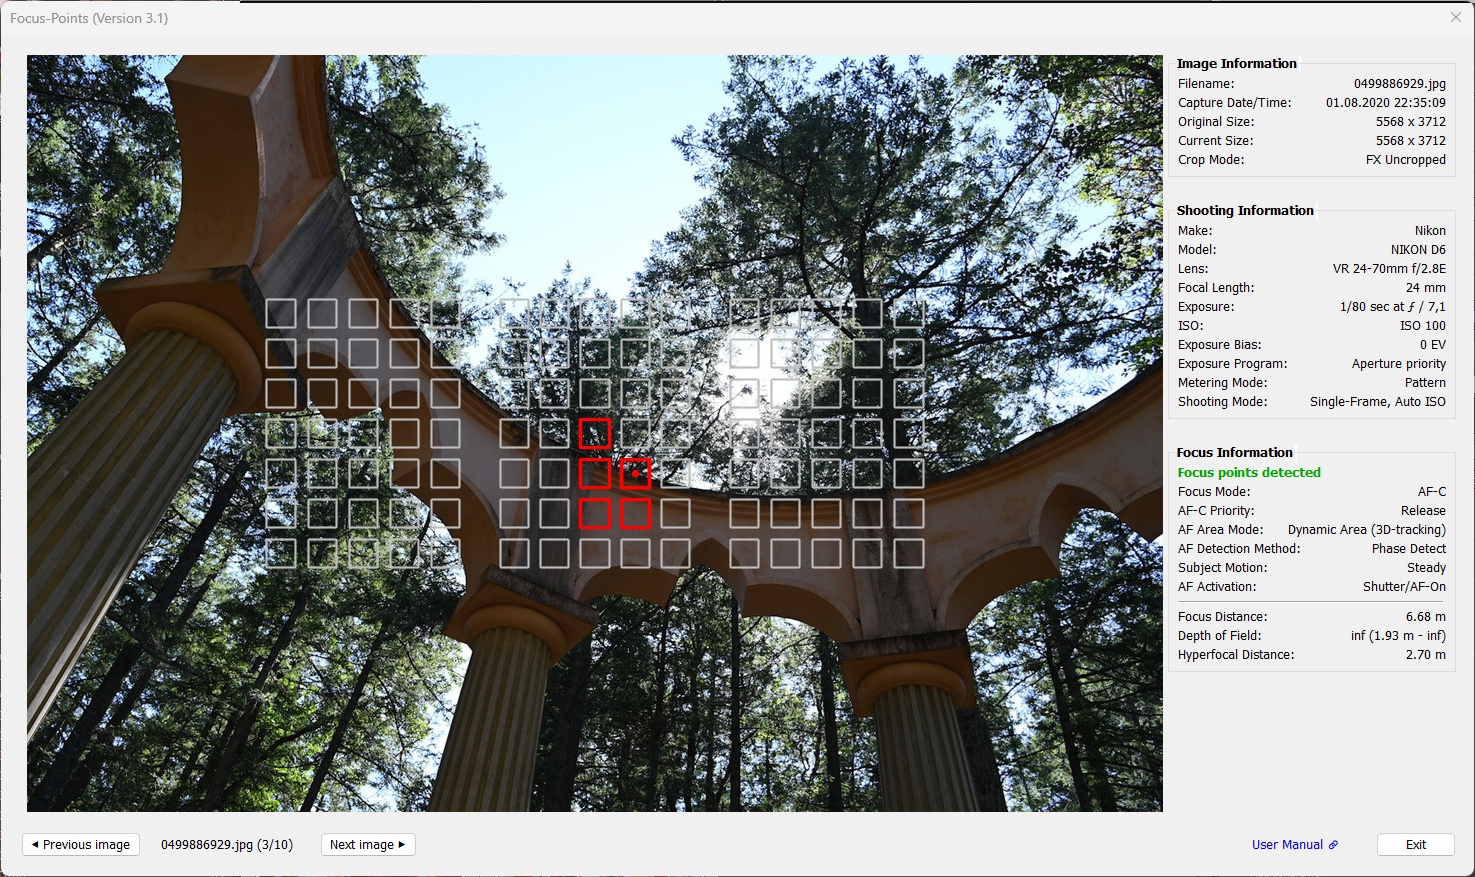
D6, Dynamic Area (3D tracking) shot. Multiple AF points were used to focus the image; the primary AF point is indicated by a center dot.
D500, Live View shot. In Contrast AF modes, the focus “point” is an area that varies in size depending on the shooting conditions.
D780, Live View shot, with several of the sensor based 81 AF areas engaged. The primary AF area is indicated by a center dot.
3.1.2 Nikon Mirrorless
Nikon’s mirrorless cameras feature a hybrid autofocus system that uses both PDAF and CAF to achieve fast and accurate focusing. While earlier models like the Z6 produced a fair amount of images with PDAF results, these images become rare in modern cameras like the Z9, as CAF technology becomes more powerful.
Early Z models had an 81-point (9x9) PDAF, which grew to 493 points (27x15) on the Z8/Z9. Unlike DSLRs, information about inactive (unused) focus points is less useful here, so it is not displayed.
Examples:
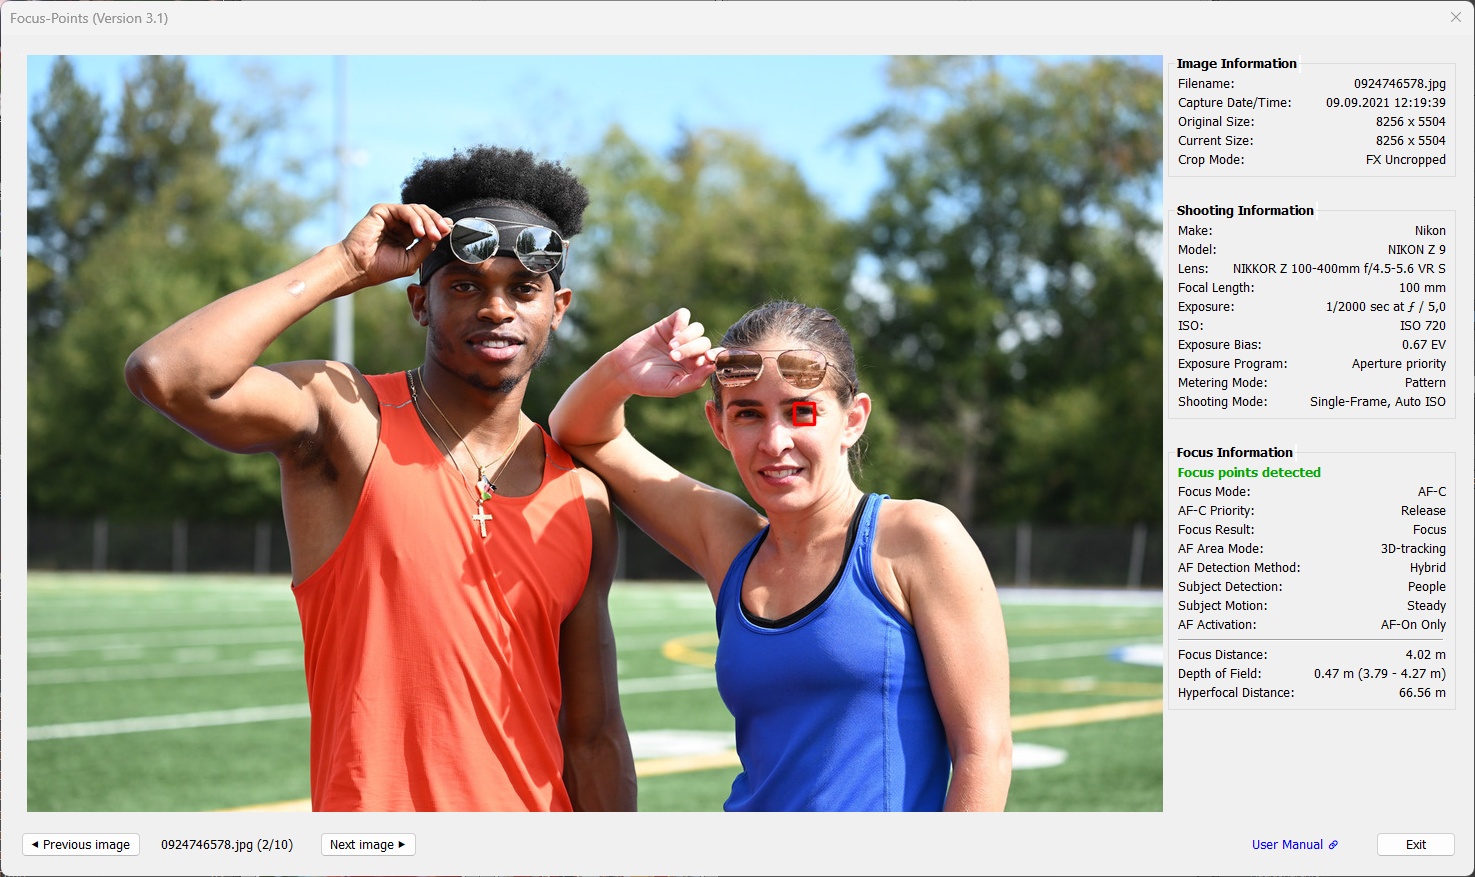
Z9, subject detection “People”.
Z5 II, no subject detection.
Z7. The first Nikon mirrorless models tended to determine the focus point using the PDAF grid, especially for “flat” scenes.
3.2 Canon
Supported features:
| MAC | WIN | Color | Meaning |
|---|---|---|---|
|
|
red1 | Active AF point. Focus area, dimensions reported by the camera |
|
|
gray | Inactive AF point. Part of DSLR AF points but not used for the image |
1 AF point color can be chosen from red, green, blue in Viewing Options.
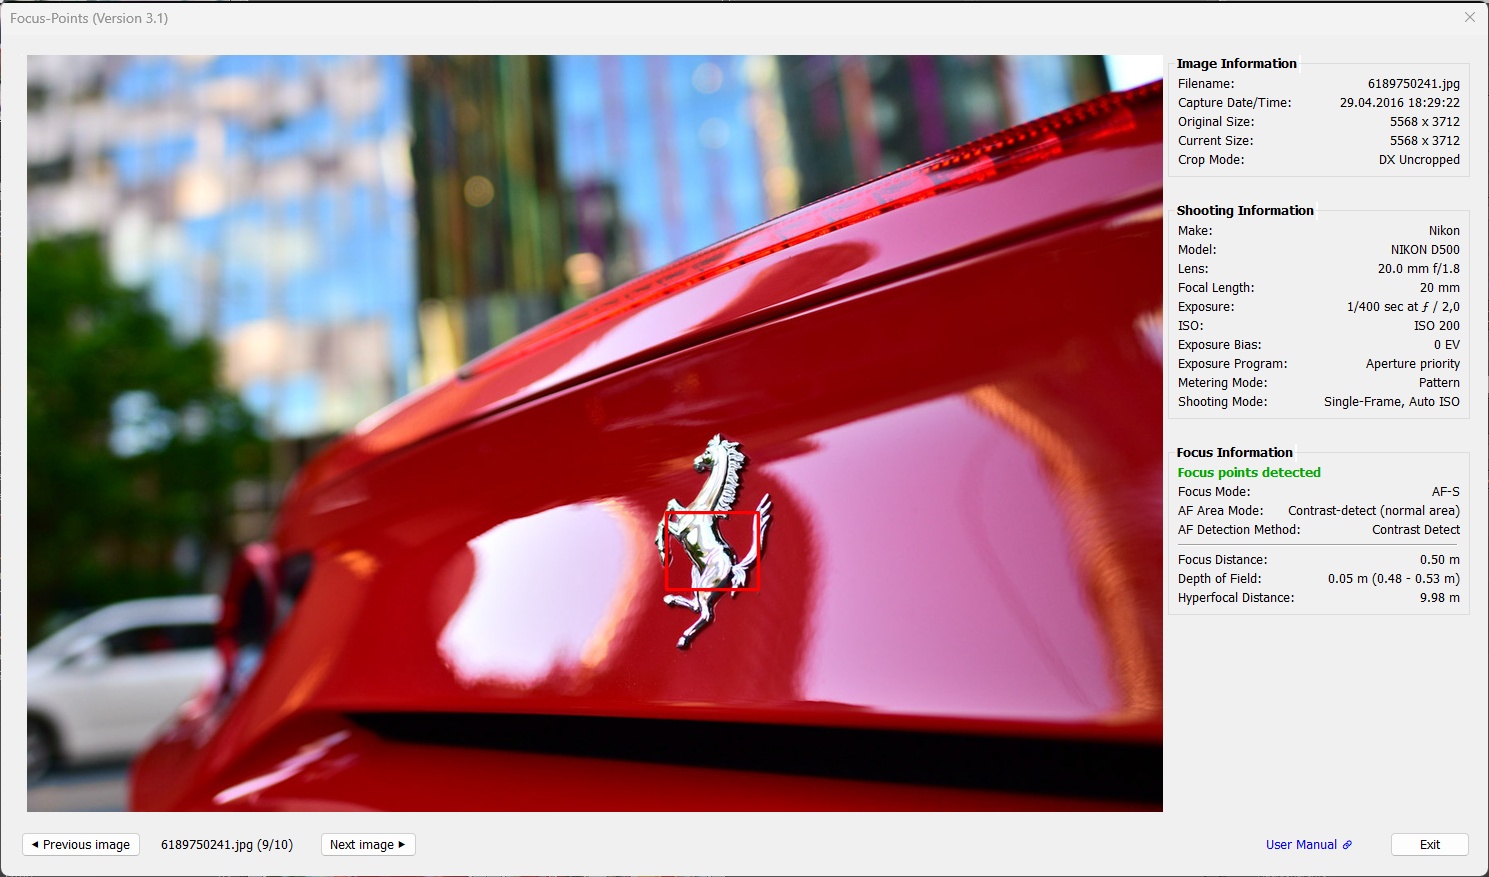
Canon focus point information in EXIF metadata always refers to an area within the frame. Focus point areas are specified by their coordinates (x,y, height, width). Therefore, for Canon focus points, you can select the color of the box, but not the size.
Canon metadata does not include face or subject detection details, so you won’t see any detection frames. This does not mean that this information is not present in the file - it just has not yet been decoded by the maintainers and active supporters of ExifTool.
Unlike other manufacturers, Canon does not give a single value for the focus distance, but rather a pair of values for the lower and upper range.
3.2.1 Canon DSLR
Like Nikon, Canon DSLRs support both PDAF and CAF. The position and size of the PDAF focus points are determined by the individual sensor AF layout of the camera model.
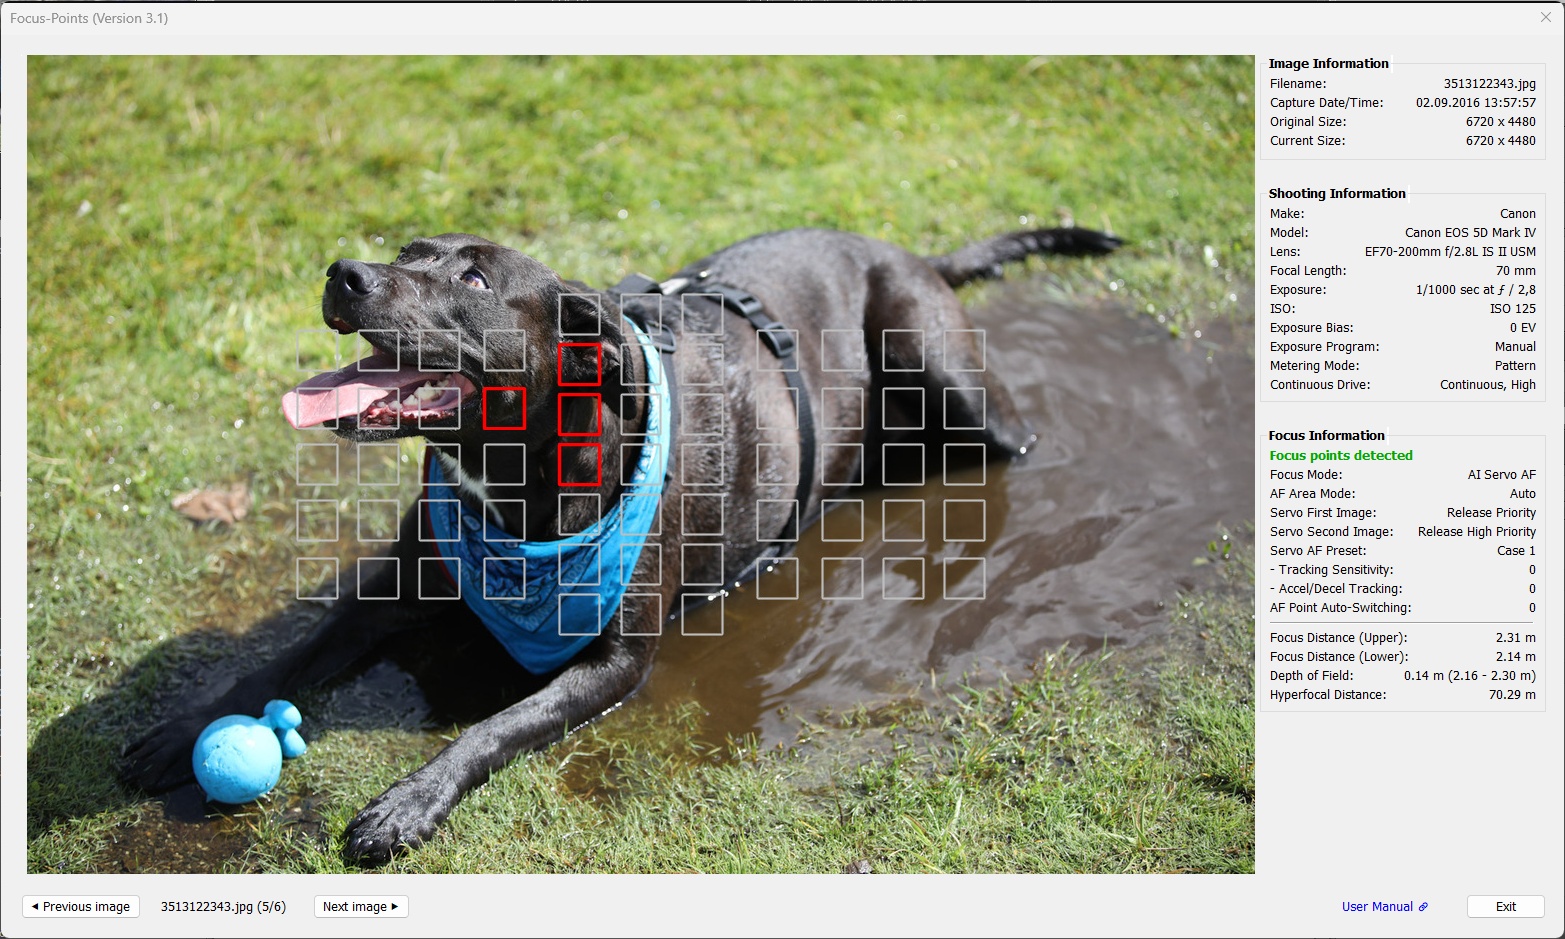
5D Mark IV. PDAF-focused shot with Servo AF Preset “Case 1” and multiple focus points used.
CAF-focused shot using the ‘green’ color for in-focus points for better visibility.
3.1.2 Canon Mirrorless
As with Nikon, Canon mirrorless models feature a hybrid autofocus system. However, in terms of focusing information stored in EXIF, the cooperation of PDAF and CAF is transparent. You can find the x, y positions of the focus point area(s) used to focus the shot as well as their width and height always in the same format.
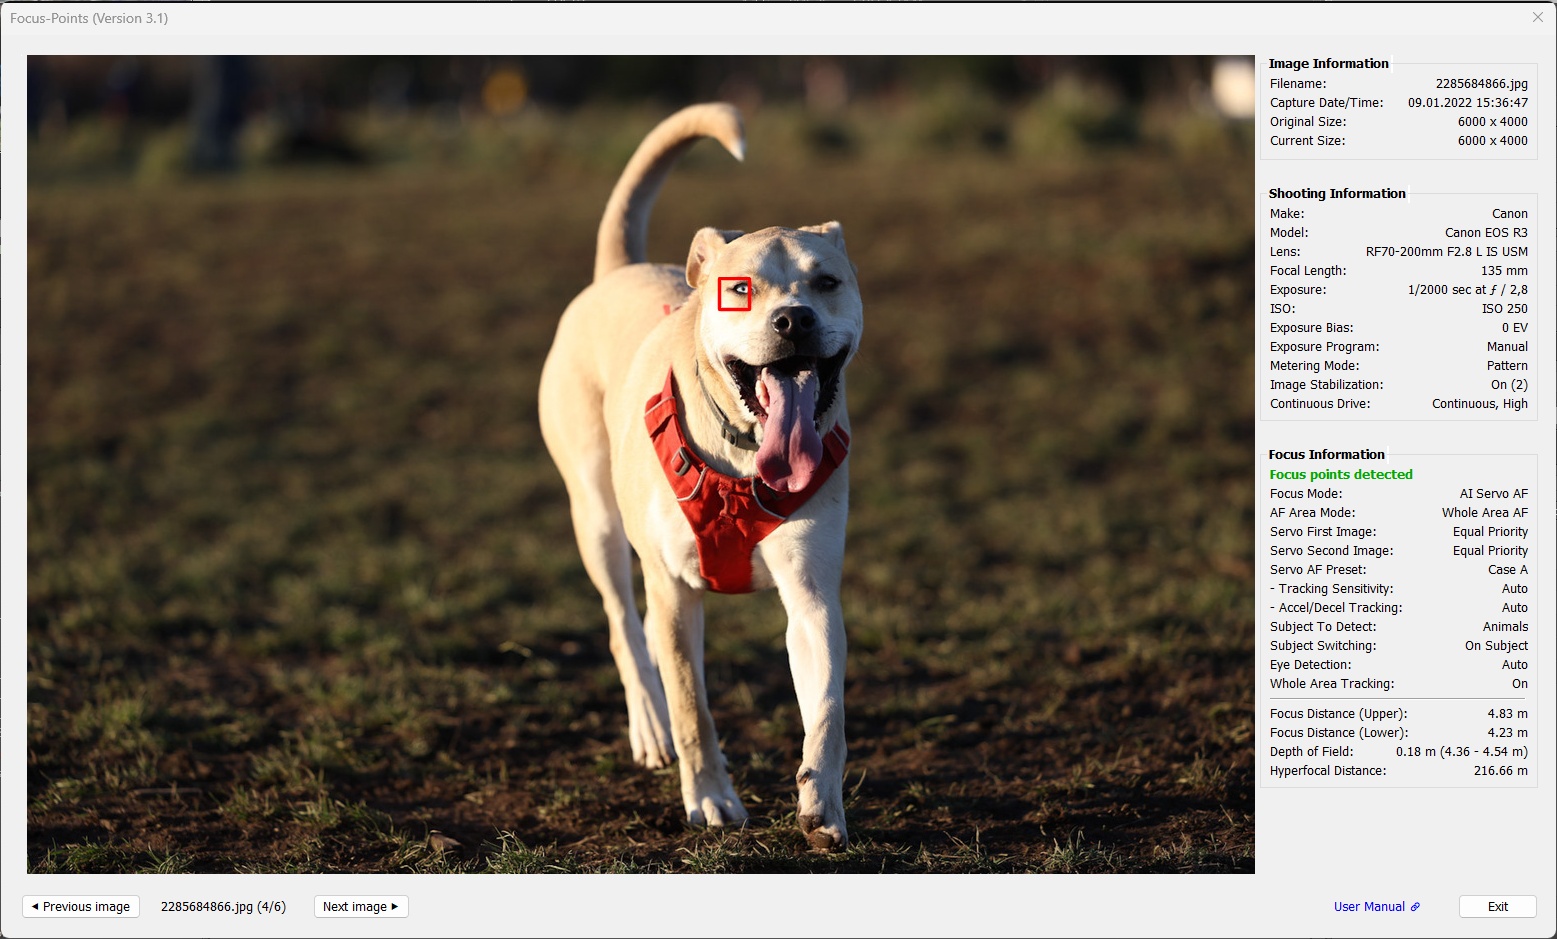
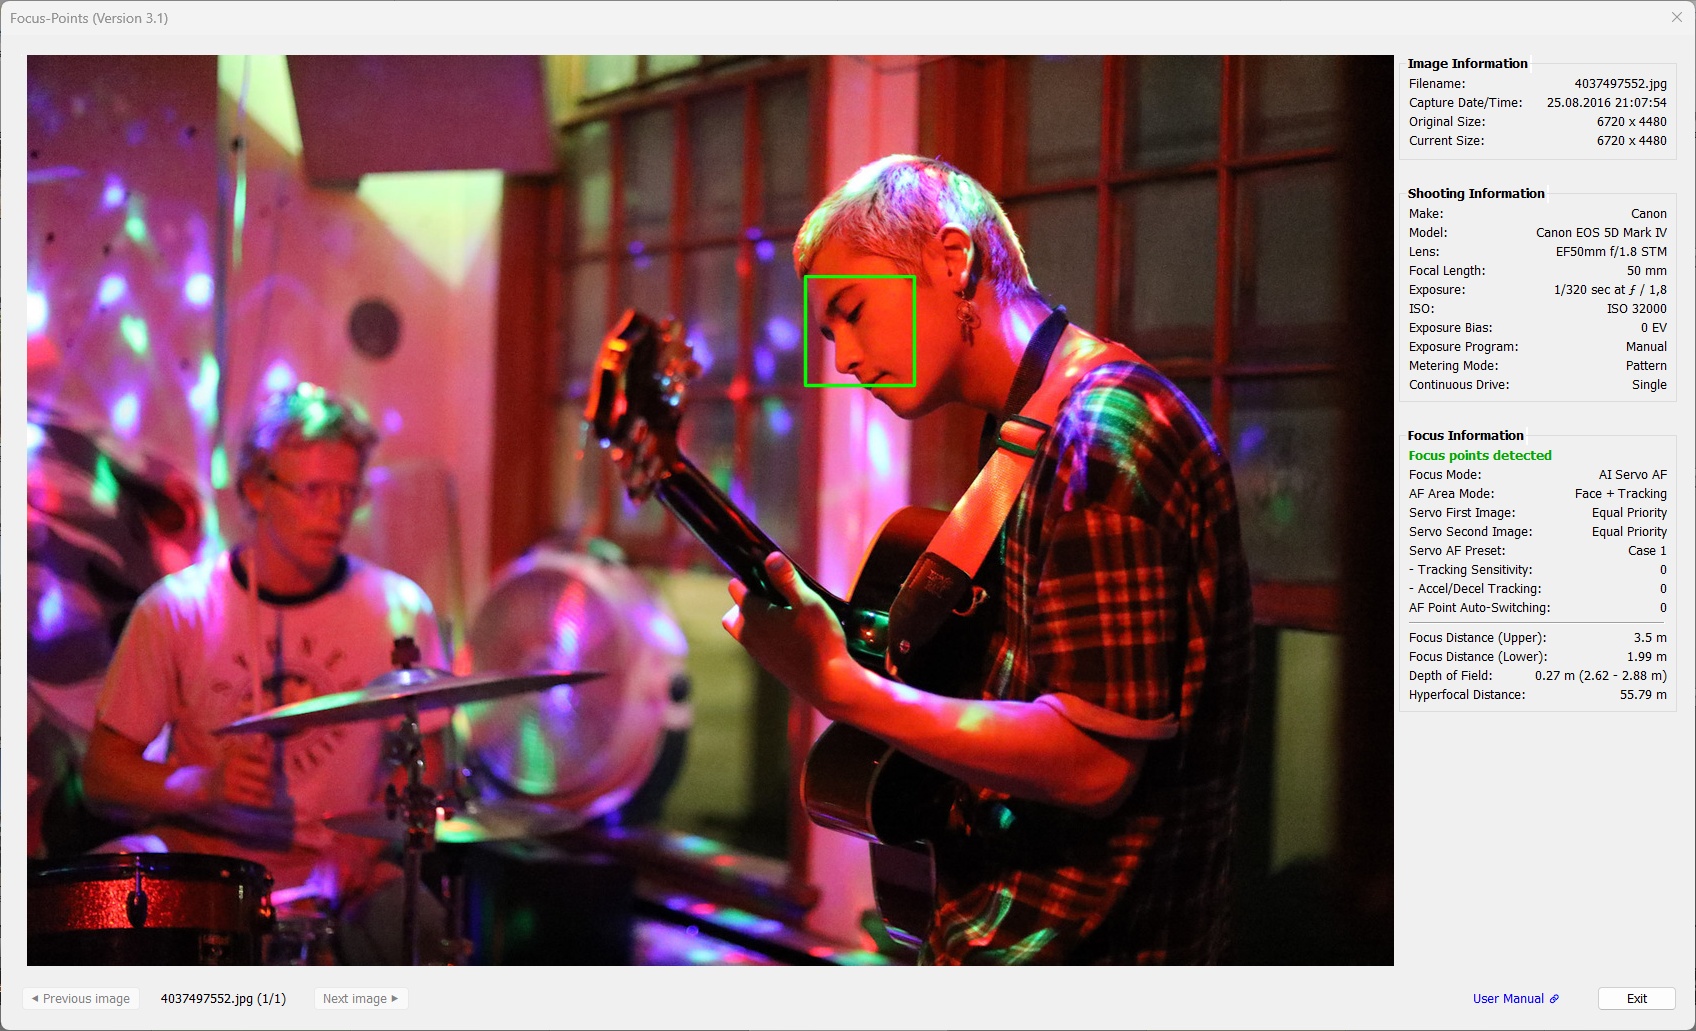
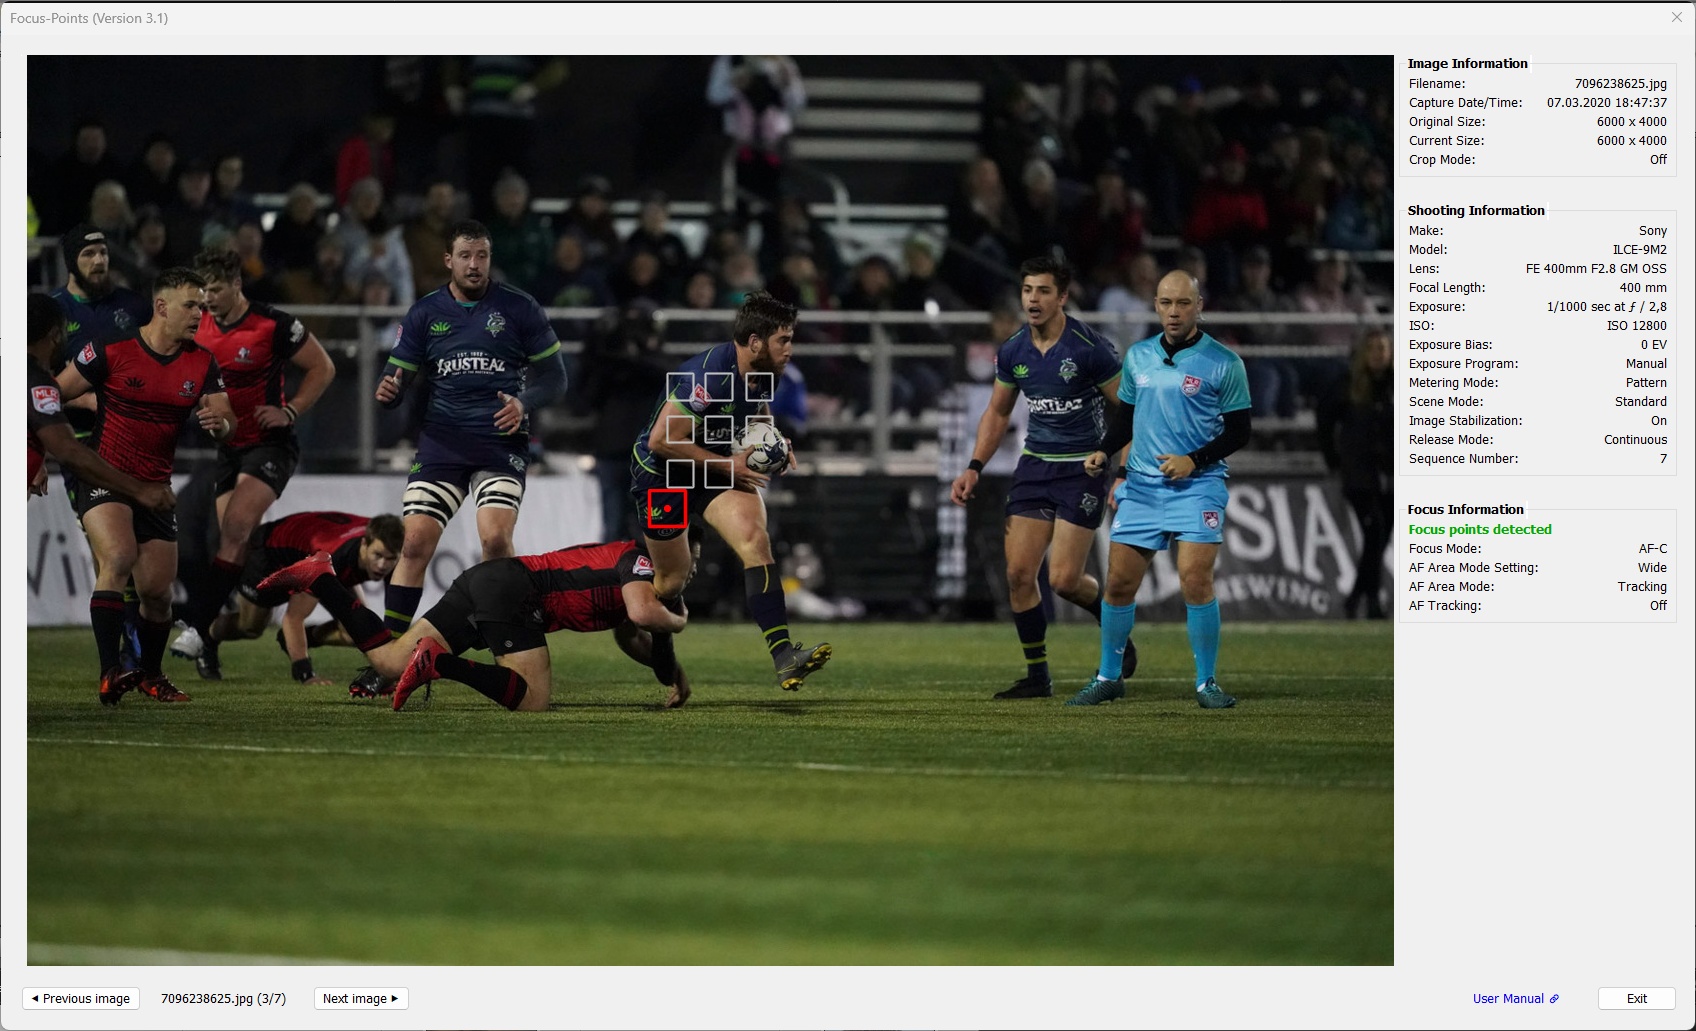
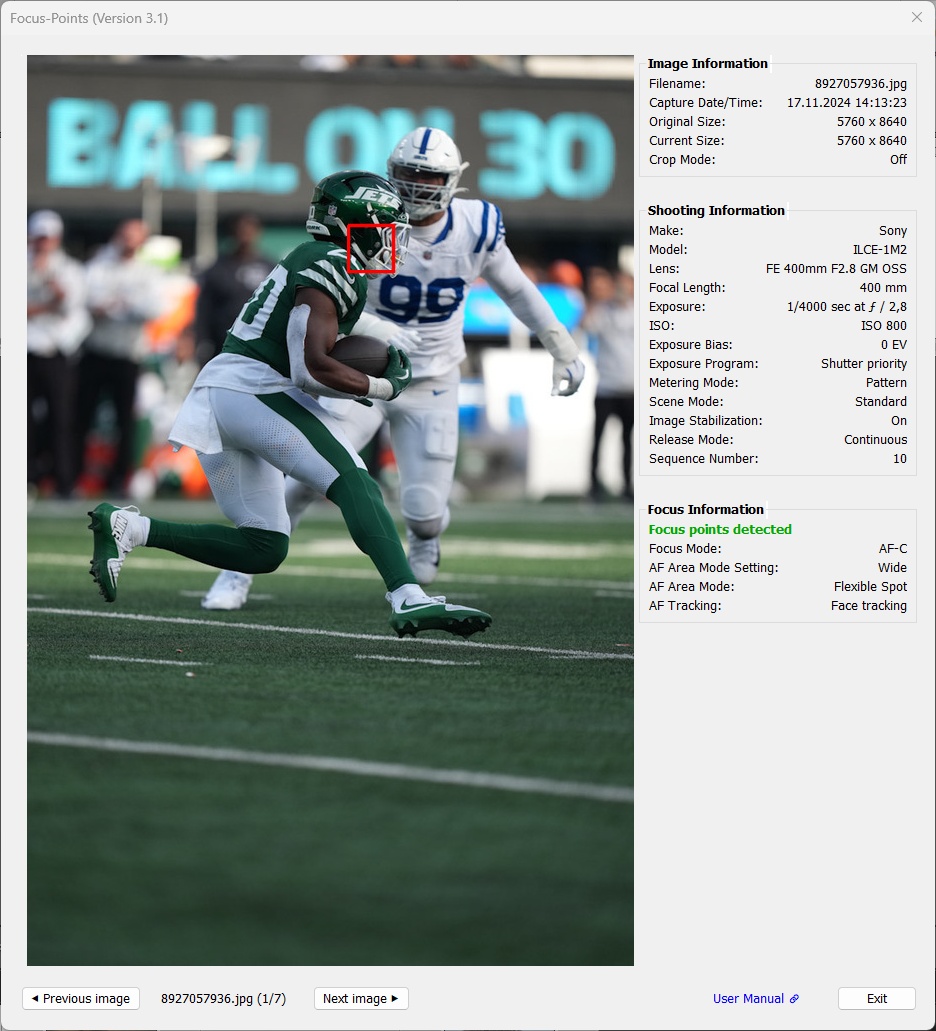
R3. AI Servo AF with Case A preset and subject detection ‘Animals’
R5 Mark II. AI Servo AF with Case A preset and subject detection ‘Auto’
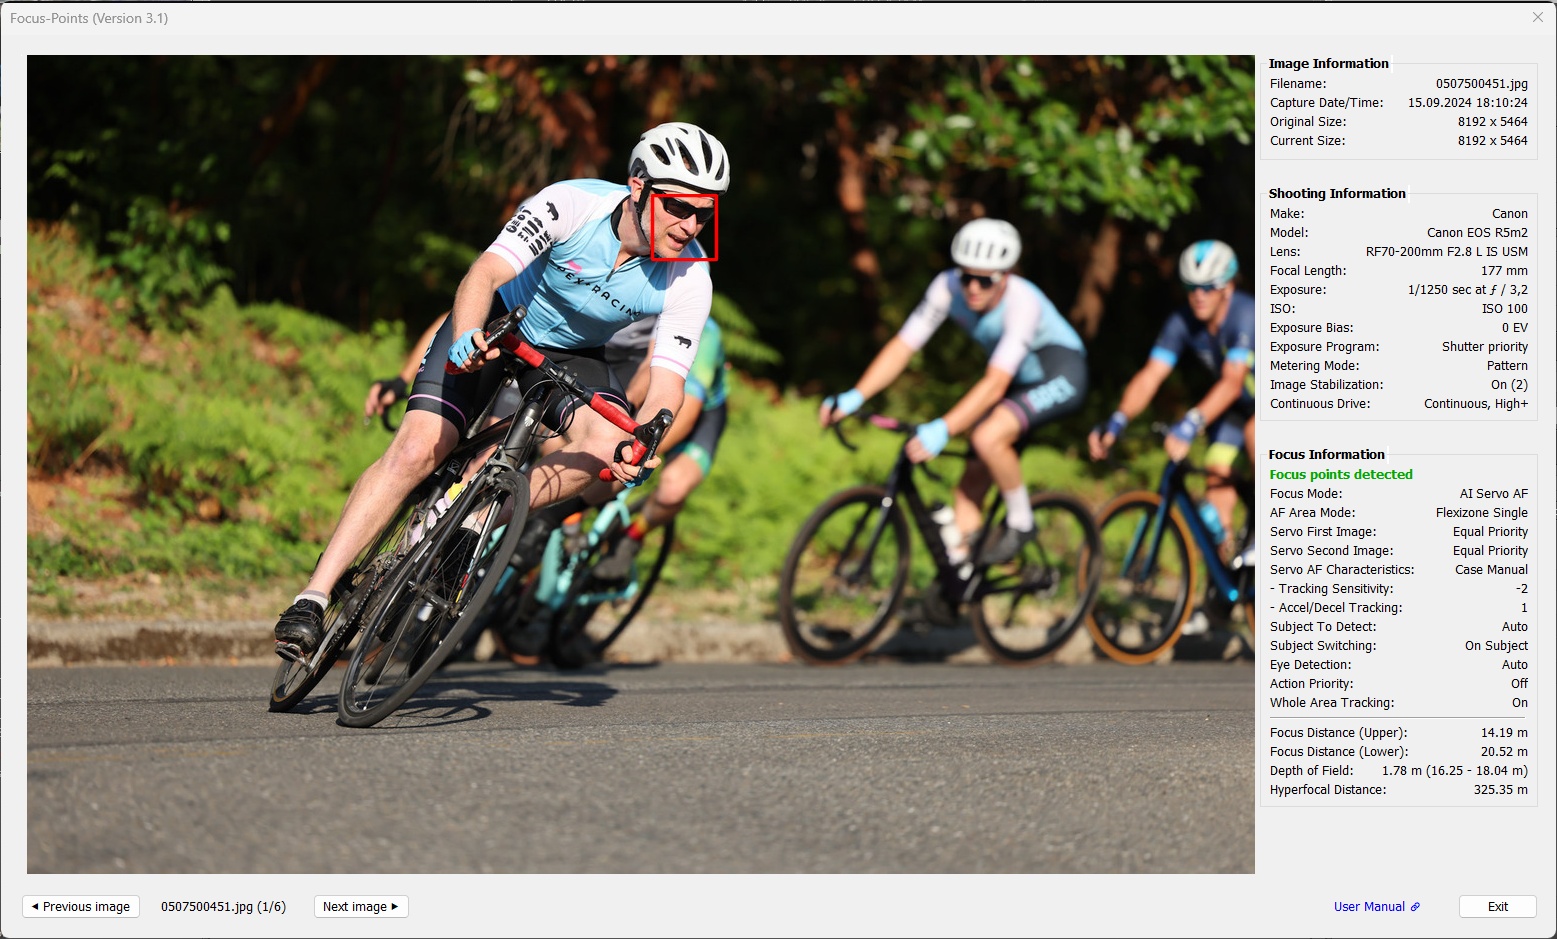
R1. AI Servo AF with Action Priority “On” and Sport Events “Basketball”.
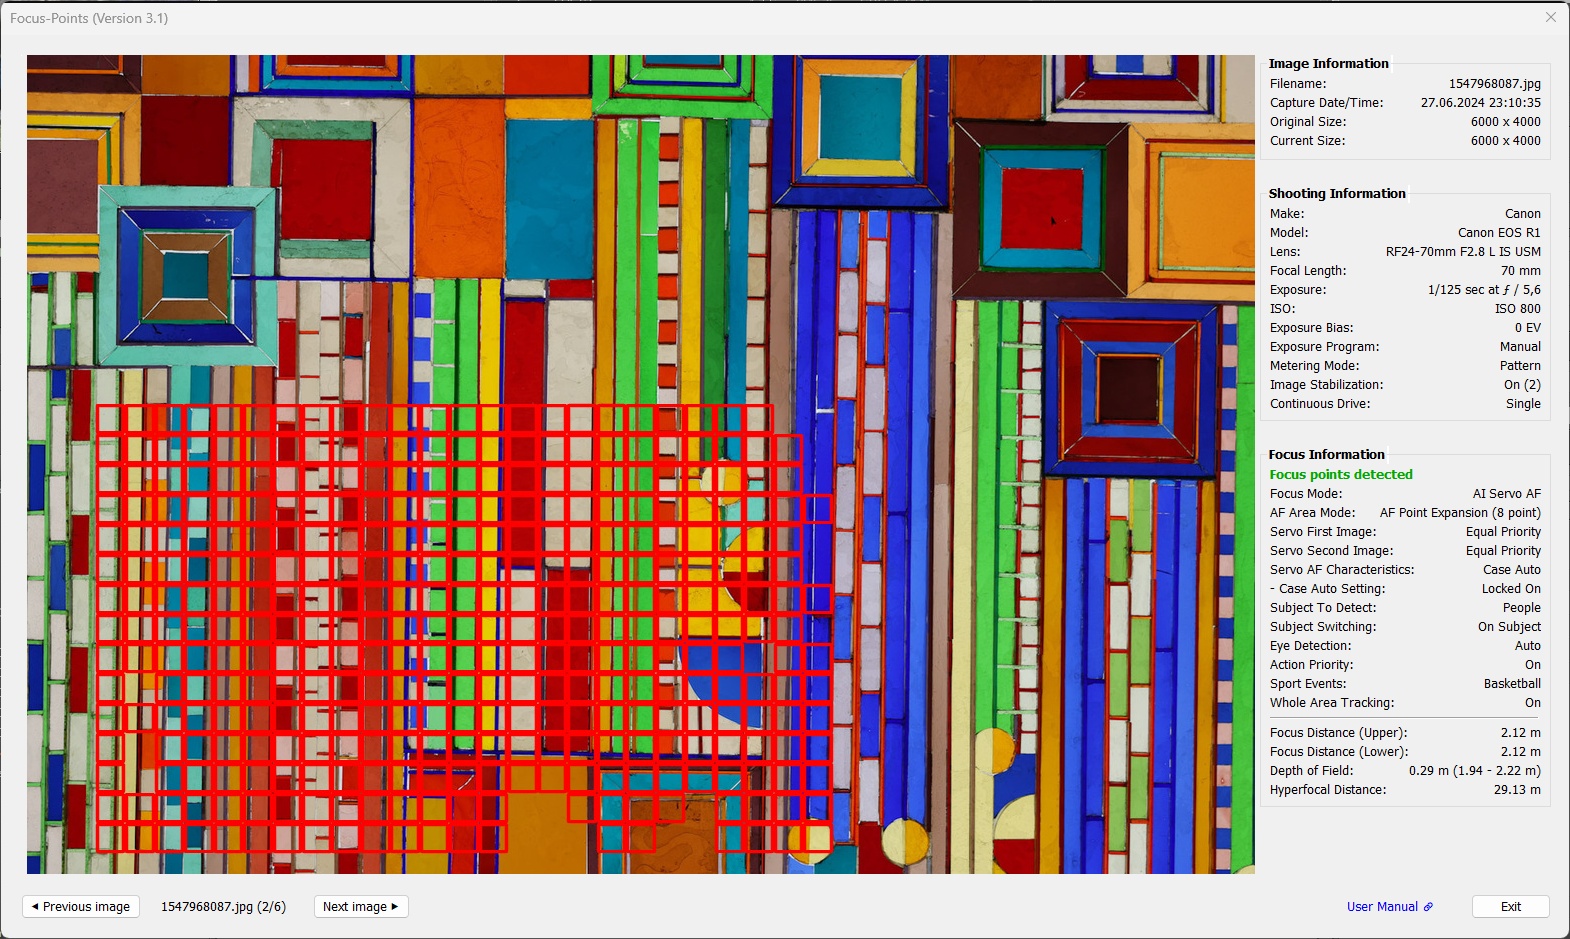
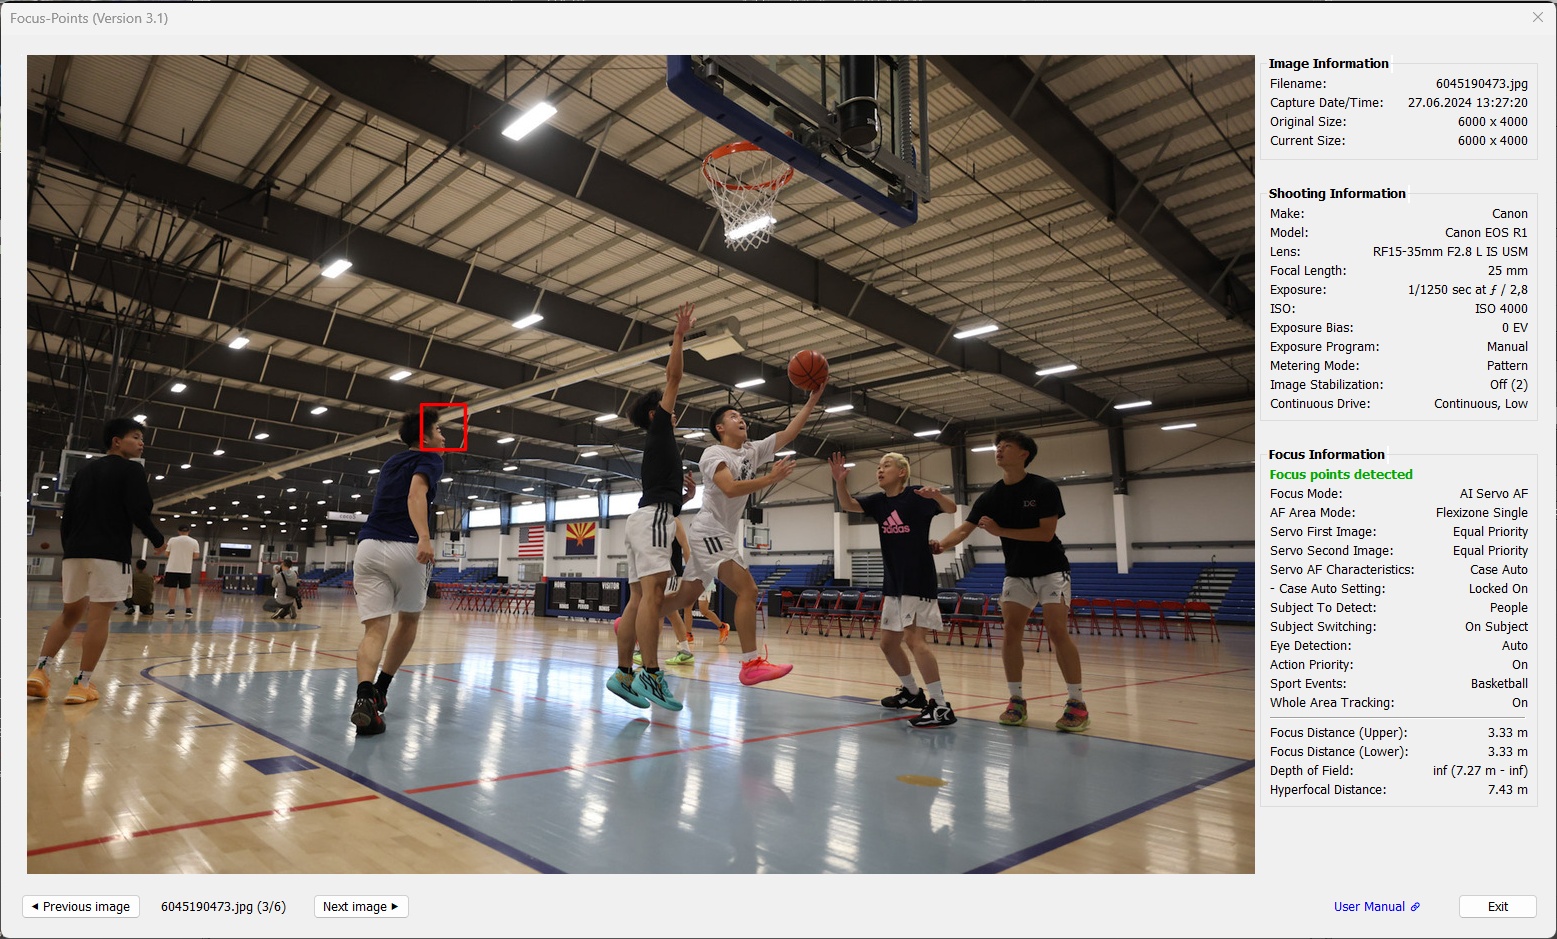
R1. When capturing flat subjects, focus point display for Canon R-series can be funny sometimes.
3.3 Sony
Supported features:
| MAC | WIN | Color | Meaning |
|---|---|---|---|
|
|
red1 | Active AF point. Focus area, dimensions reported by the camera |
|
|
red1,2 | Active AF point. Focus location, pixel coordinates reported by the camera |
|
|
gray | Focal plane phase detect AF-point used during focusing |
|
|
yellow | Face detected by the camera in this area |
1 AF point color can be chosen from red, green, blue in Viewing Options.
2 ‘Focus-pixel’ shape and size can be chosen from different options (small box or medium/large with center dot) in Viewing Options.
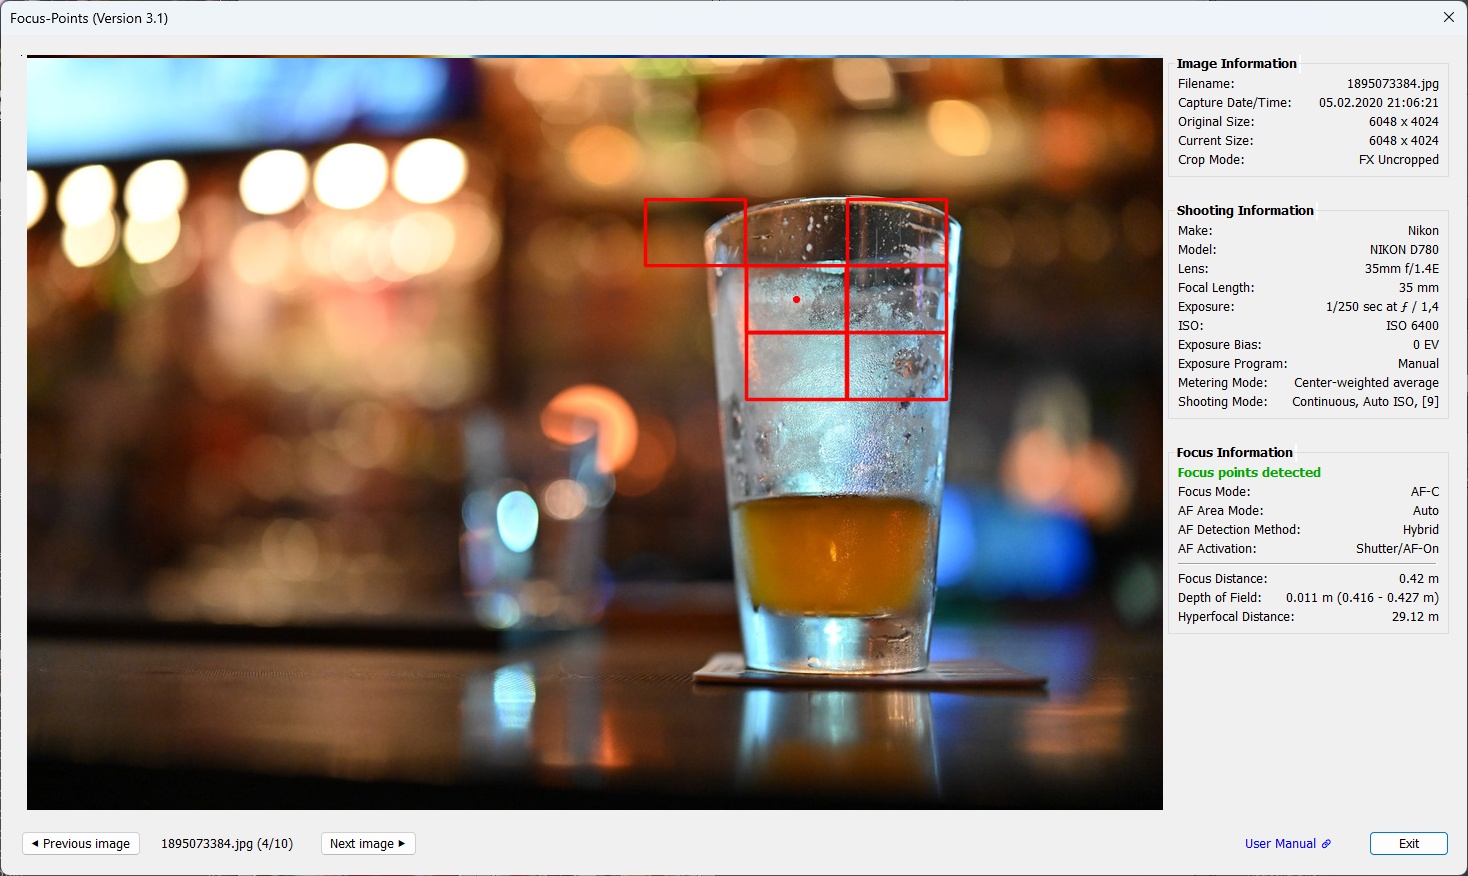
In Sony models, the focus point of an image is specified by the (x, y) coordinates in the FocusLocation tag. Newer models also support a FocusFrameSize tag, which specifies the size of the focus area. Custom focus frame size settings in the plugin’s preferences only apply when the focus frame size is not available in the metadata. In this case, medium and large focus boxes will display a center dot.
α9. The focus point recorded by the camera corresponds to the center dot. The box is only there to make the dot more visible.
α9 II. If the focal plane phase detection autofocus points have been engaged during the focusing process, they will be displayed in grey.
α9 III. When focus frame size is given in metadata, the focus box cannot be changed in size (since this is determined by the camera) and the box will not have a center dot.
Sony supports face detection on almost all of their mirrorless (alpha) and also compact (RX series) camera. The plugin can display the yellow face detection frames even on images taken with cameras 14 years back where it’s not possible to detect focus points using EXIF data.
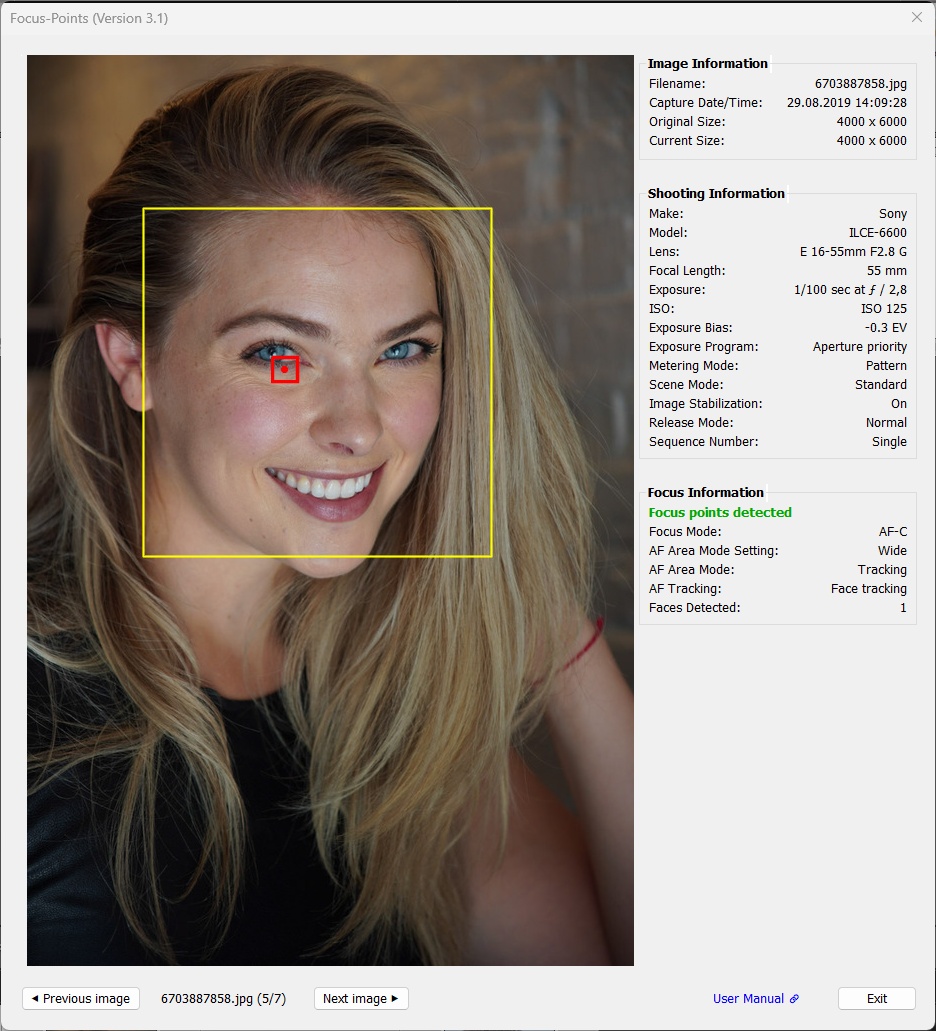
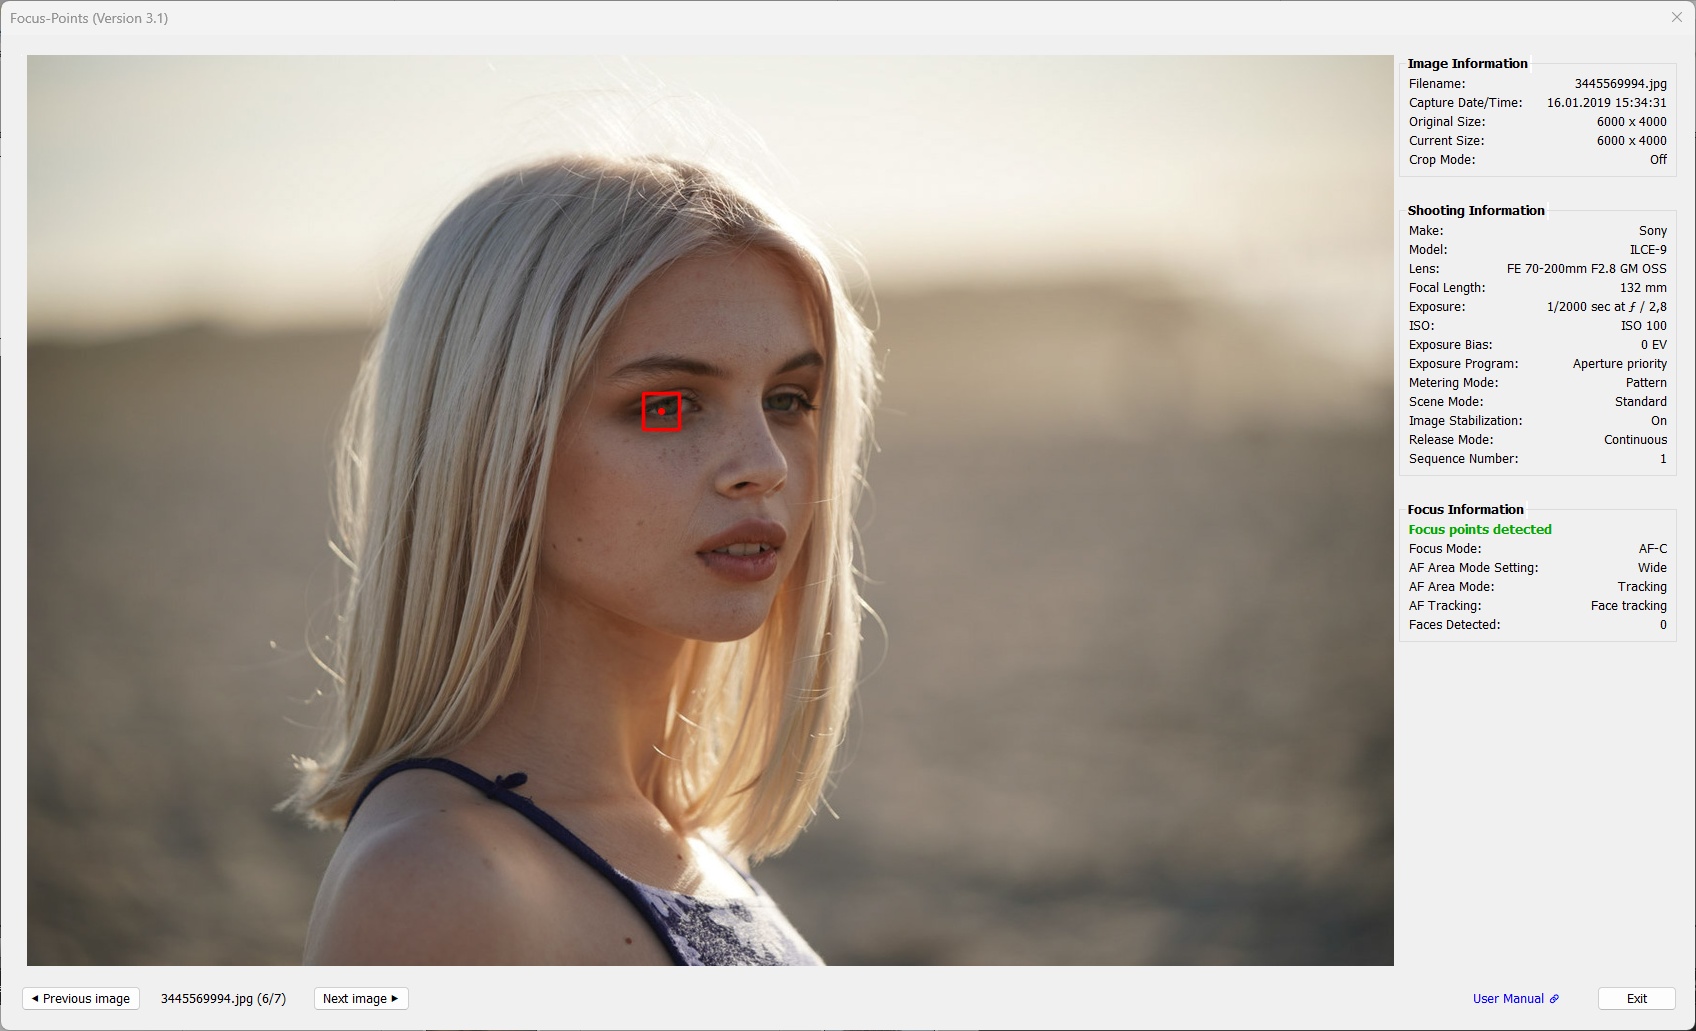
α6600 Detected face indicated by a yellow frame. Detected eye in focus indicated by a red dot.
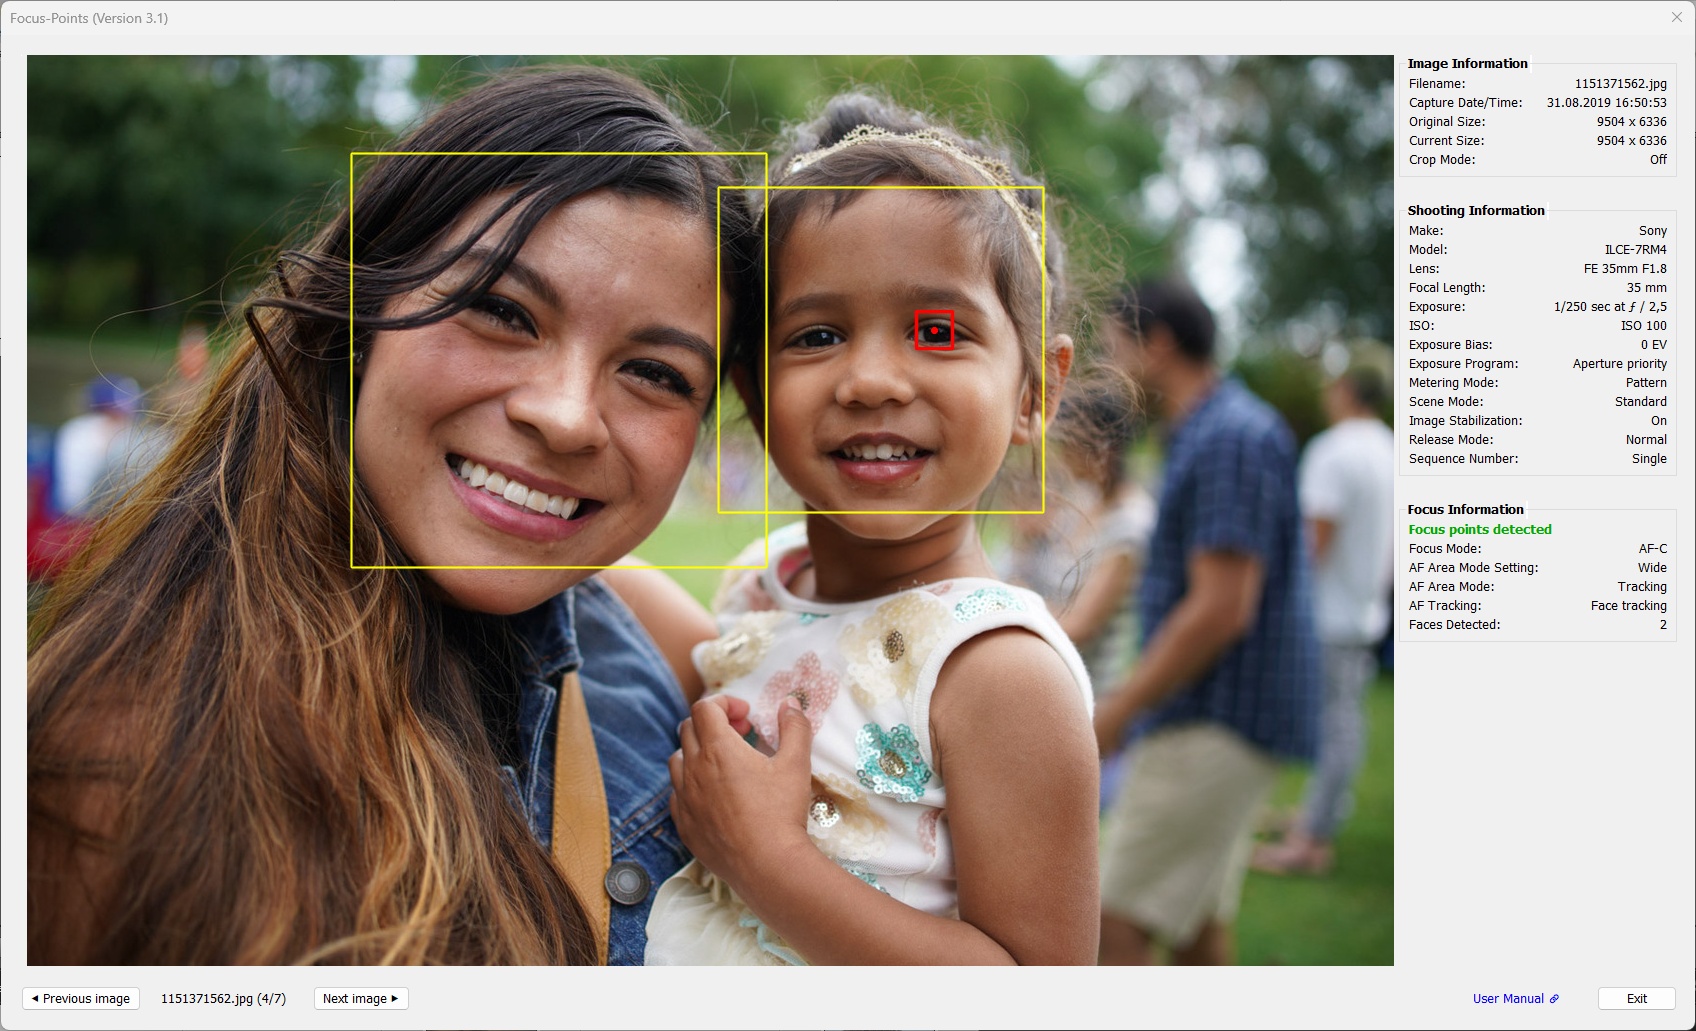
α7 IV. Two face detected, one eye in focus.

RX10 IV. Detected face indicated by a yellow frame. Detected eye in focus indicated by a red dot.
In contrast to Canon and Nikon, there’s not much that you can find in the EXIF maker notes for Sony’s AF menu settings. This is why the focus information section is rather empty. Sony also lacks a focus distance tag, meaning there is no Depth of Field section.
α1 II. The number of known* AF settings entries is small compared to a Canon R5 Mark II.
* not “known” means that information may be present in metadata but has not been identified and decoded yet.
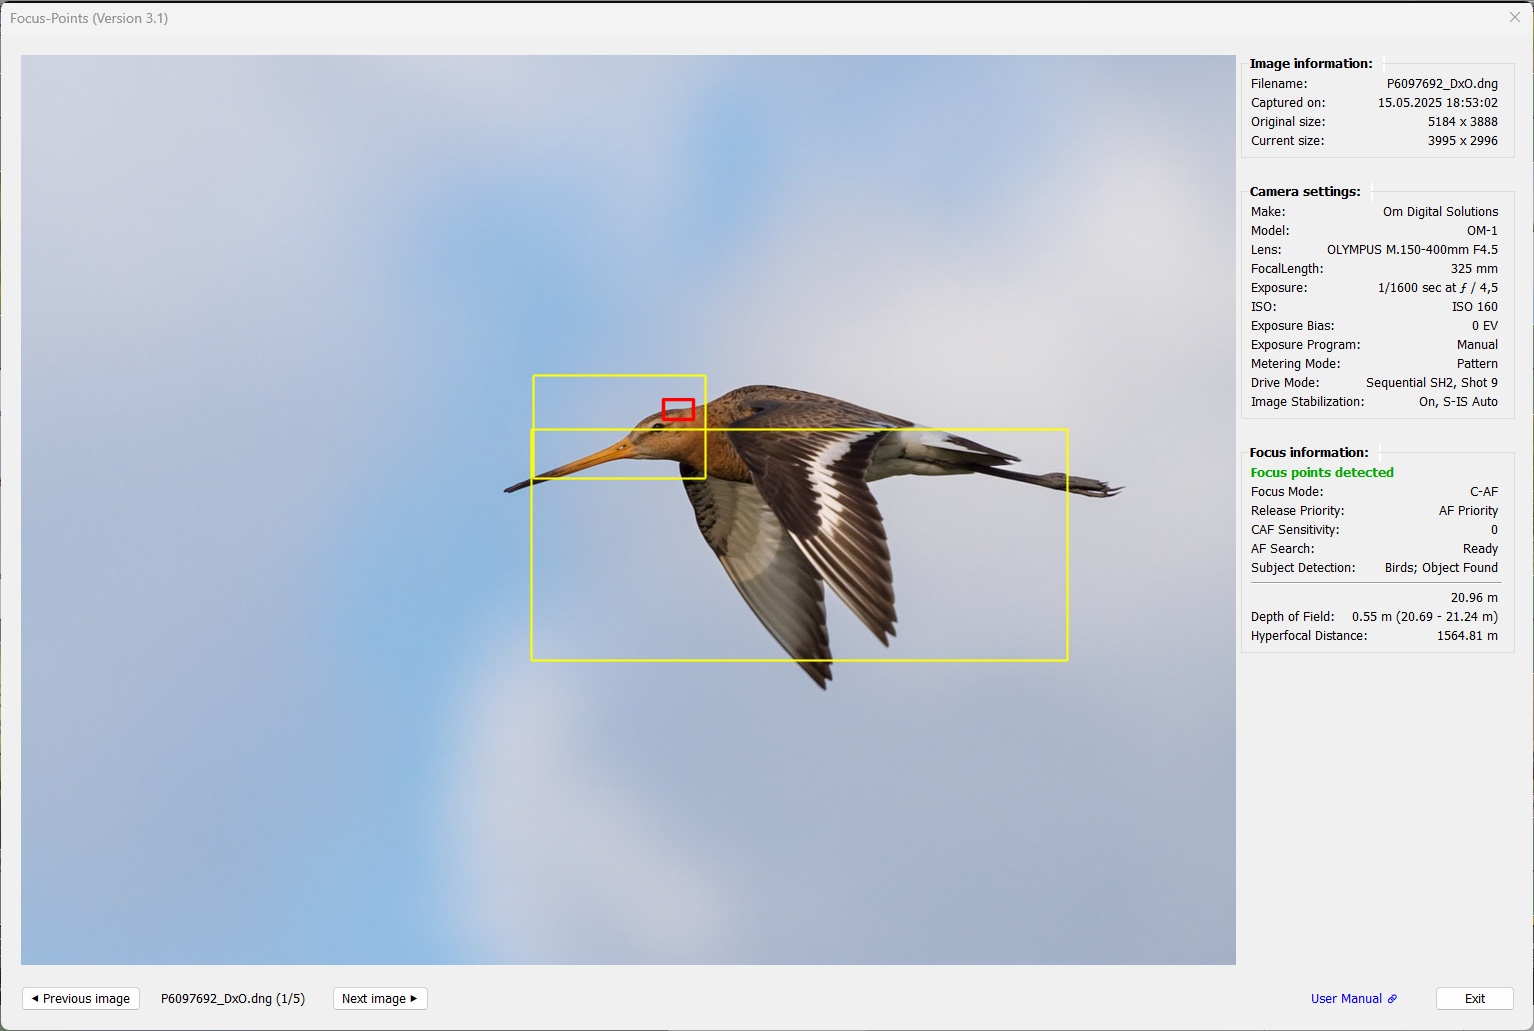
3.4 Fuji
Supported features:
| MAC | WIN | Color | Meaning |
|---|---|---|---|
|
|
red1,2 | Active AF point. Focus location, pixel coordinates reported by the camera |
|
|
yellow | Face, subject or detail detected by the camera in this area |
|
|
black | Part of the image that is used by the camera in ‘crop mode’ |
1 AF point color can be chosen from red, green, blue in Viewing Options.
2 ‘Focus-pixel’ shape and size can be chosen from different options (small box or medium/large with center dot) in Viewing Options.
Fuji metadata contains information on both face and subject recognition. Whether the detected subject is a person, an animal, a bicycle, a car, an airplane, or a train, and whether the detected eye is a real eye or a cockpit, all the information for visualizing a detected subject and its parts is stored in the same place and format.
Fuji focus points are ‘focus pixel’ points with no dimension. For better visualization, you can change the size and color of the focus box in the plugin’s preferences.
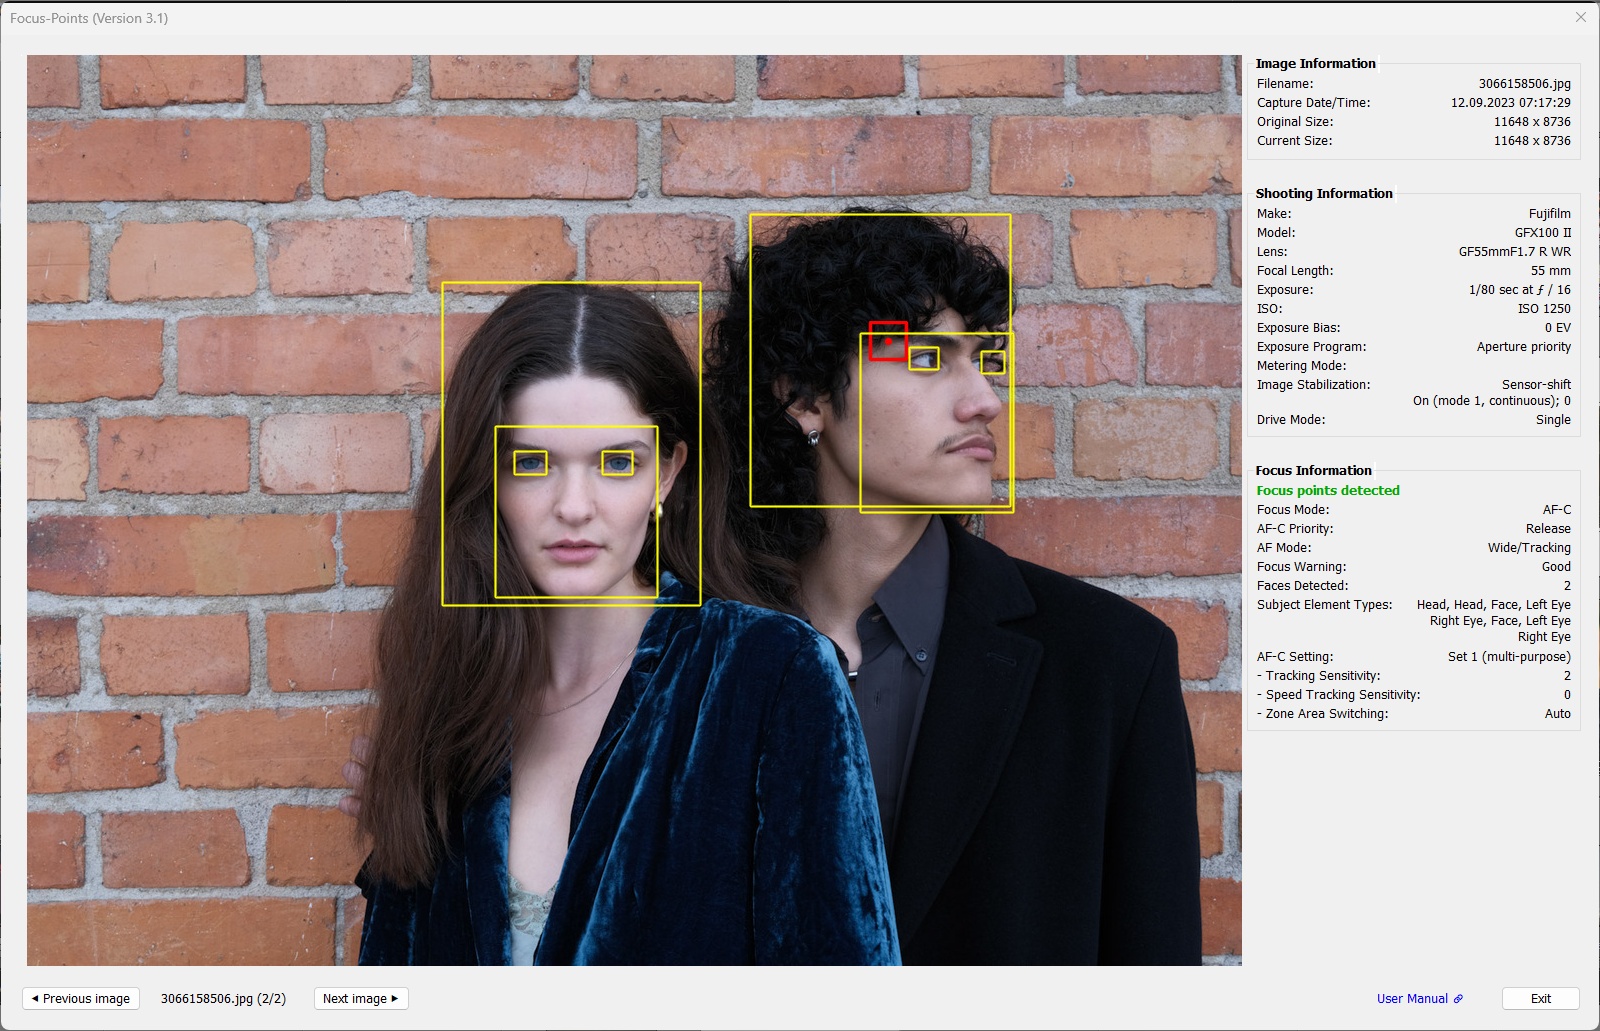
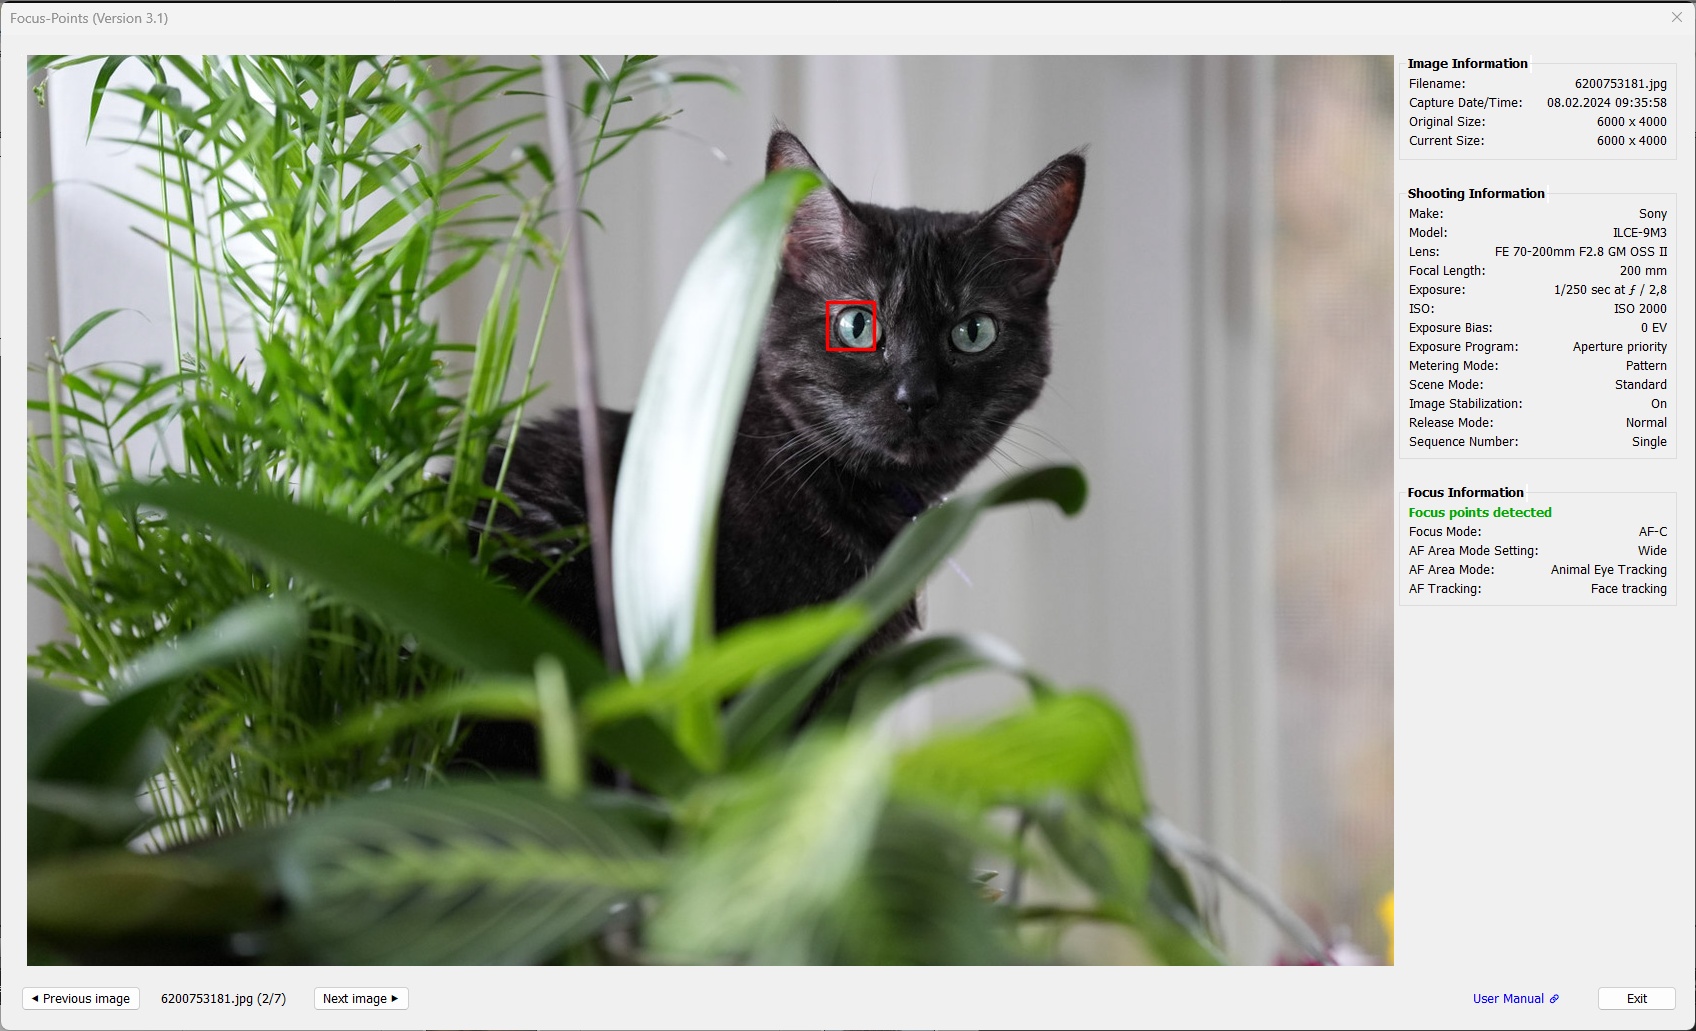
GFX100 II shot with face detection. Heads, faces and eyes are detected for both people (indicated by yellow frames). The focus point is slightly off the detected eye; this can also be seen in shots taken with OM system cameras. It seems that the subject detection analysis performed on a 2D image on the sensor is more accurate than what the 3D autofocus can achieve.
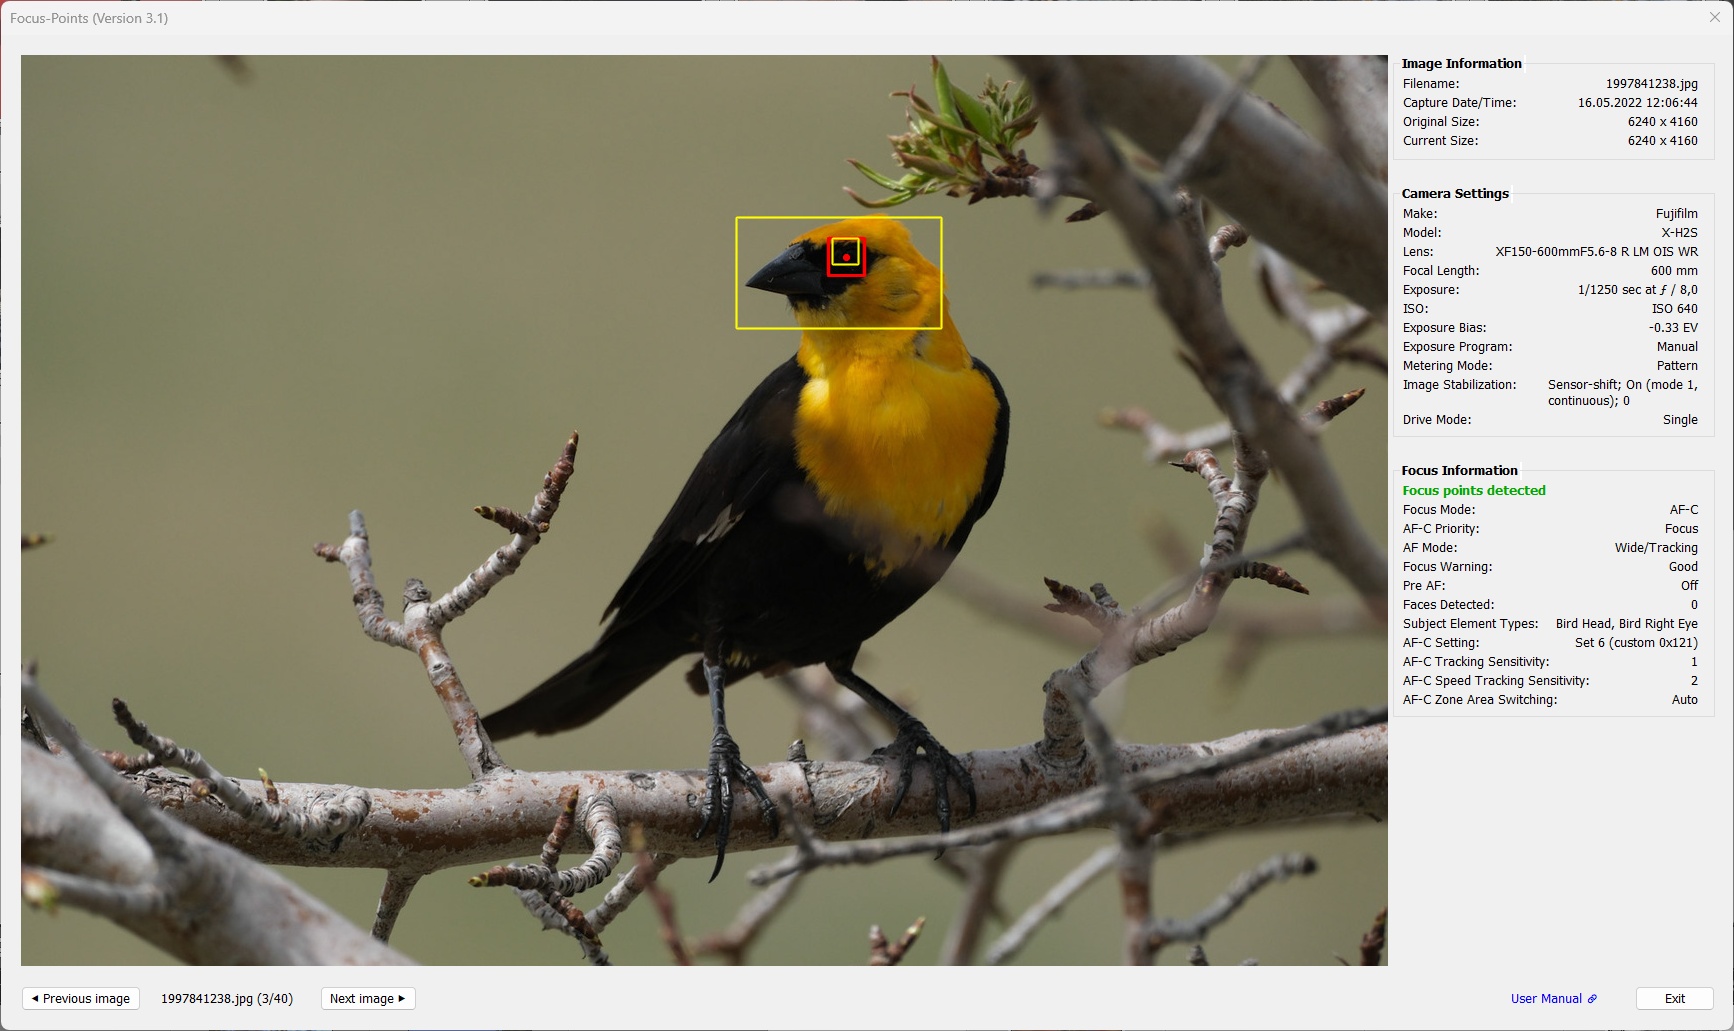
X-H2S shot with subject detection. The bird’s head and eye were detected.
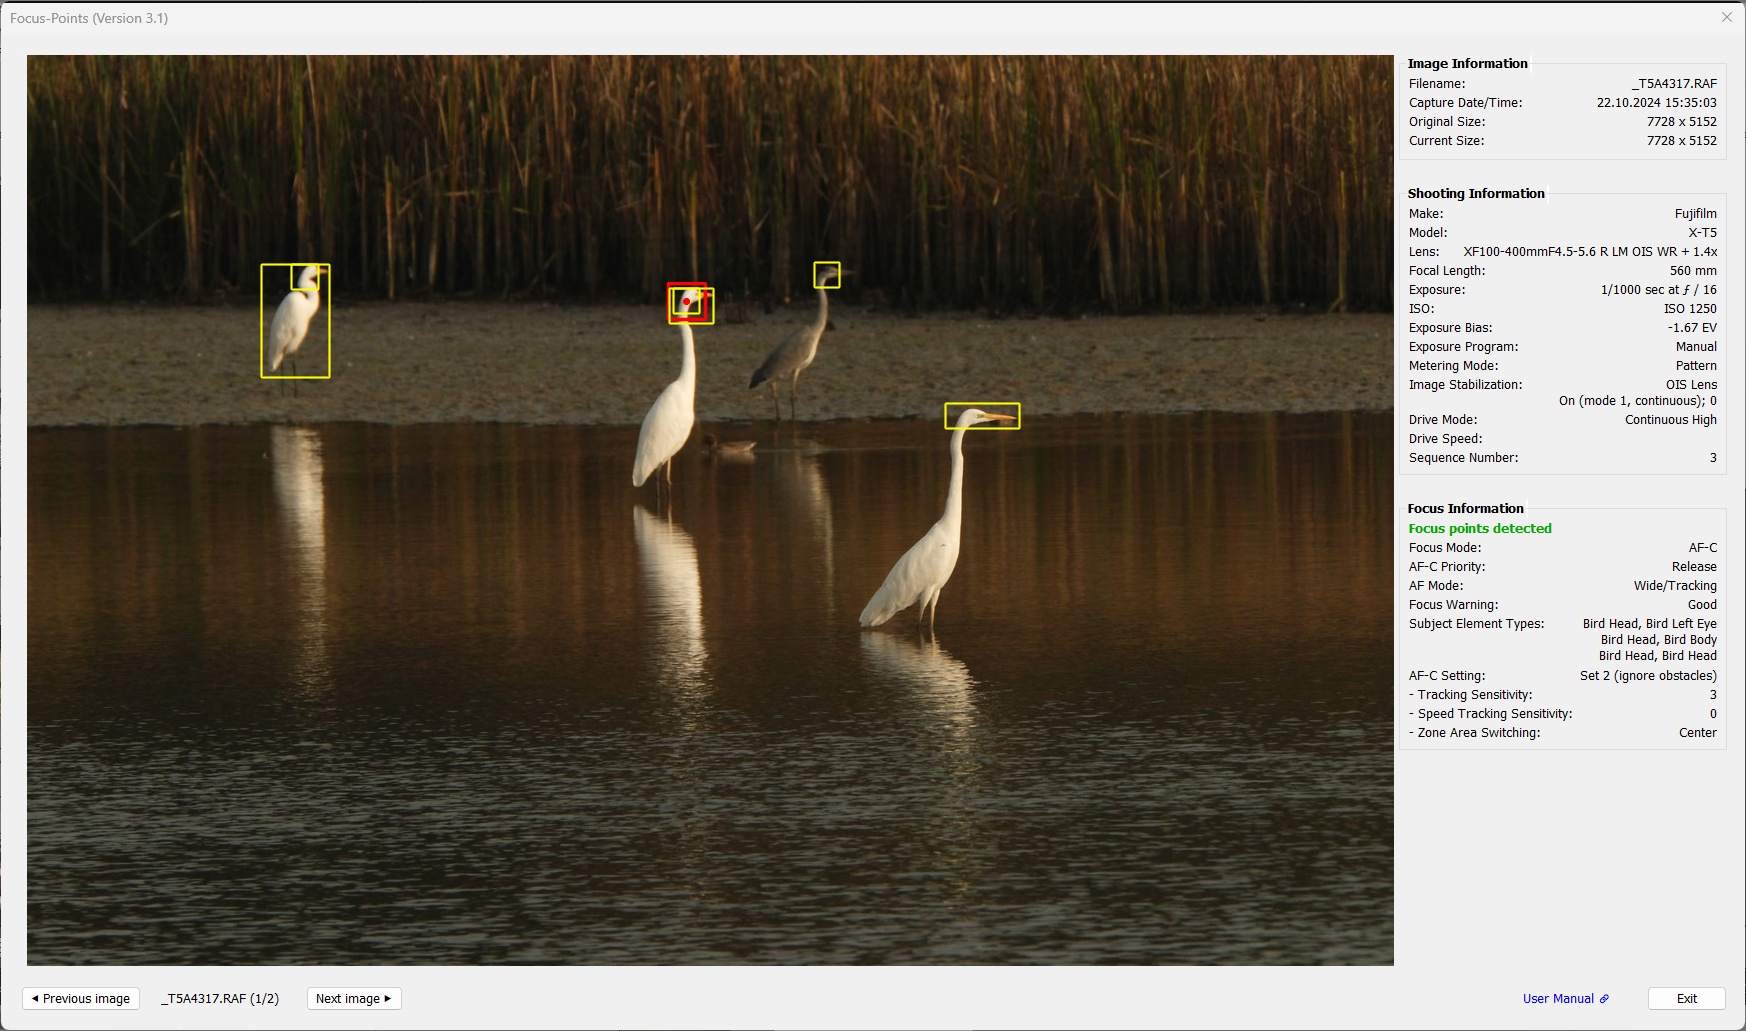
X-T5 shot with subject detection. 4 birds were detected, with different level of details. In addition to the coordinates of the detected elements these are also listed in SubjectElementTypes.
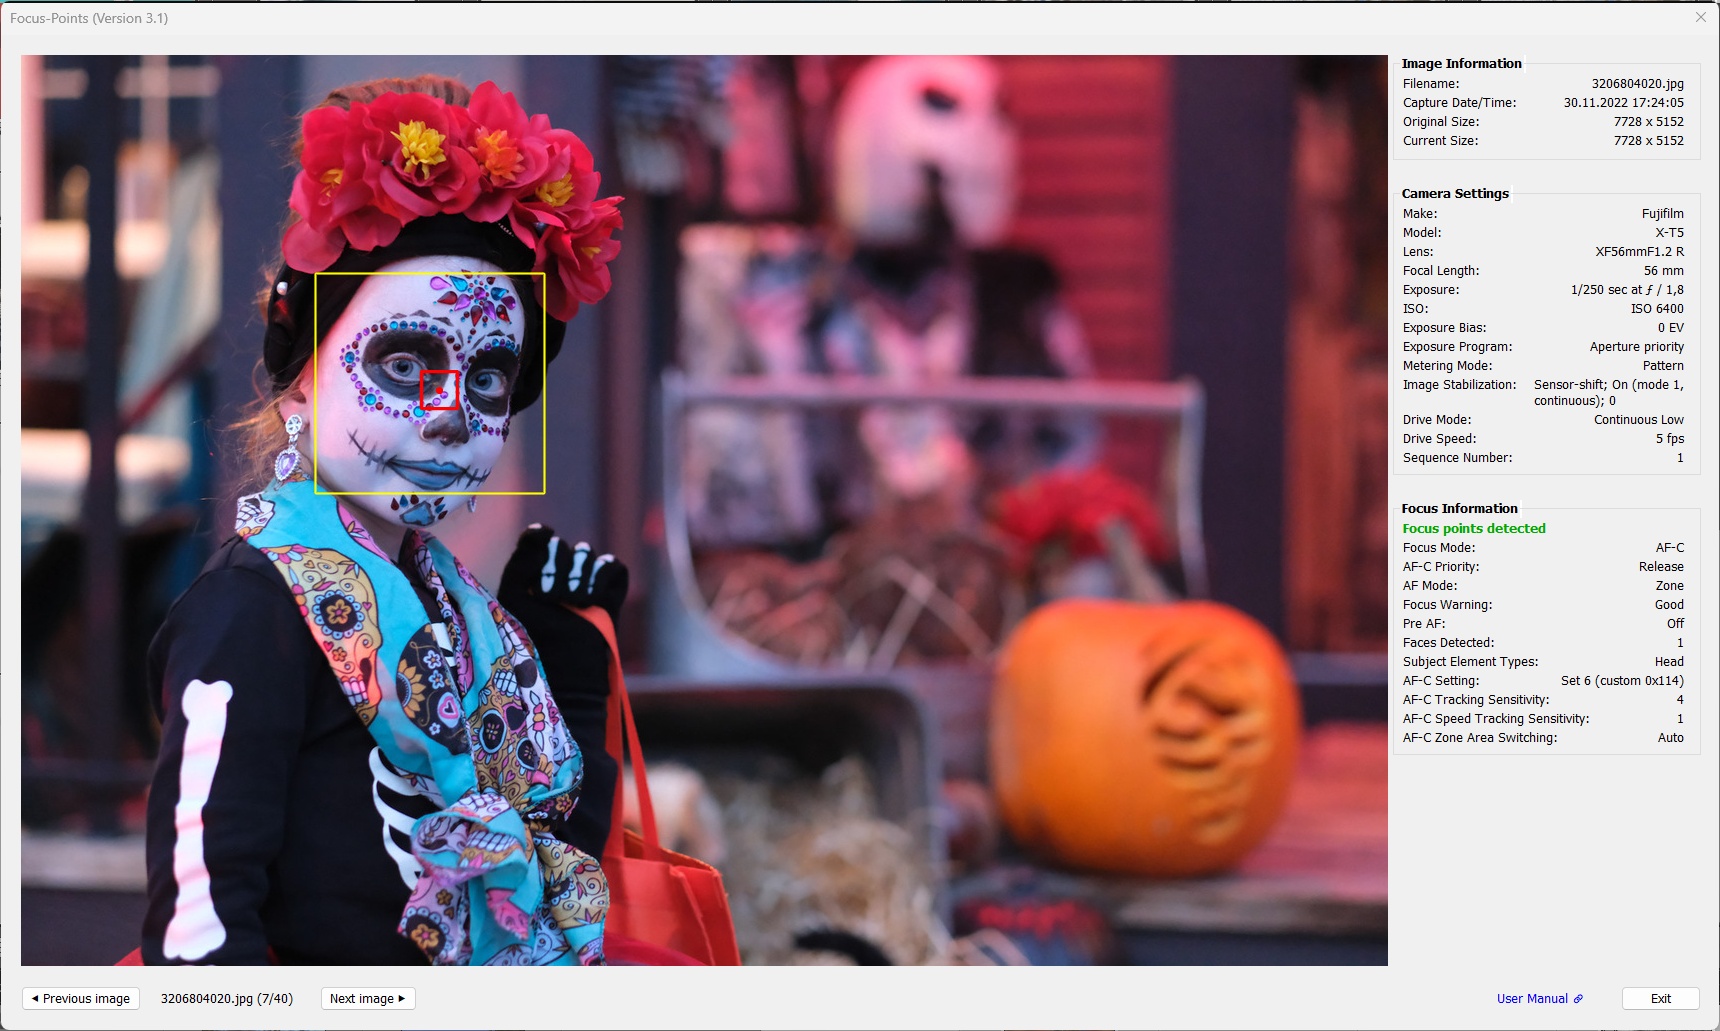
X-T5 shot with face detection. Fuji provides comprehensive information on camera and AF settings in the photo’s metadata.
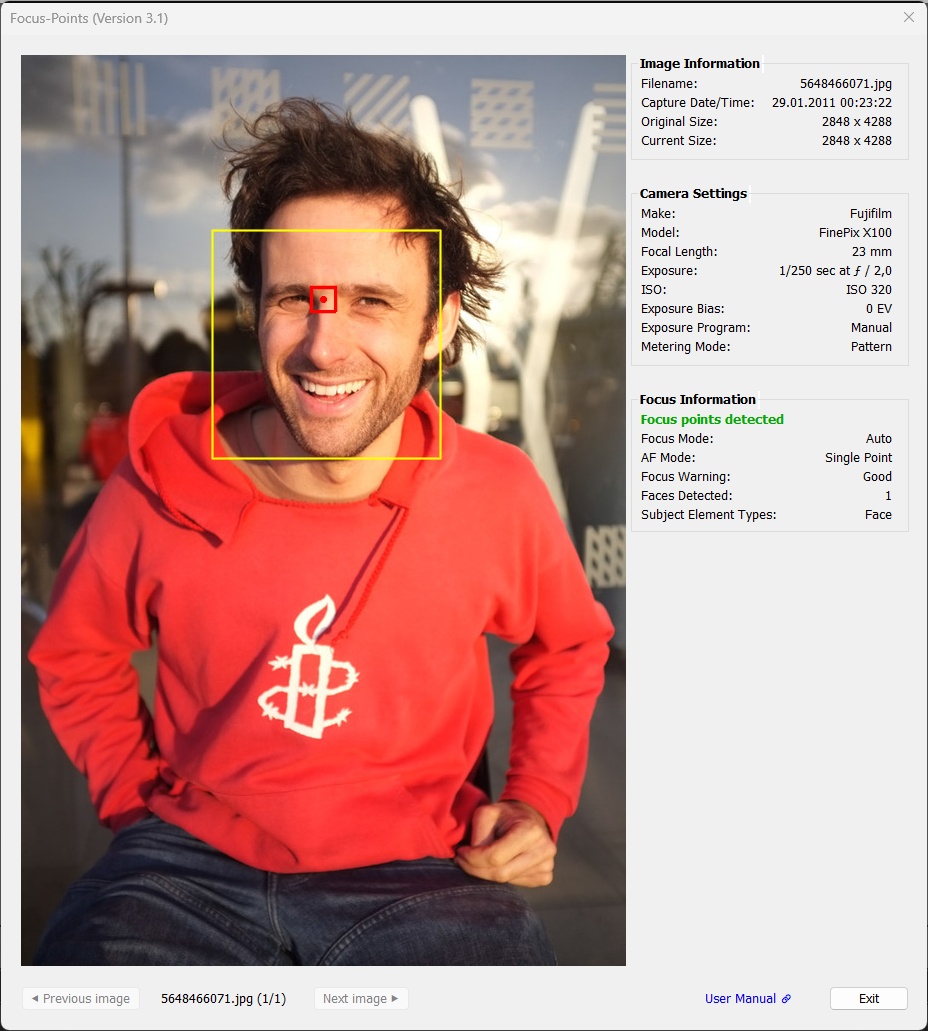
Finepix X100 shot with face detection. The plugin supports also compact FinePix models after 2007 .
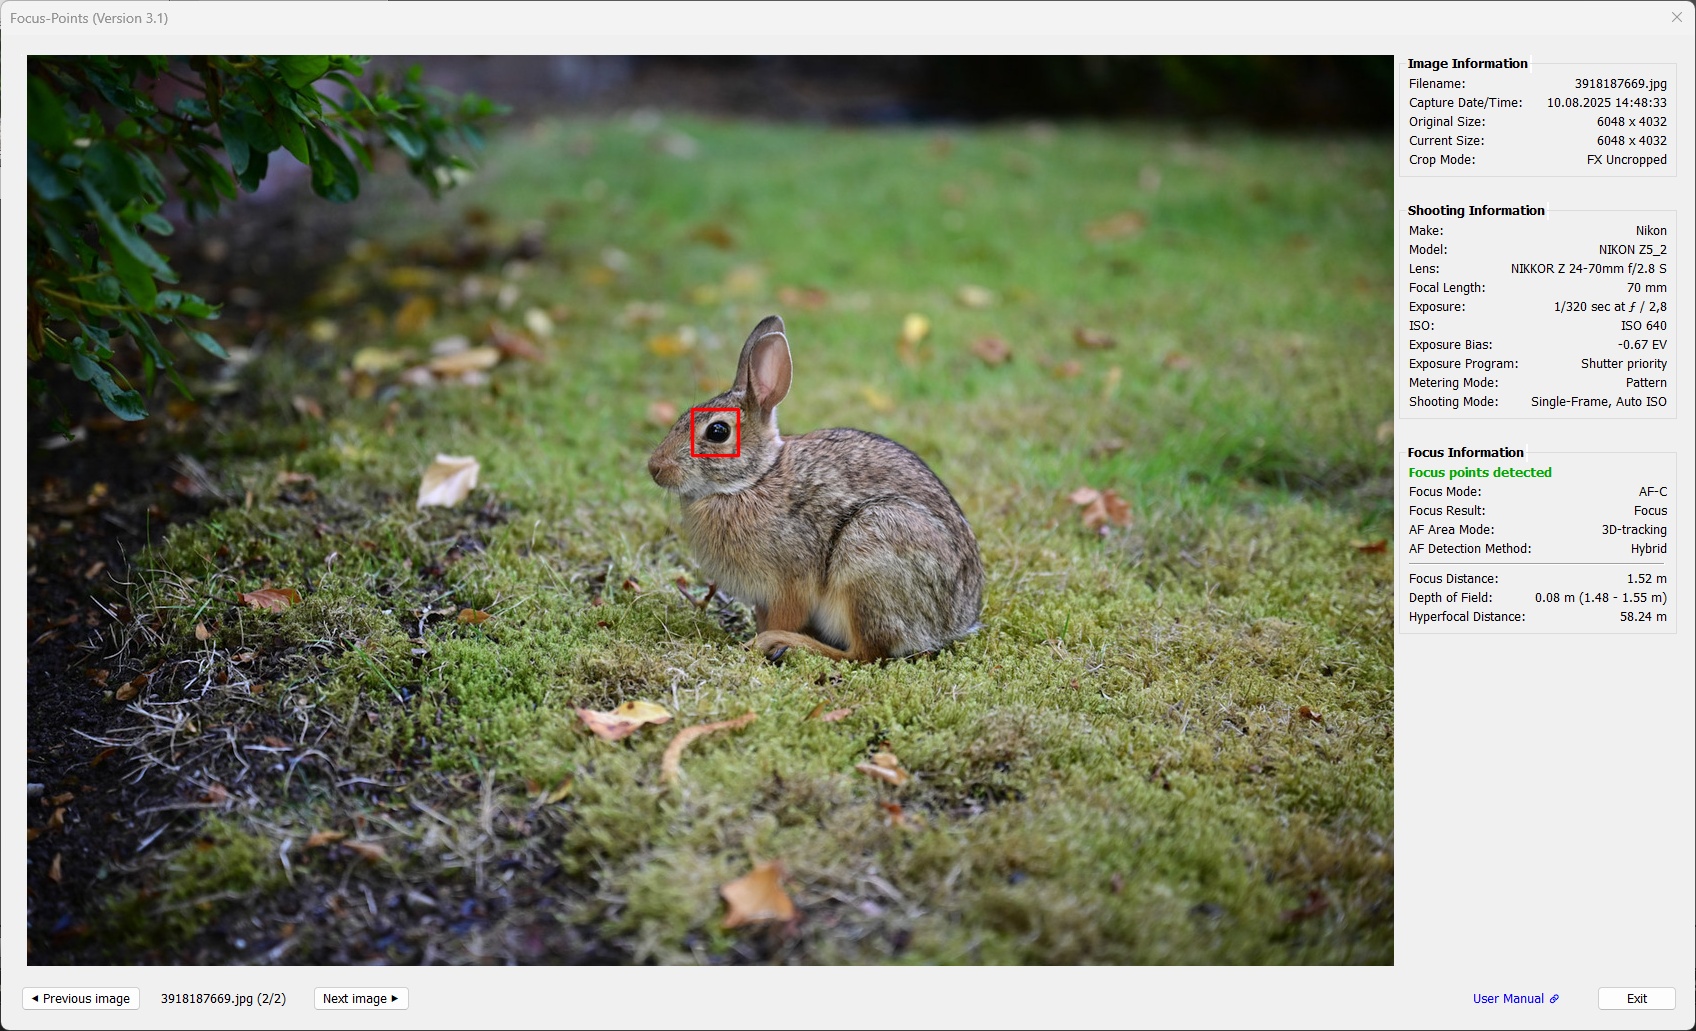
3.5 Olympus
Supported features:
| MAC | WIN | Color | Meaning |
|---|---|---|---|
|
|
red1 | Active AF point. Focus area, dimensions reported by the camera |
|
|
red1,2 | Active AF point. Focus location, pixel coordinates reported by the camera |
|
|
yellow | Face or eye detected by the camera in this area |
1 AF point color can be chosen from red, green, blue in Viewing Options.
2 ‘Focus-pixel’ shape and size can be chosen from different options (small box or medium/large with center dot) in Viewing Options.
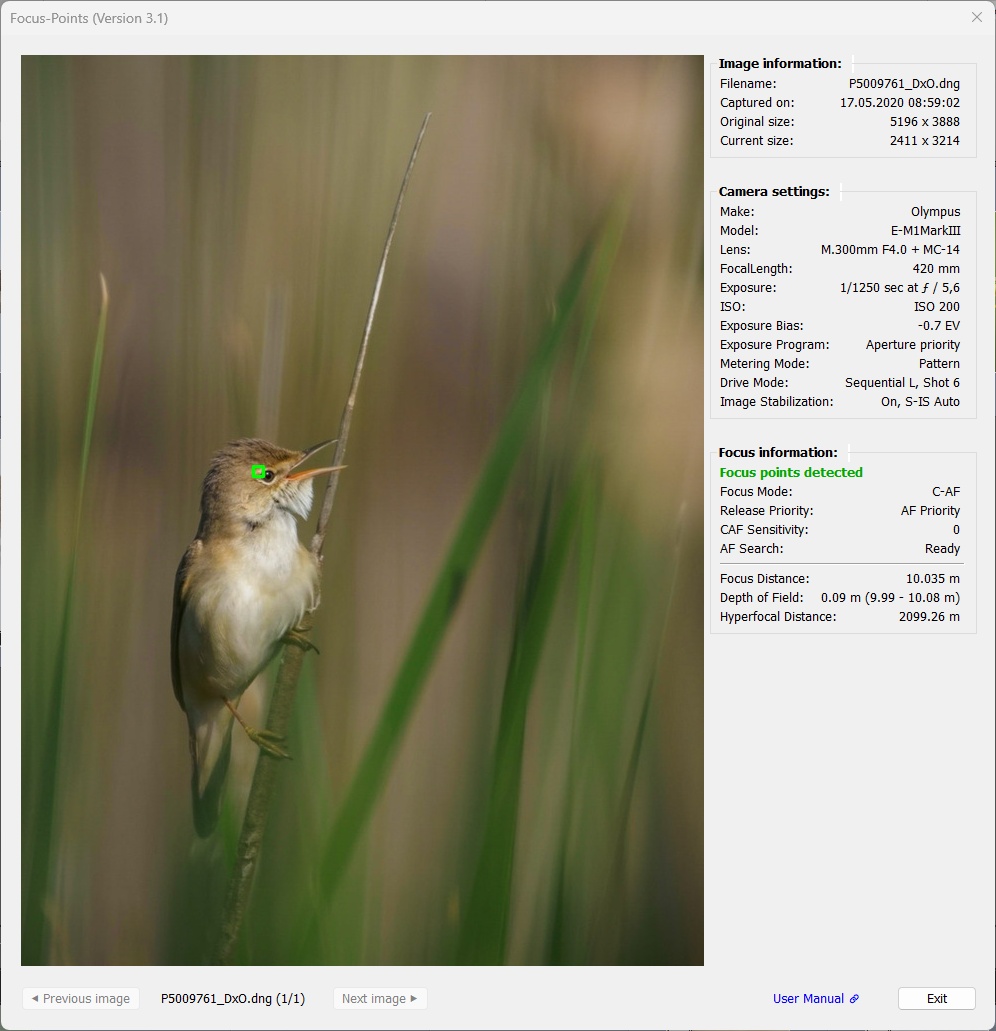
Since 2008, Olympus has been using the same format for storing autofocus information in EXIF for all of its mirrorless cameras (starting with the E-M5 in 2012) as well as the last E-System models (E-5, E-420, E-520, E-620). Therefore, the focus point display is the same for all these models. The AFPointSelected tag contains the pixel coordinates of the focus point. The size and color of the focus box can be adjusted in the plugin’s preferences.
Earlier E-System models used the AFAreas tag, which gives a fixed size area that is displayed without a center point.
Examples:
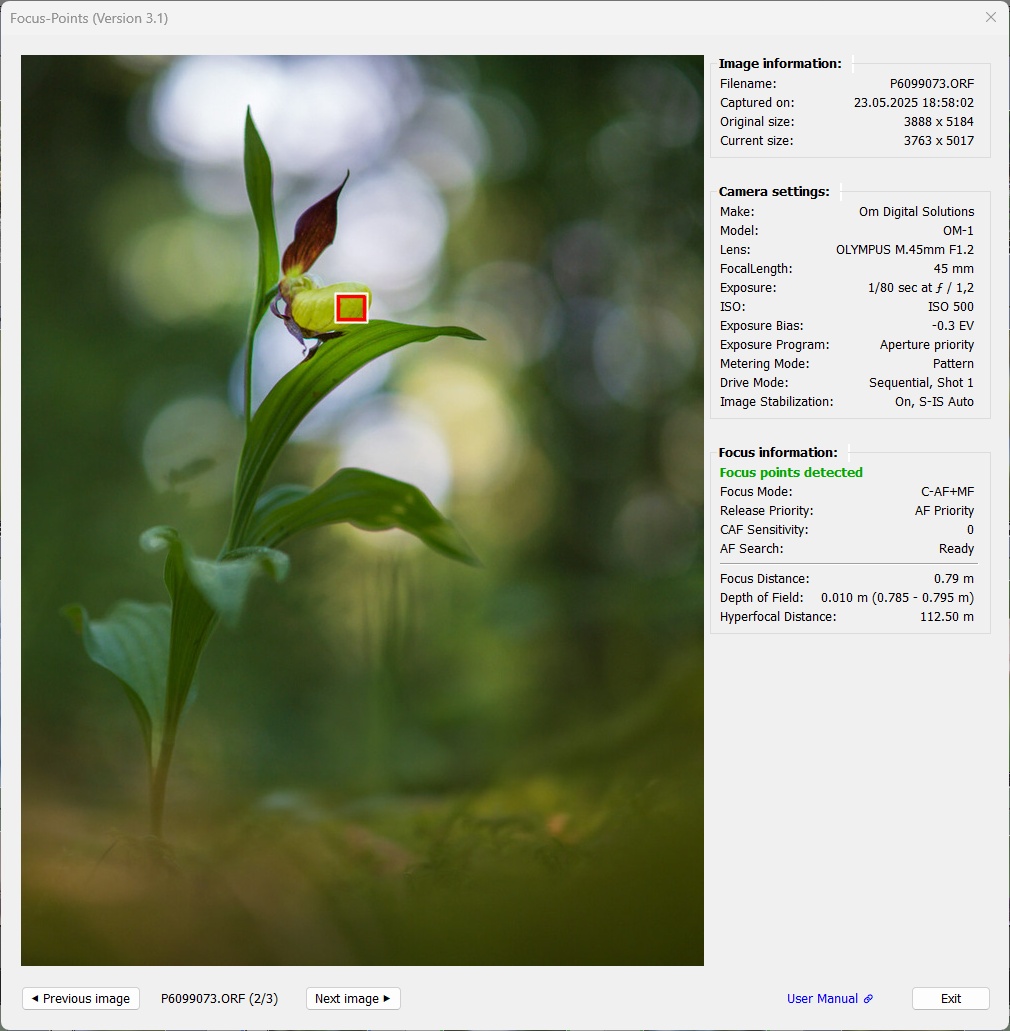
This is the typical display for all Olympus cameras from 2008 (E-420, E-520) to 2019 (E-M1X). A single focus point is reported as the focus position.
By tweaking the AF-Point settings, the focus point display can be adjusted to look like Olympus / OM shooters are used to from the OM Workspace application.
Olympus makernotes also contains information on face detection:
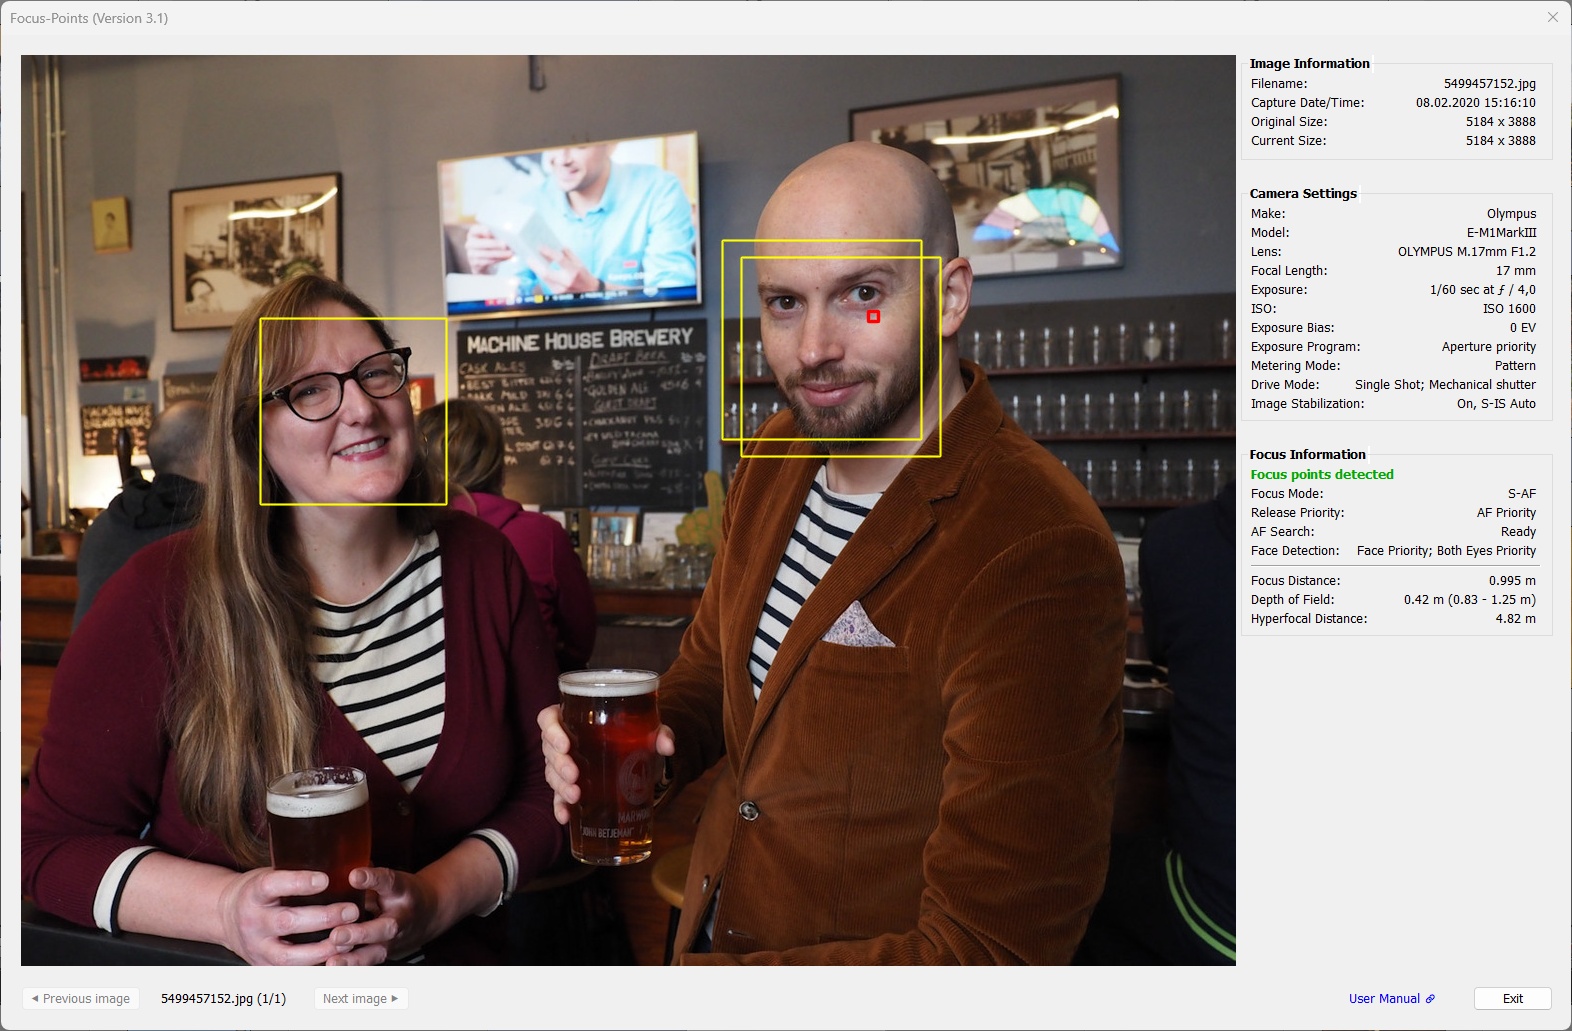
E-M1 Mark III shot with face detection and Both Eyes priority.
Olympus cameras store two sets of recognized faces (a maximum of eight faces per set). The exact position of a face may differ between the two sets, or a face present in one set may not be present in the other. Since it is neither possible to deduce which set has “better” information, nor to combine the information of the two sets (at least not with reasonable effort), all faces in both sets are visualized by yellow face detection frames.
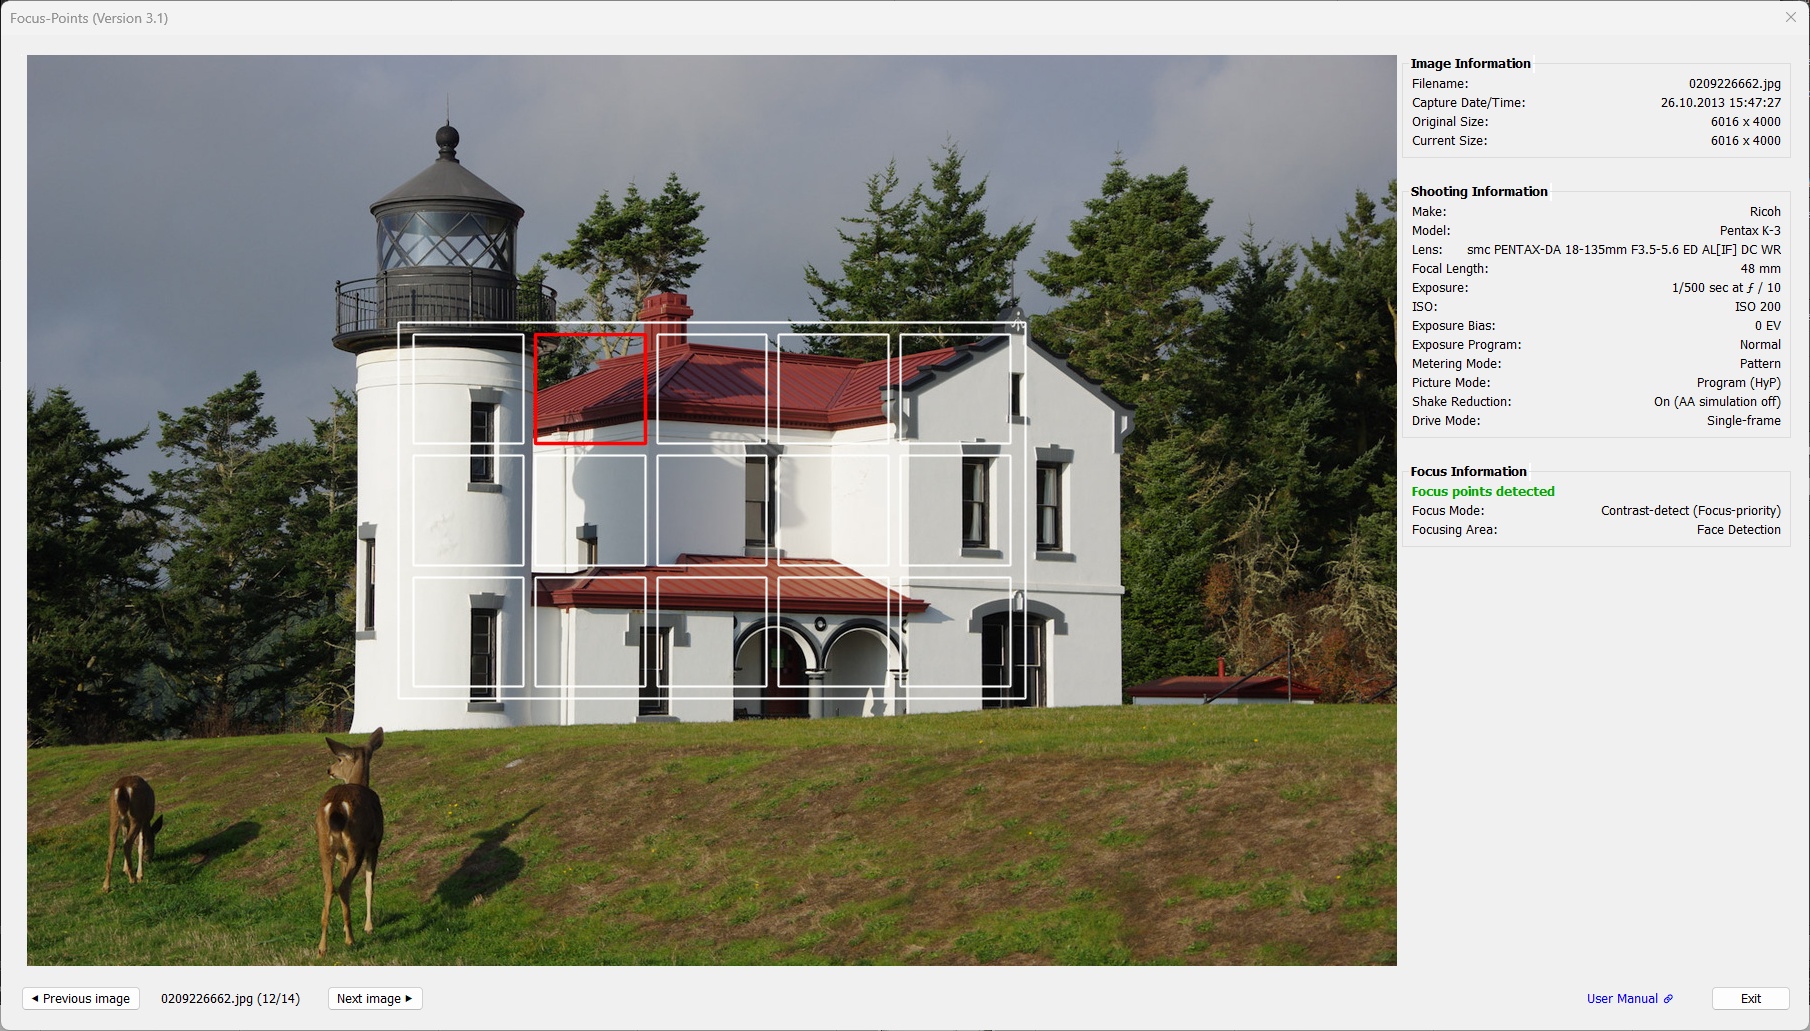
A typical example of a situation where no focus point is displayed.
Focus Information shows that the AFSearch tag has a value of “Not Ready”, which means that the camera was unable to lock focus when the shutter was pressed. A typical use case is when shooting with release priority or using the back button focus.
 Since V3.1 the plugin supports the whole E-System. While the benefit of supporting the focus point display for the old DSLR models is questionable3 due to their very limited number of AF points (e.g. the E-1 has only 3 AF points), the implementation effort was small since the pre-2008 E-System models follow a very similar logic as the mirrorless models. Instead of using
 AFPointSelected, the focus area stored in AFAreas can be used to visualize the focus point/area.
3 Using autofocus with a camera that has few focus points usually results in a two-step process: 1. focus on the desired point, then 2. hold the shutter button halfway down and pan the camera to achieve the desired composition. While this can produce great results, it’s impossible to reconstruct the actual focus point. However, the focus point indicator can be useful for action shots, as “focus and pan” is not the best way to capture such scenes.
3.6 OM System
Supported features:
| MAC | WIN | Color | Meaning |
|---|---|---|---|
|
|
red1 | Active AF point. Focus area, dimensions reported by the camera |
|
|
red1,2 | Active AF point. Focus location, pixel coordinates reported by the camera |
|
|
white | User-selected AF point |
|
|
yellow | Face, subject or detail detected by the camera in this area |
1 AF point color can be chosen from red, green, blue in Viewing Options.
2 ‘Focus-pixel’ shape and size can be chosen from different options (small box or medium/large with center dot) in Viewing Options.
With the release of plugin version V3.1, OM System has its own chapter in this user documentation. This is mainly because previously unknown metadata tags have been identified and decoded: AFSelection, AFFocusArea and SubjectDetectionArea.
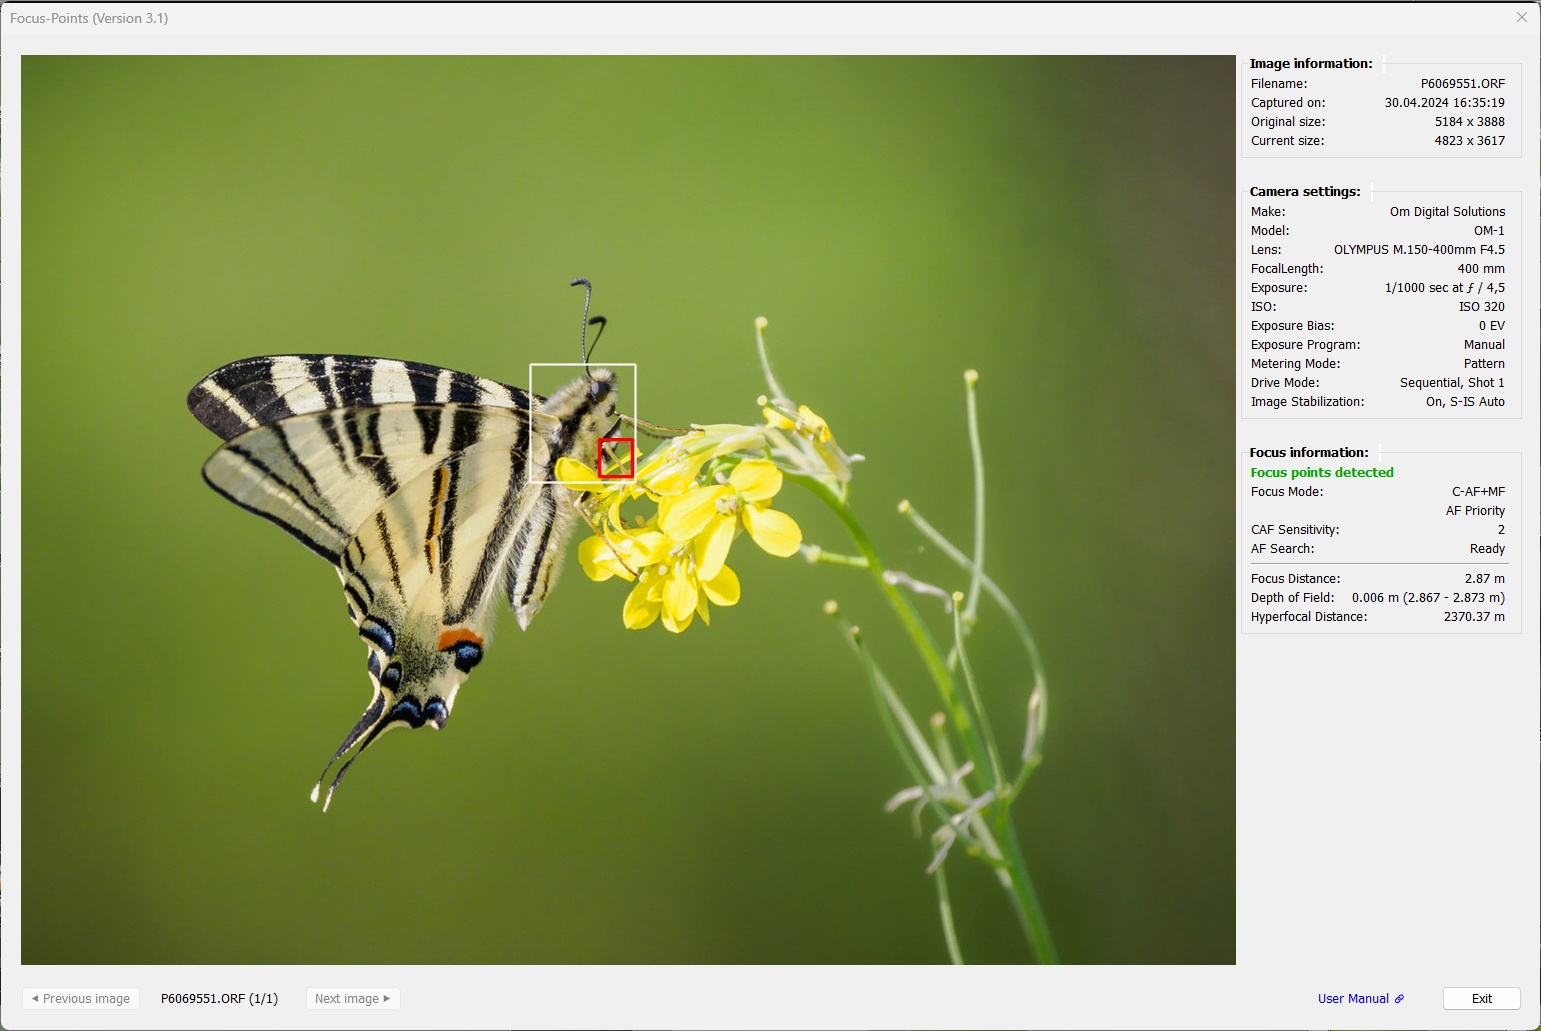
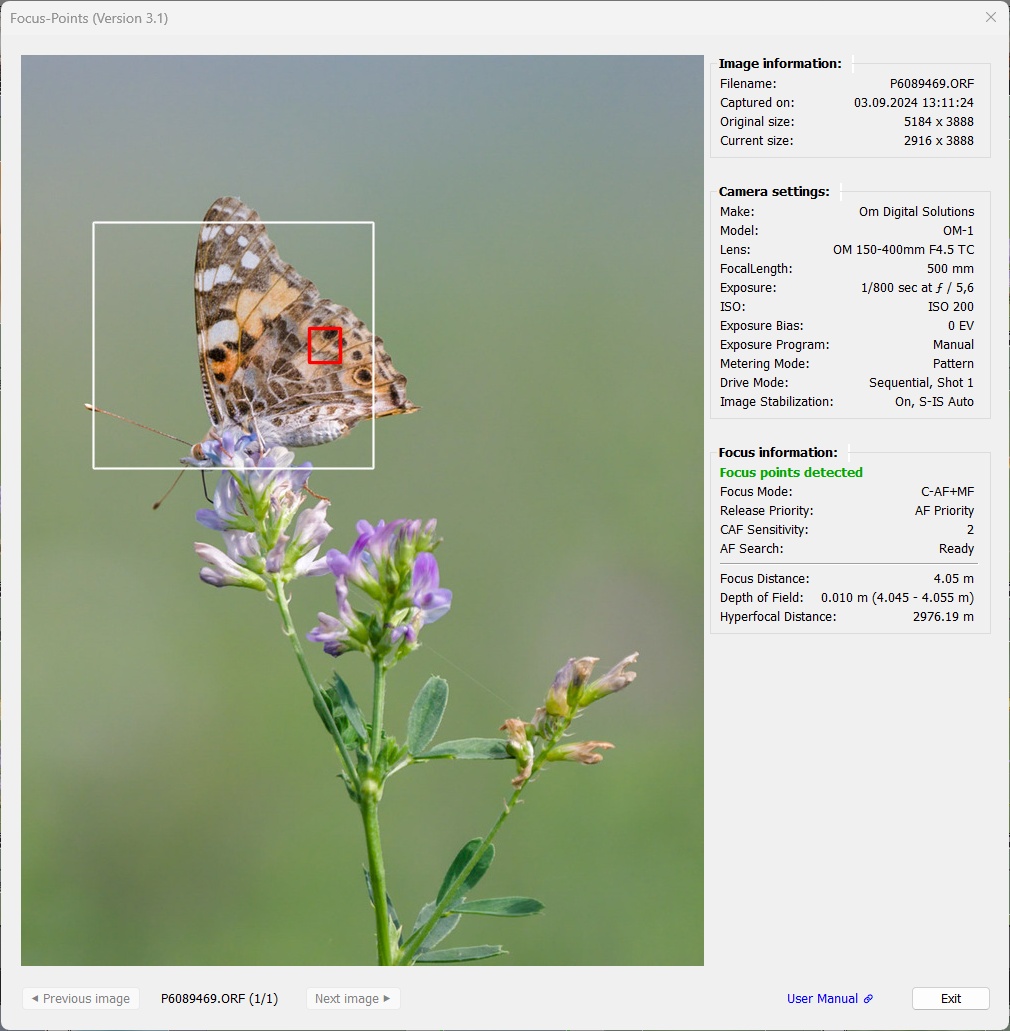
With this information, it is possible to visualize not only the AF area selected by the user and the point of focus, but also the frames used to detect the subject. These frames are the same frames that you can see in the viewfinder or on the camera display when shooting with Subject Detection enabled.
3.6.1 OM System - AF Selection
The AF area selected by the user is highlighted in white. The focus area is displayed in the color specified in the plugin preferences. The size of the focus area cannot be selected, as the dimensions are set by the camera.
Here are some examples for visualization of in-focus vs selected AF points (subject detection mode OFF):
“Single” AF Area selected
“Small” AF Area selected
“Medium” AF Area selected
“Custom” AF Area selected
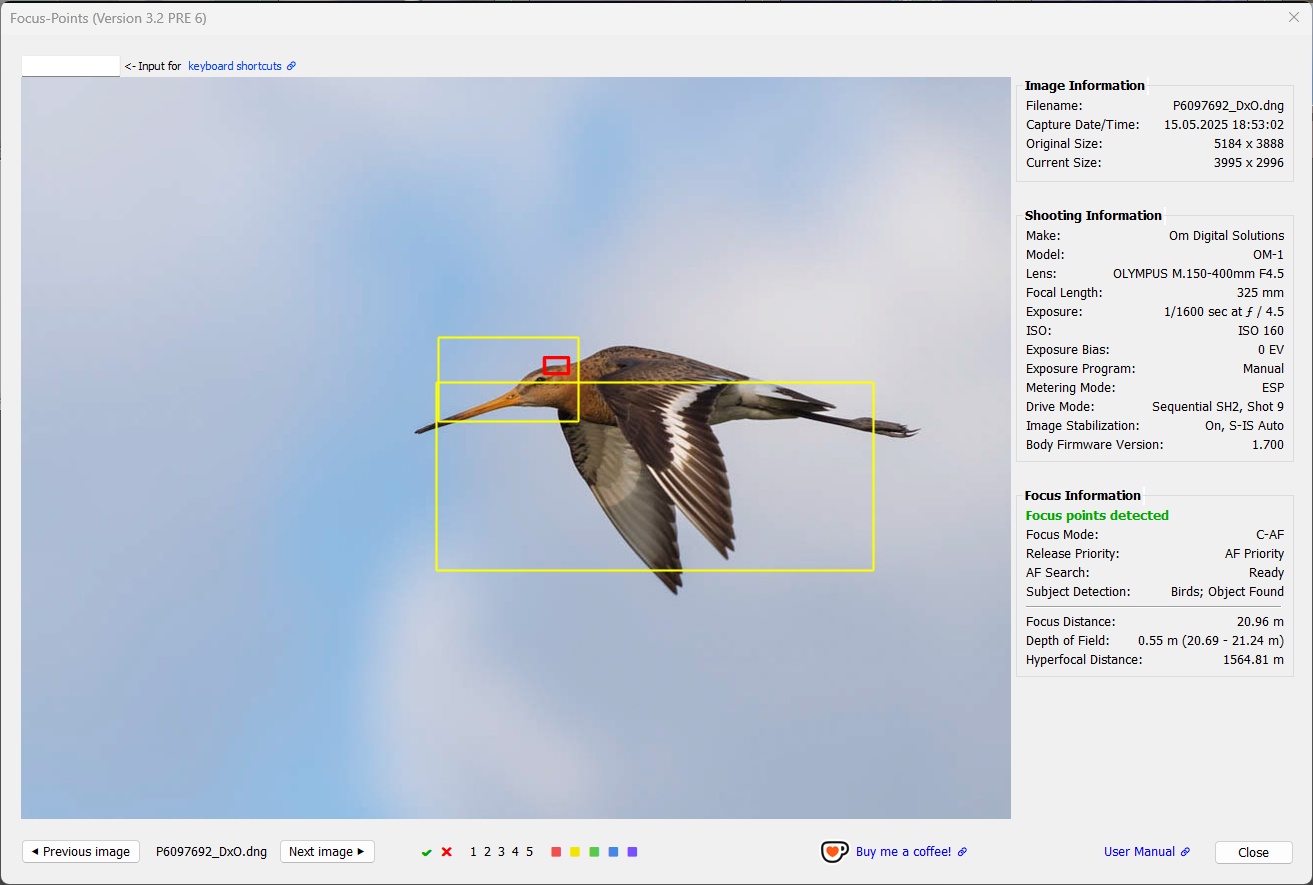
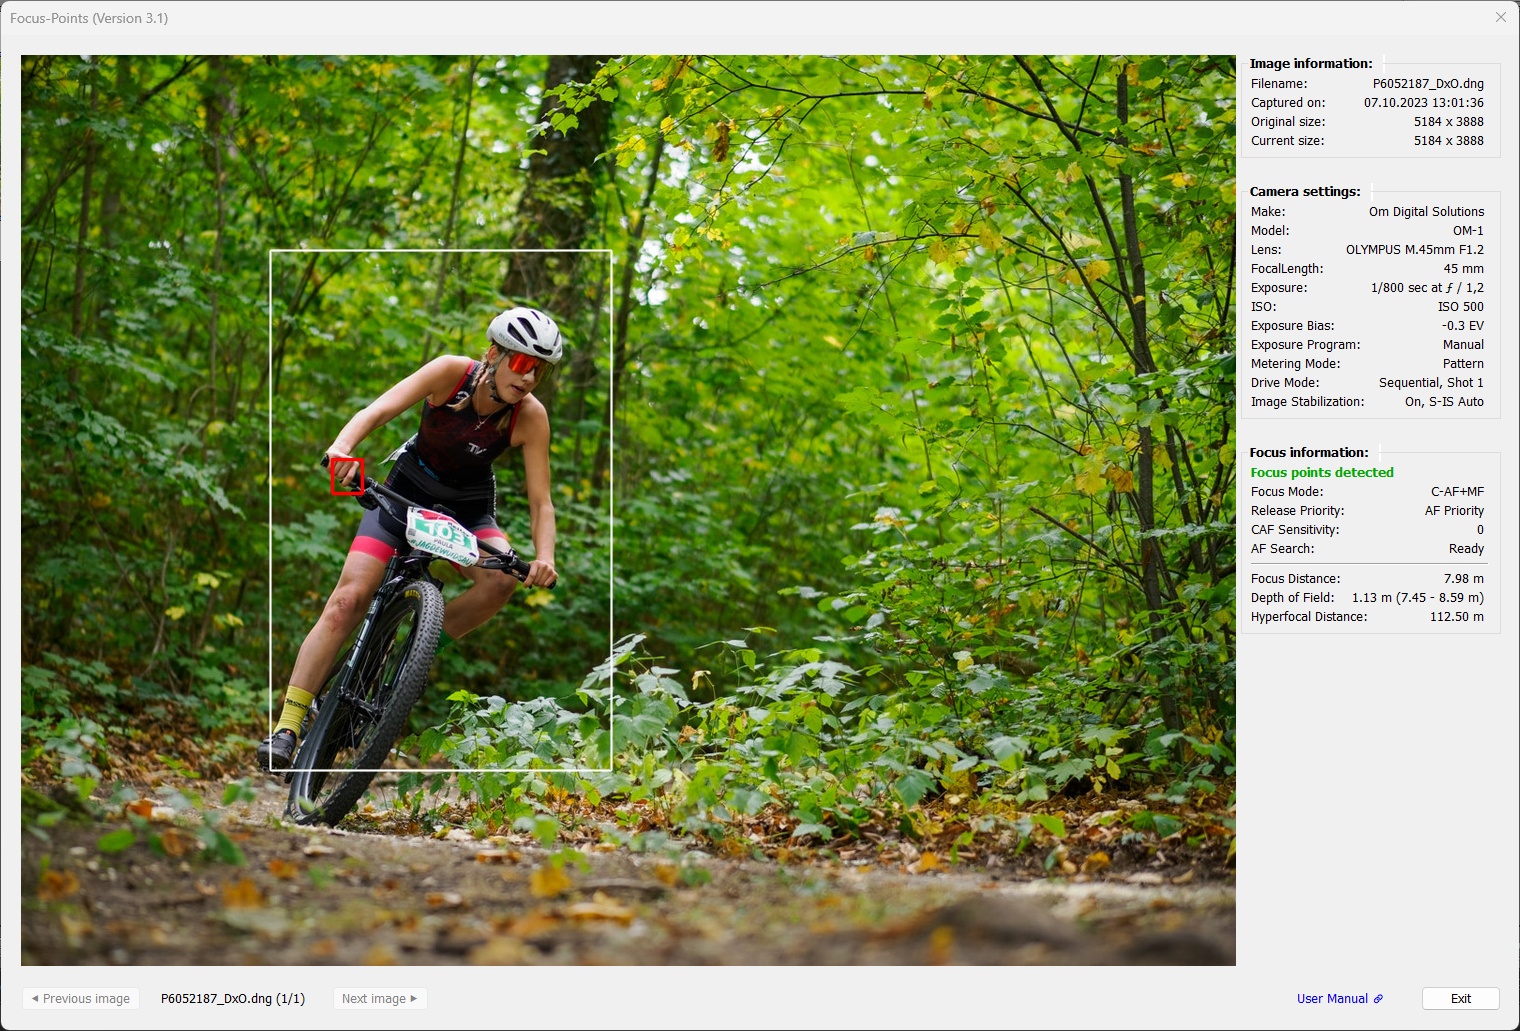
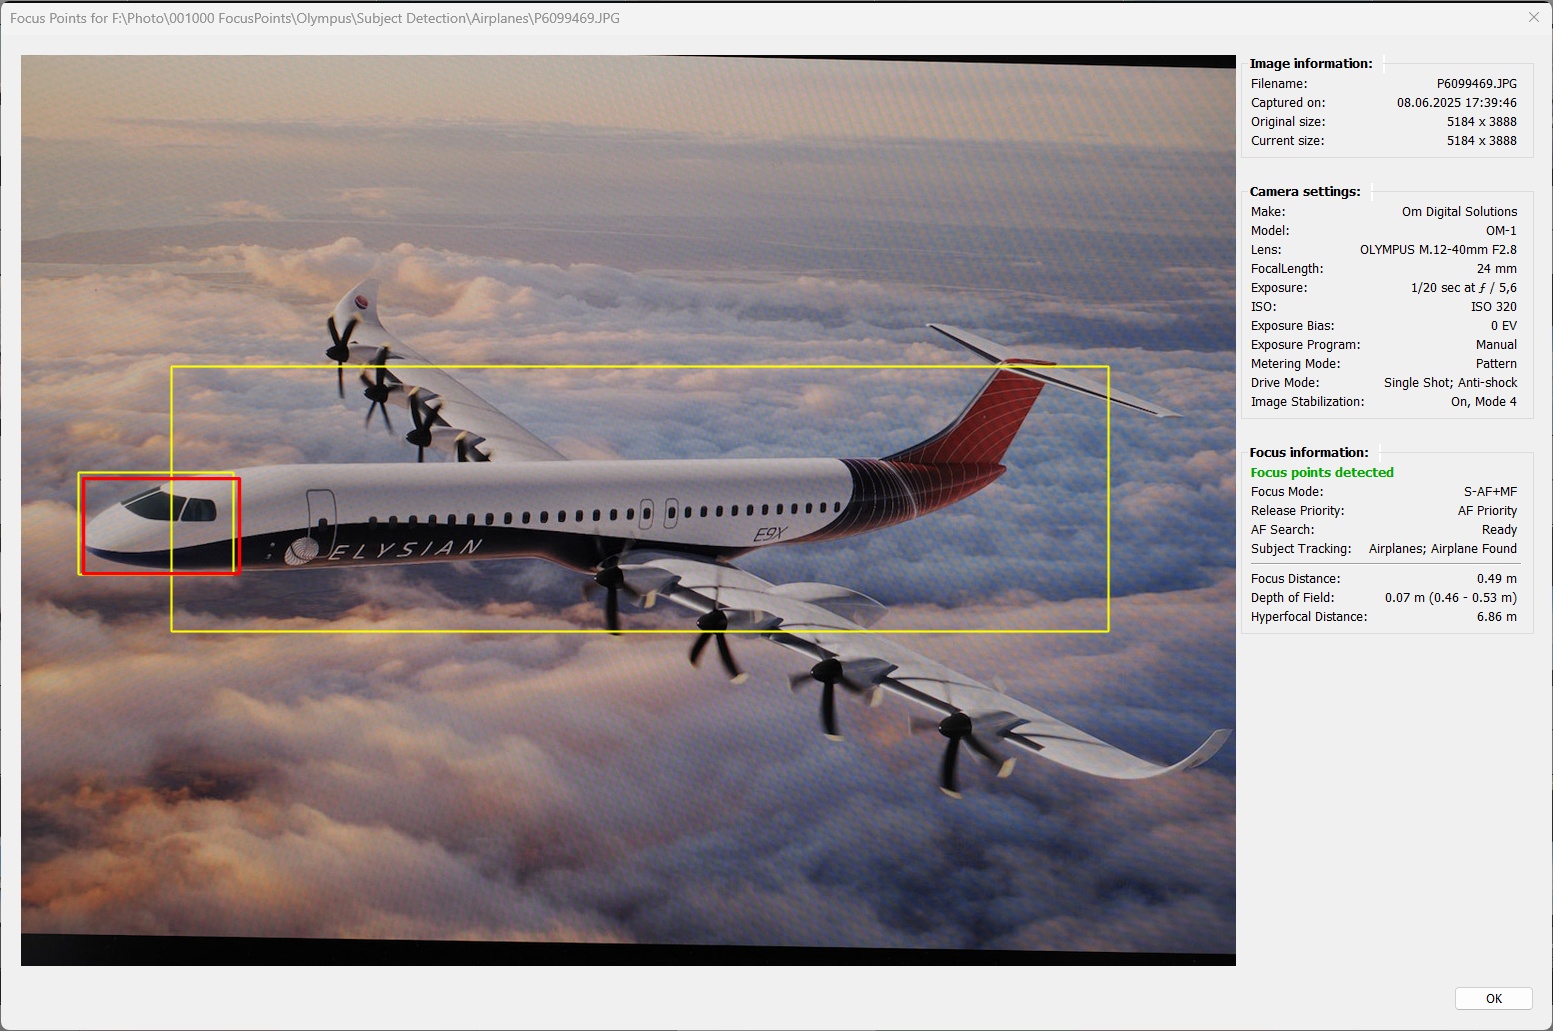
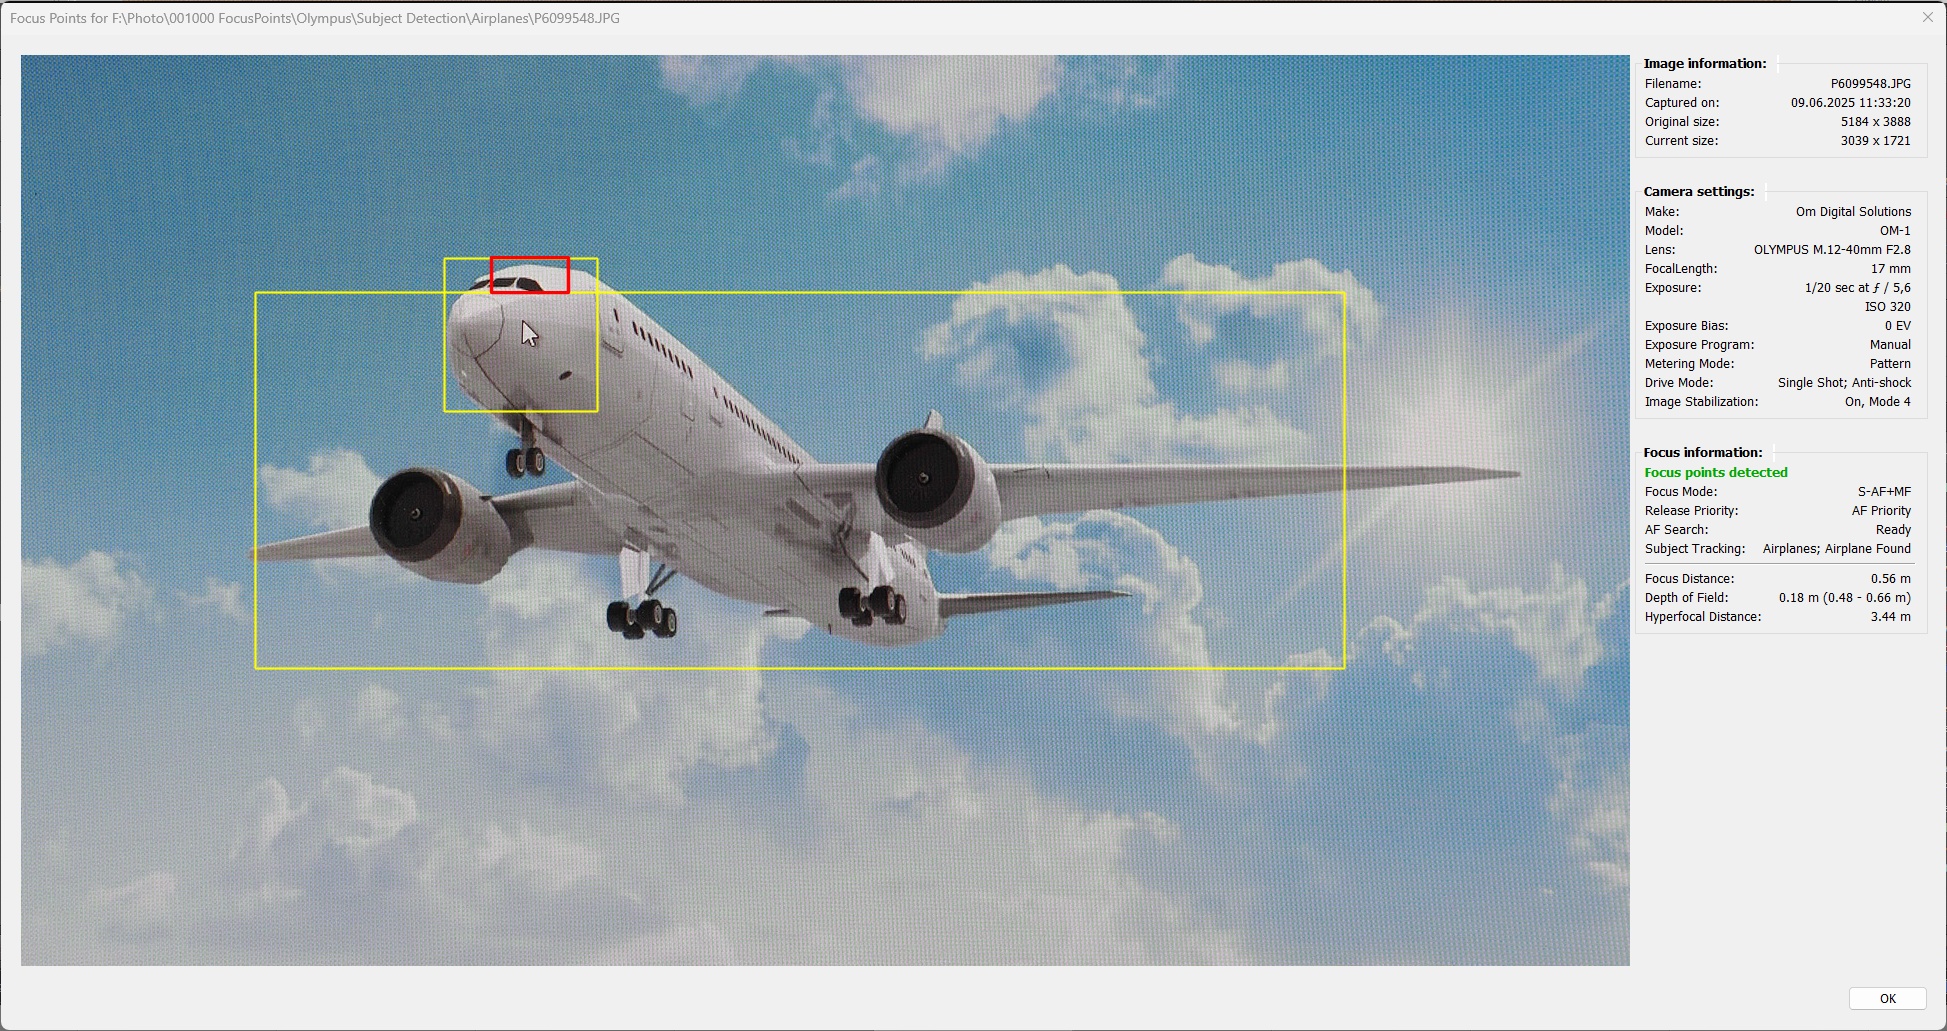
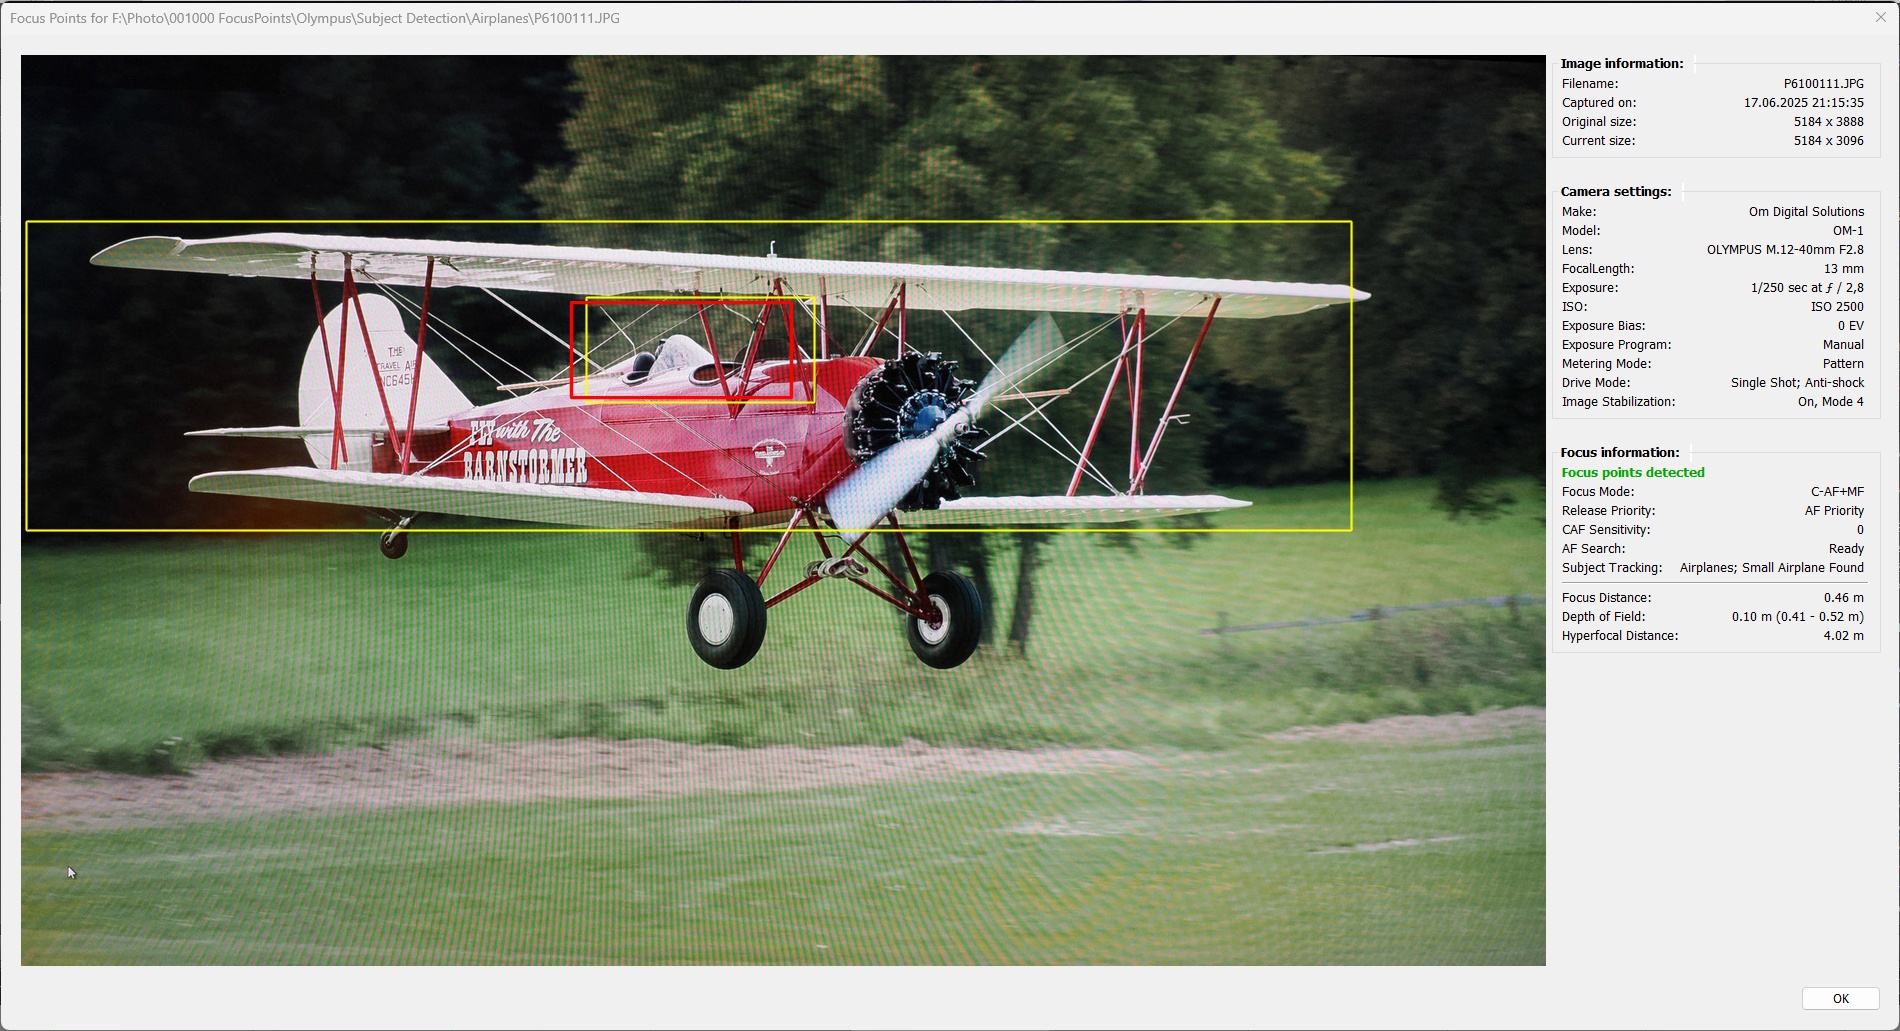
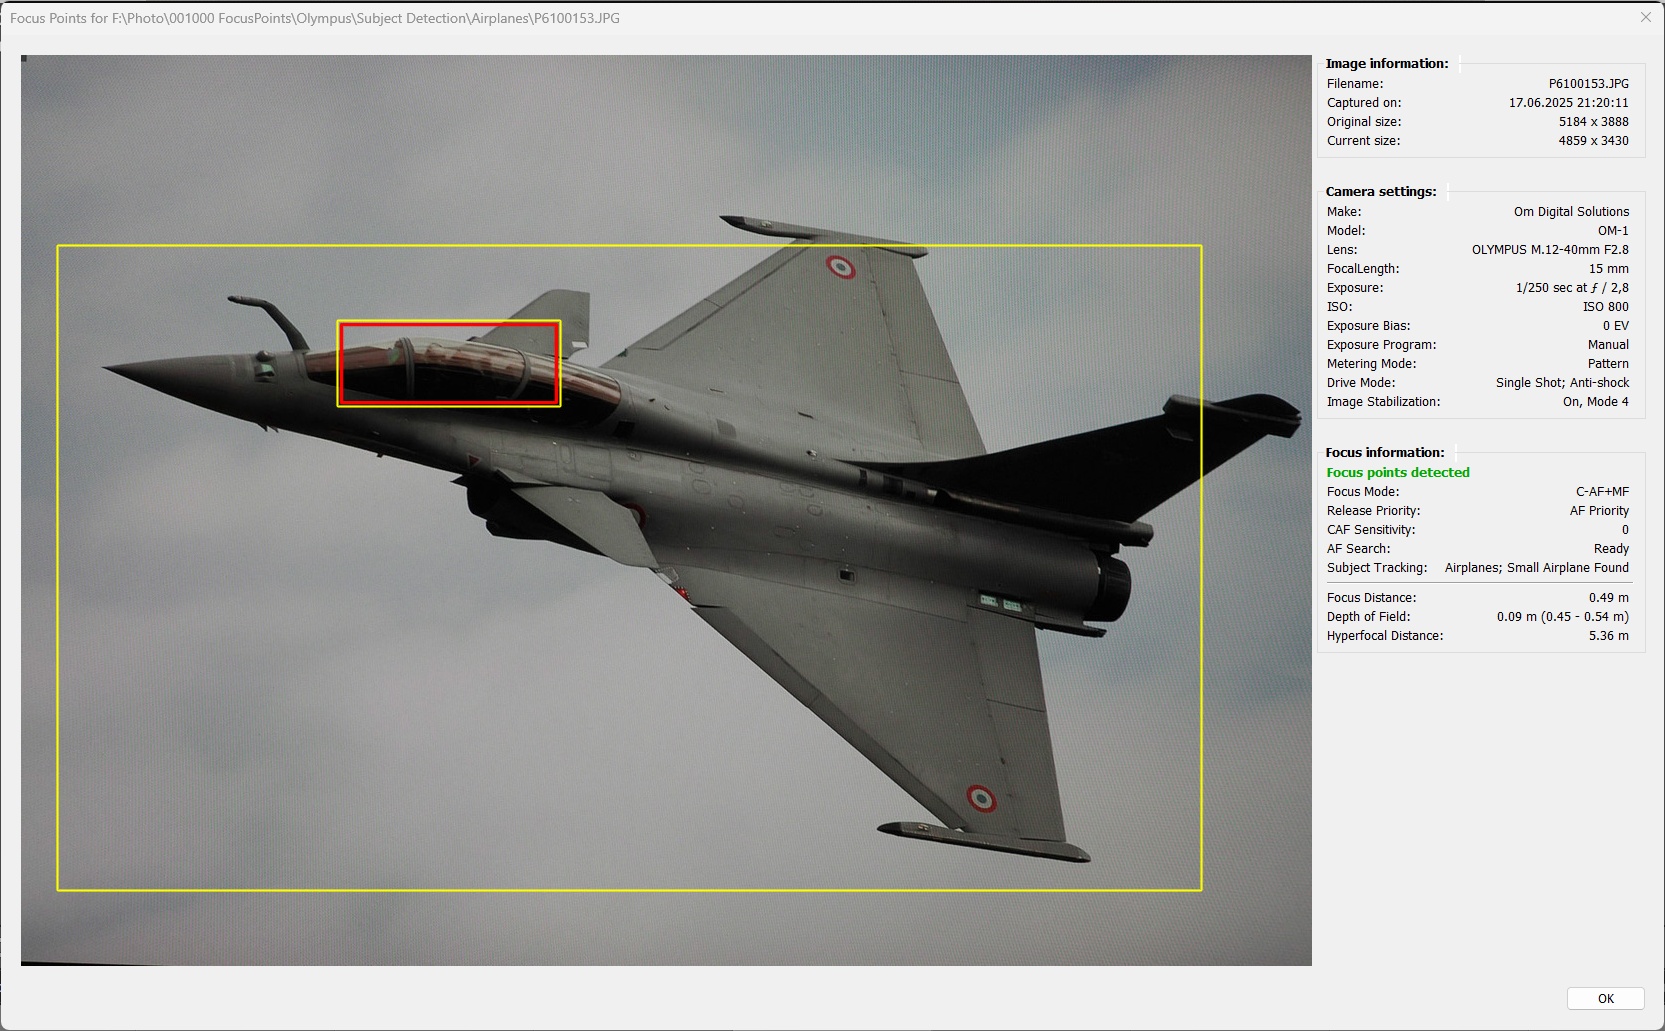
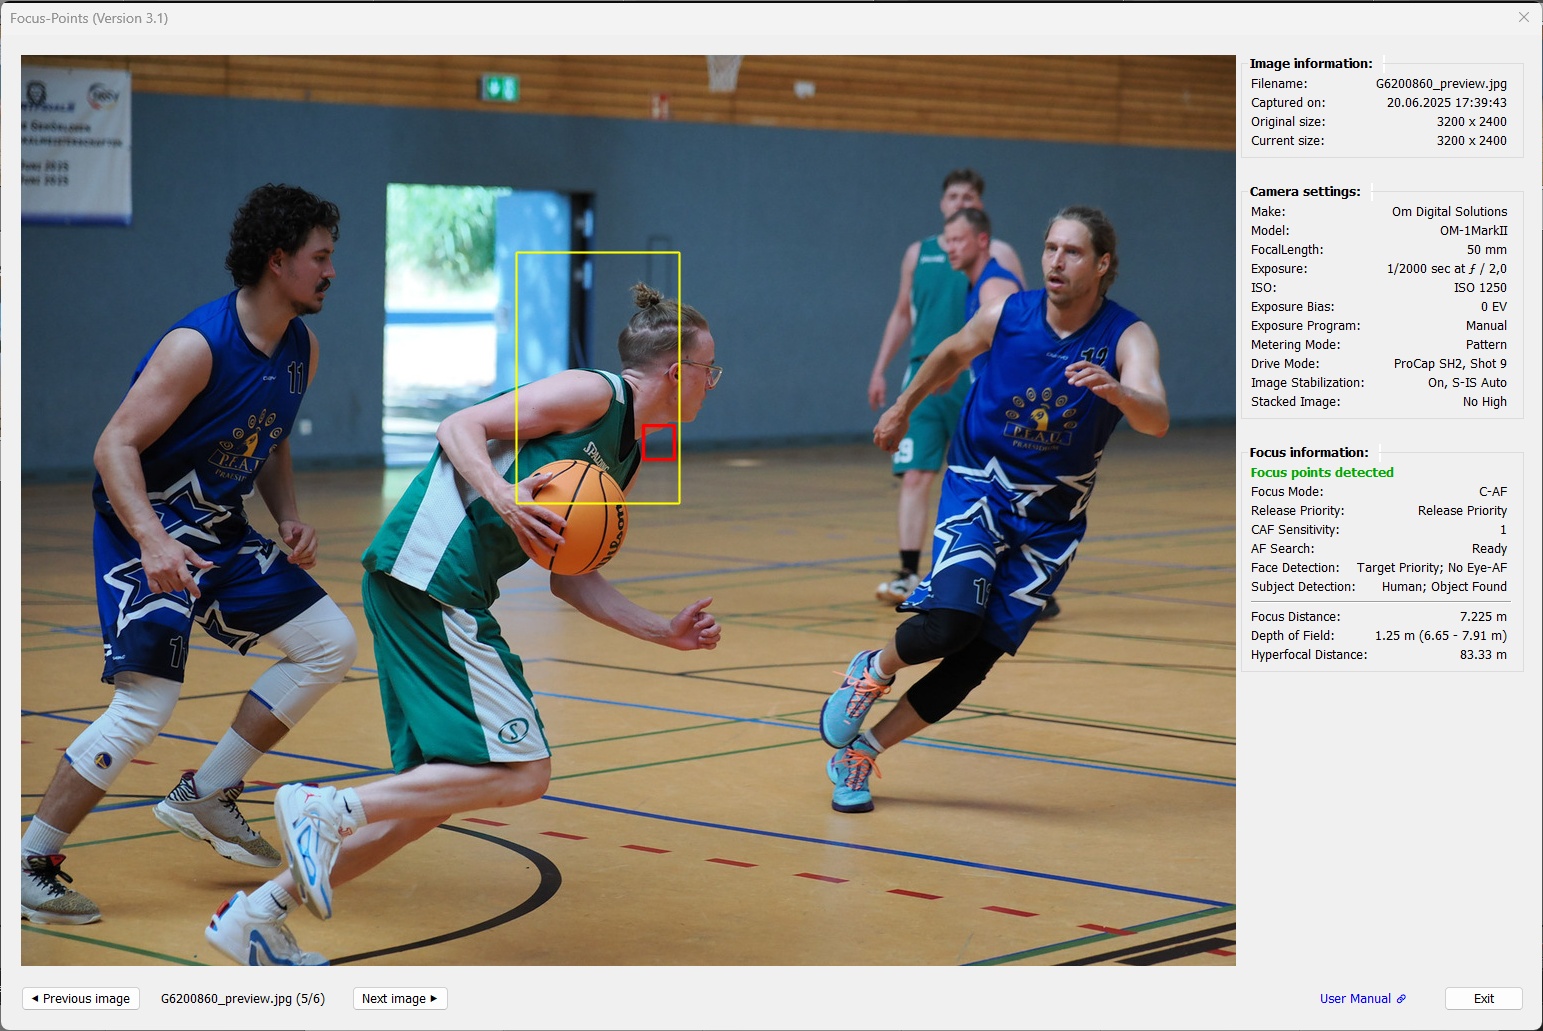
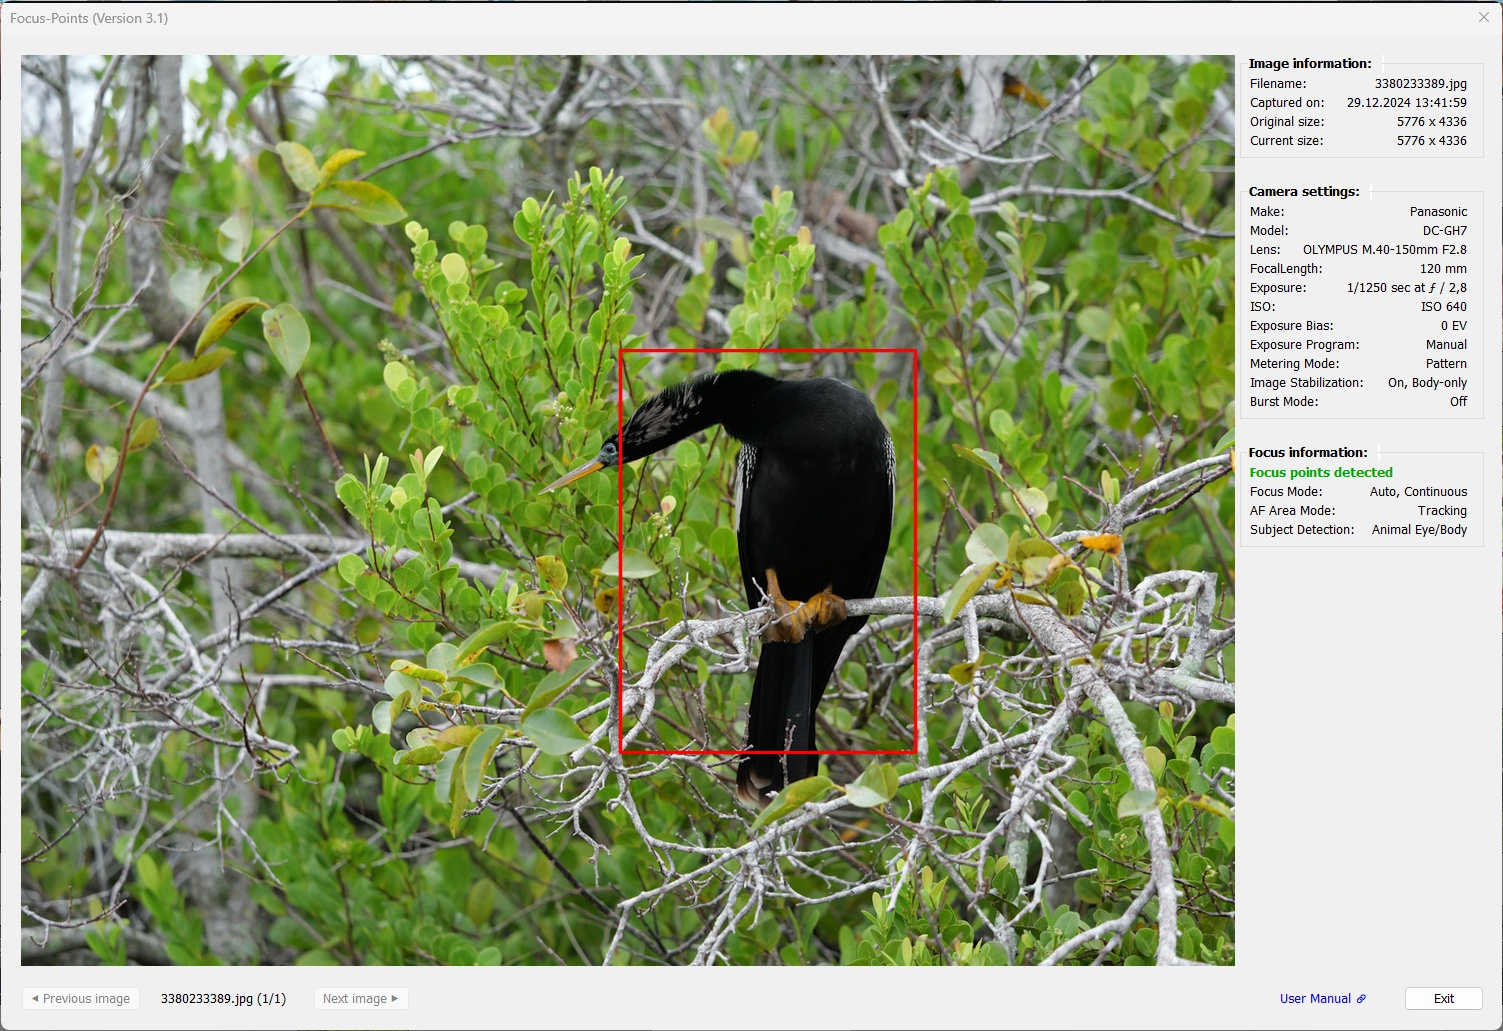
3.6.2 OM System - Subject Detection
The plugin visualizes the subject detection frames as they appear in the viewfinder/on-camera display at the time of capture, according to the available subject detection modes:

The subject and subject detail detection frames are displayed in yellow. The focus area is displayed in the color specified in the plugin preferences. The size of the focus area cannot be selected, as the dimensions are set by the camera. The focus area has a center because the center of this area coincides with the coordinates specified by the AFPointSelected tag.
Birds:
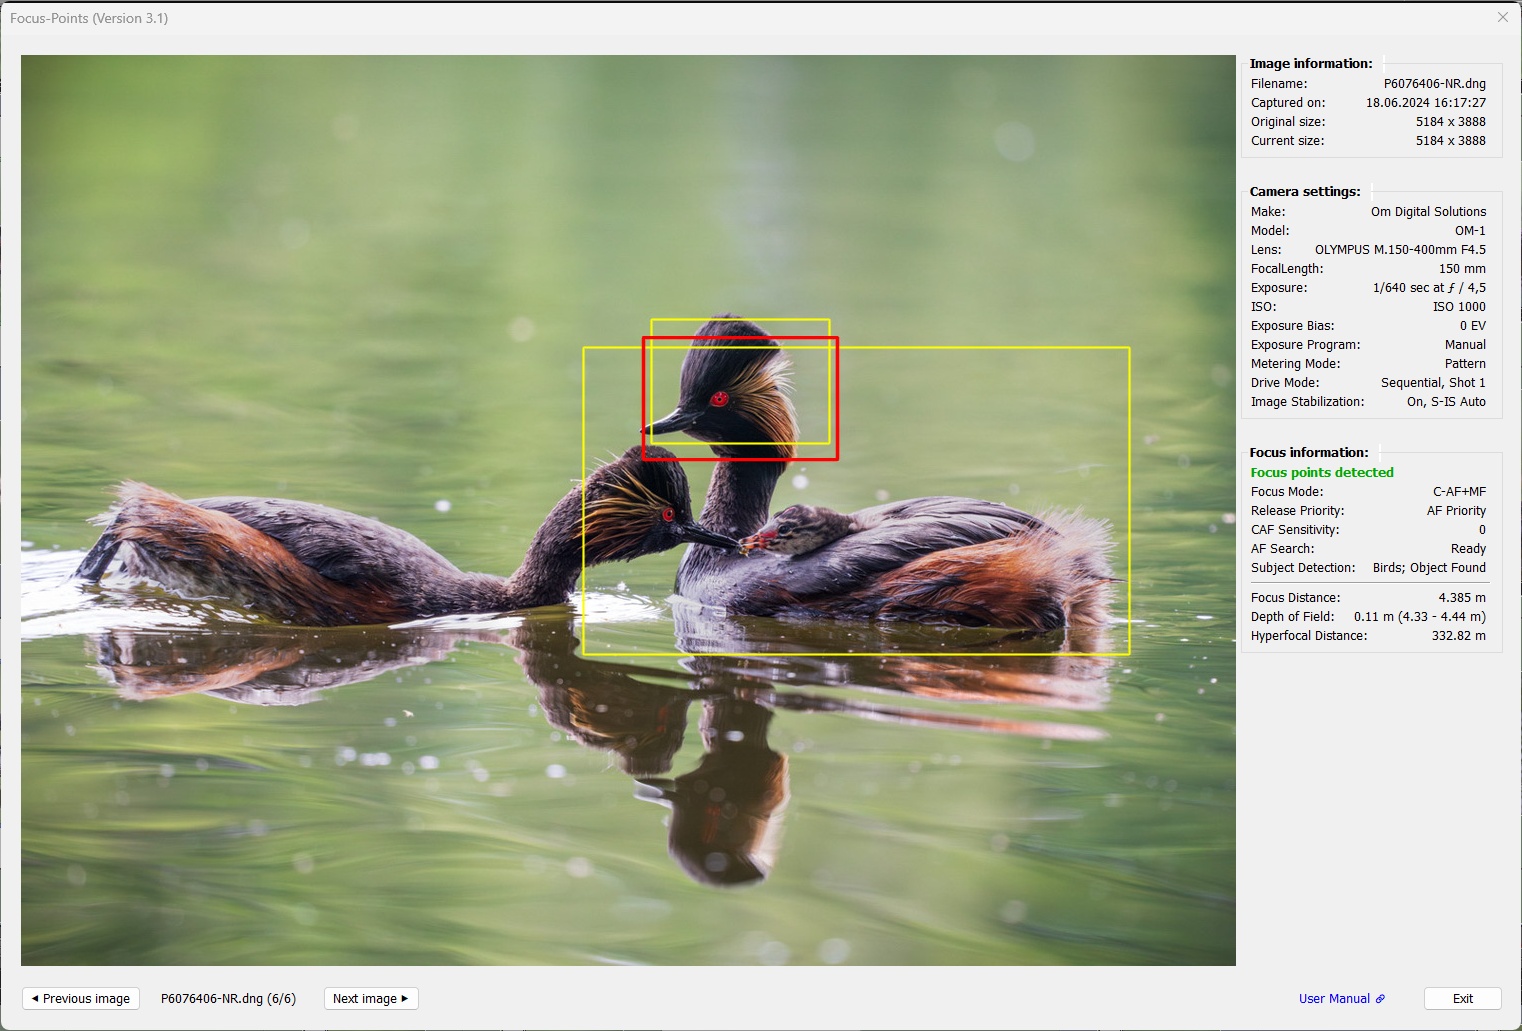
Body and head detected, focus is on the head.
Body and head eye detected, focus is on the eye.
Body and eye detected, focus is on the eye.
Dogs & Cats:
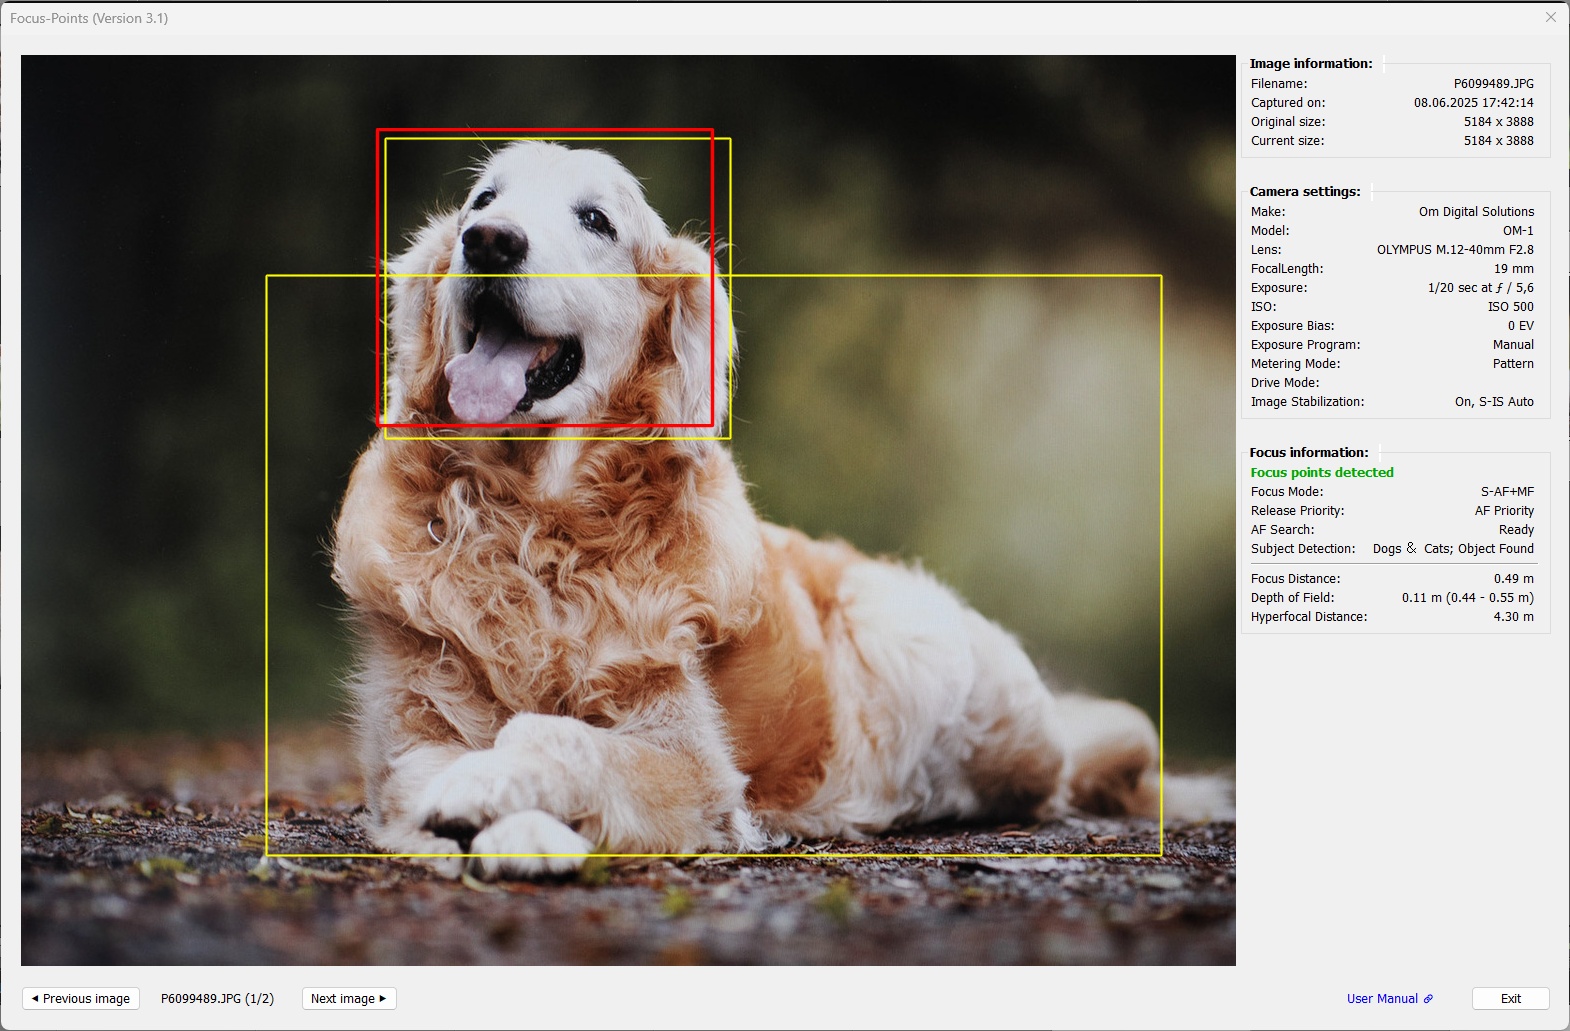
Body and head detected, focus is on the head
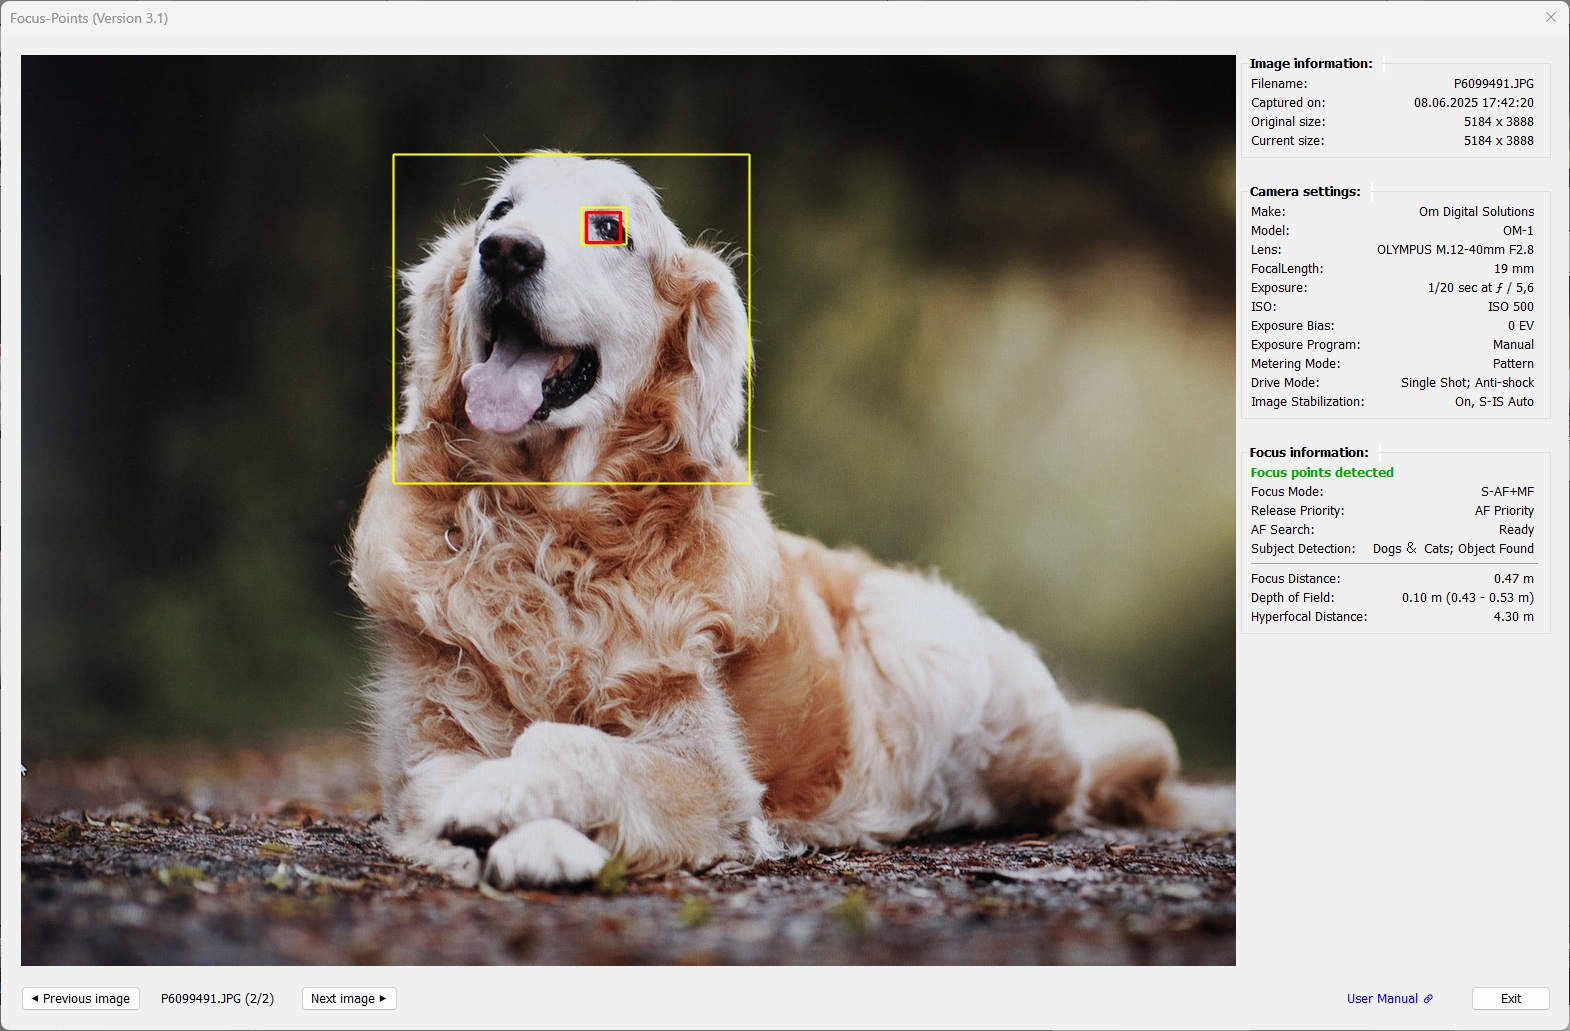 Same subject and scene, better detection - head and eye detected, focus is on the eye
Motorsports:
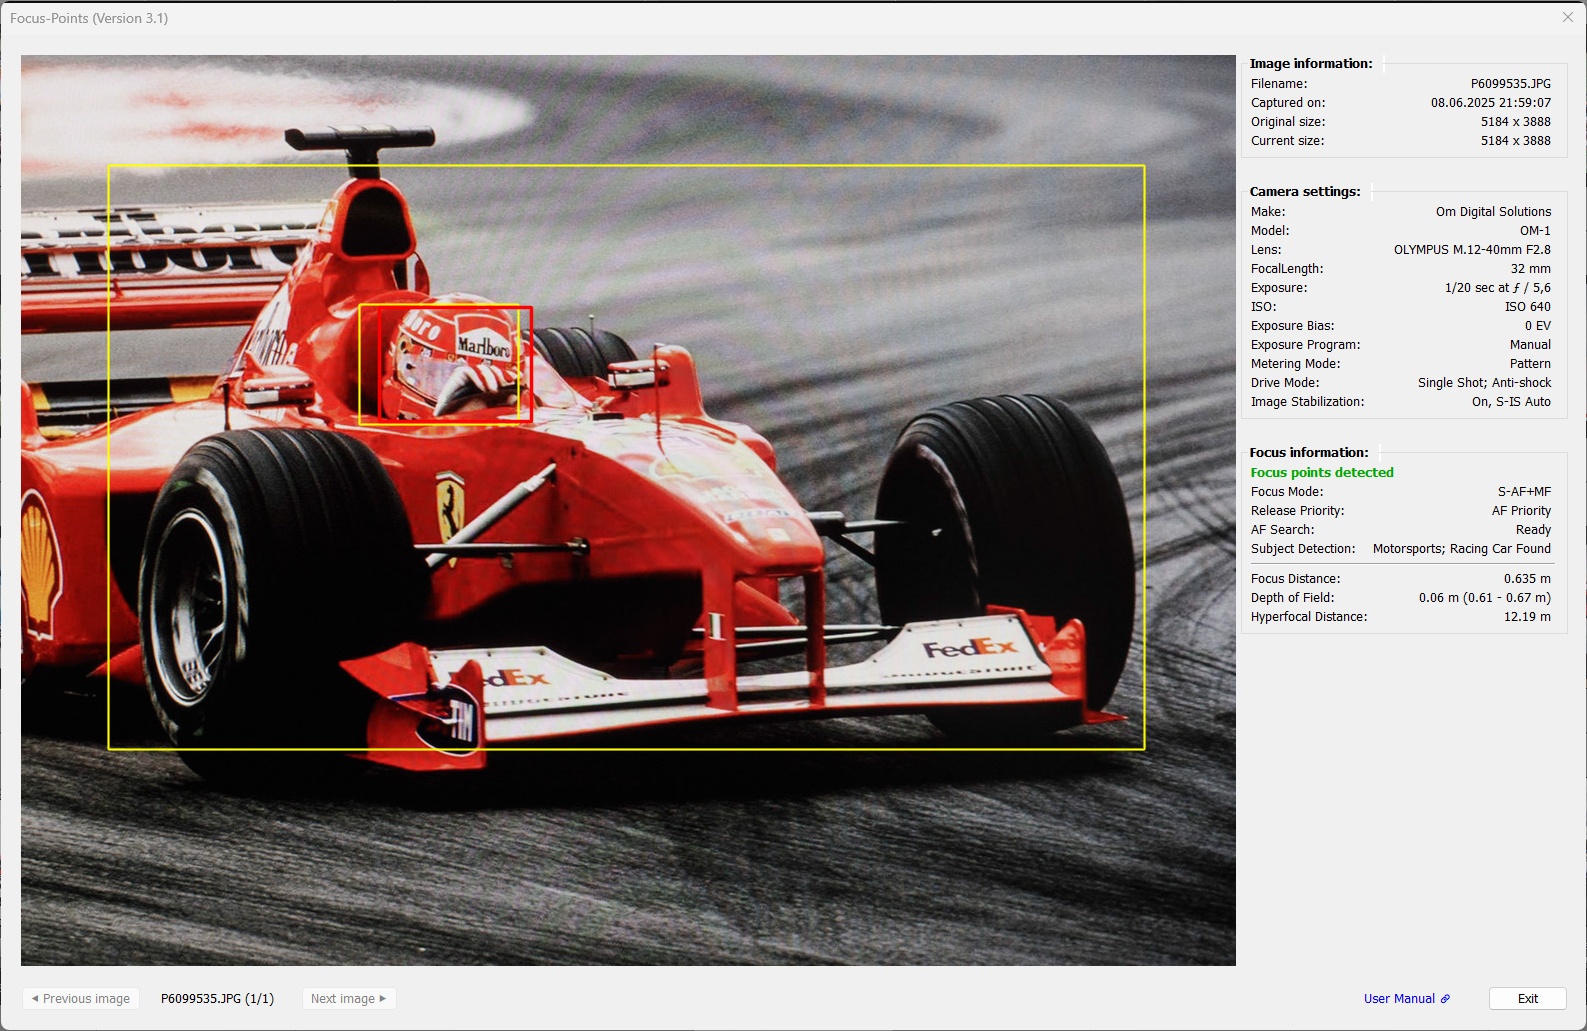
Racing car found, chassis and driver detected. Focus is on the driver.
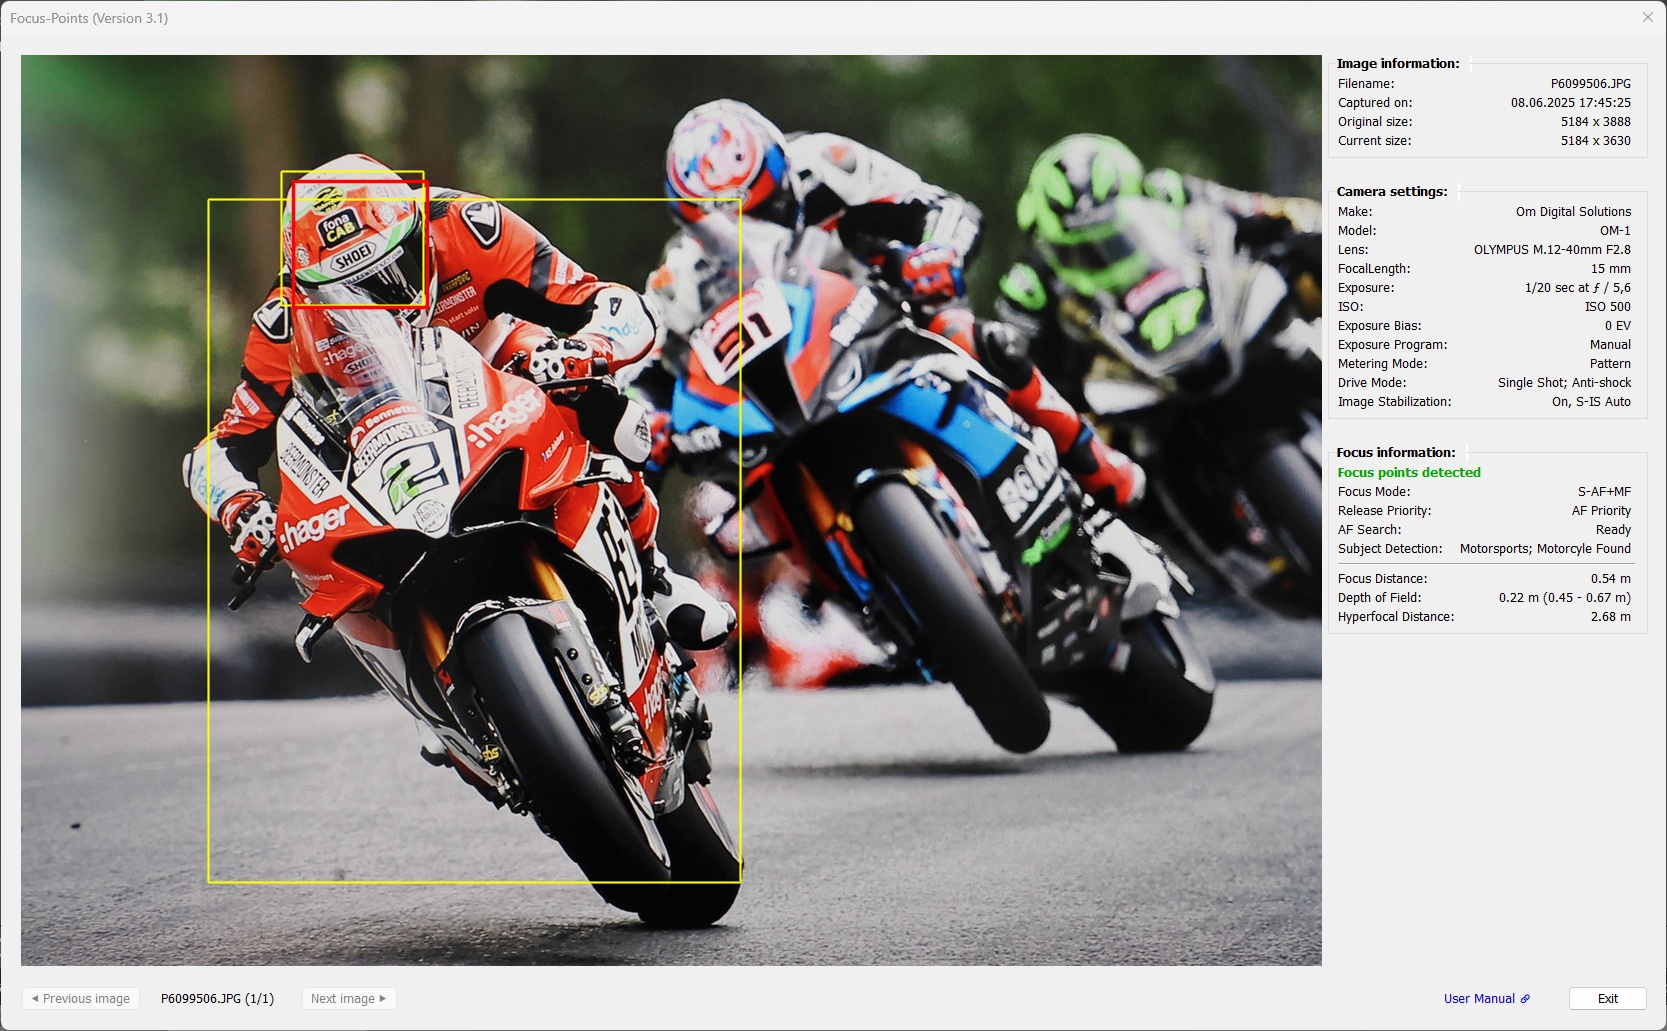
Motorcycle found, vehicle and driver detected. Focus is on the driver.

Car found, chassis and front detected. Focus is on the front.
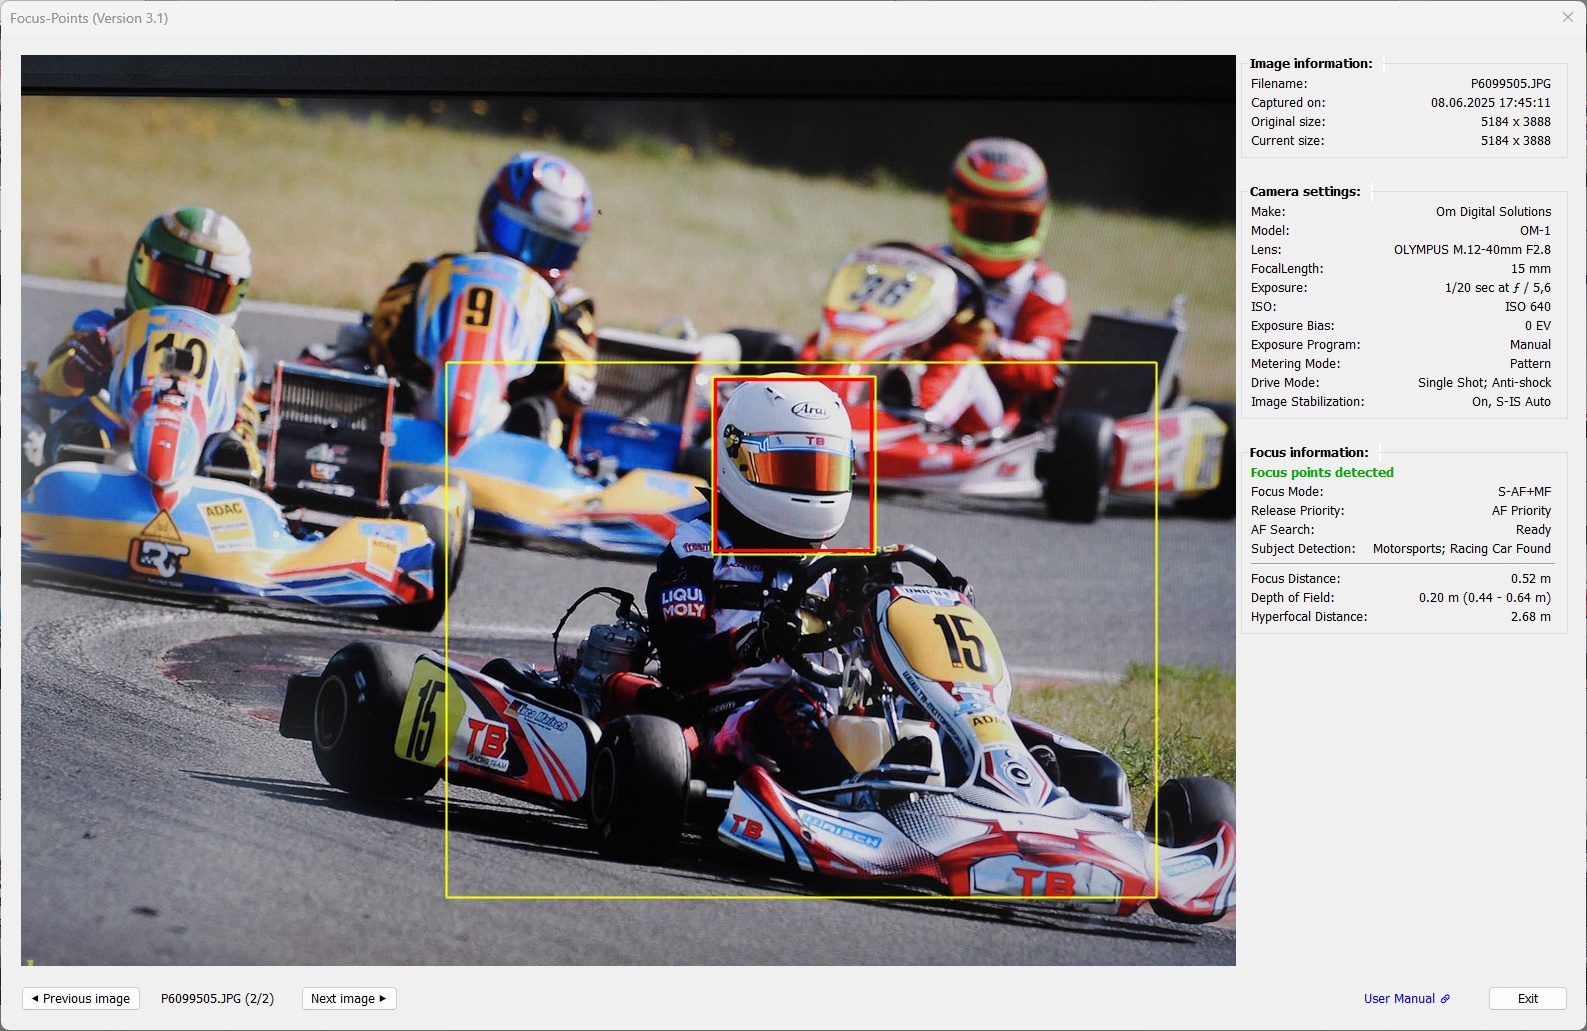
The cart is detected as racing car, chassis and driver detected. Focus is on the driver.
Airplanes
Trains
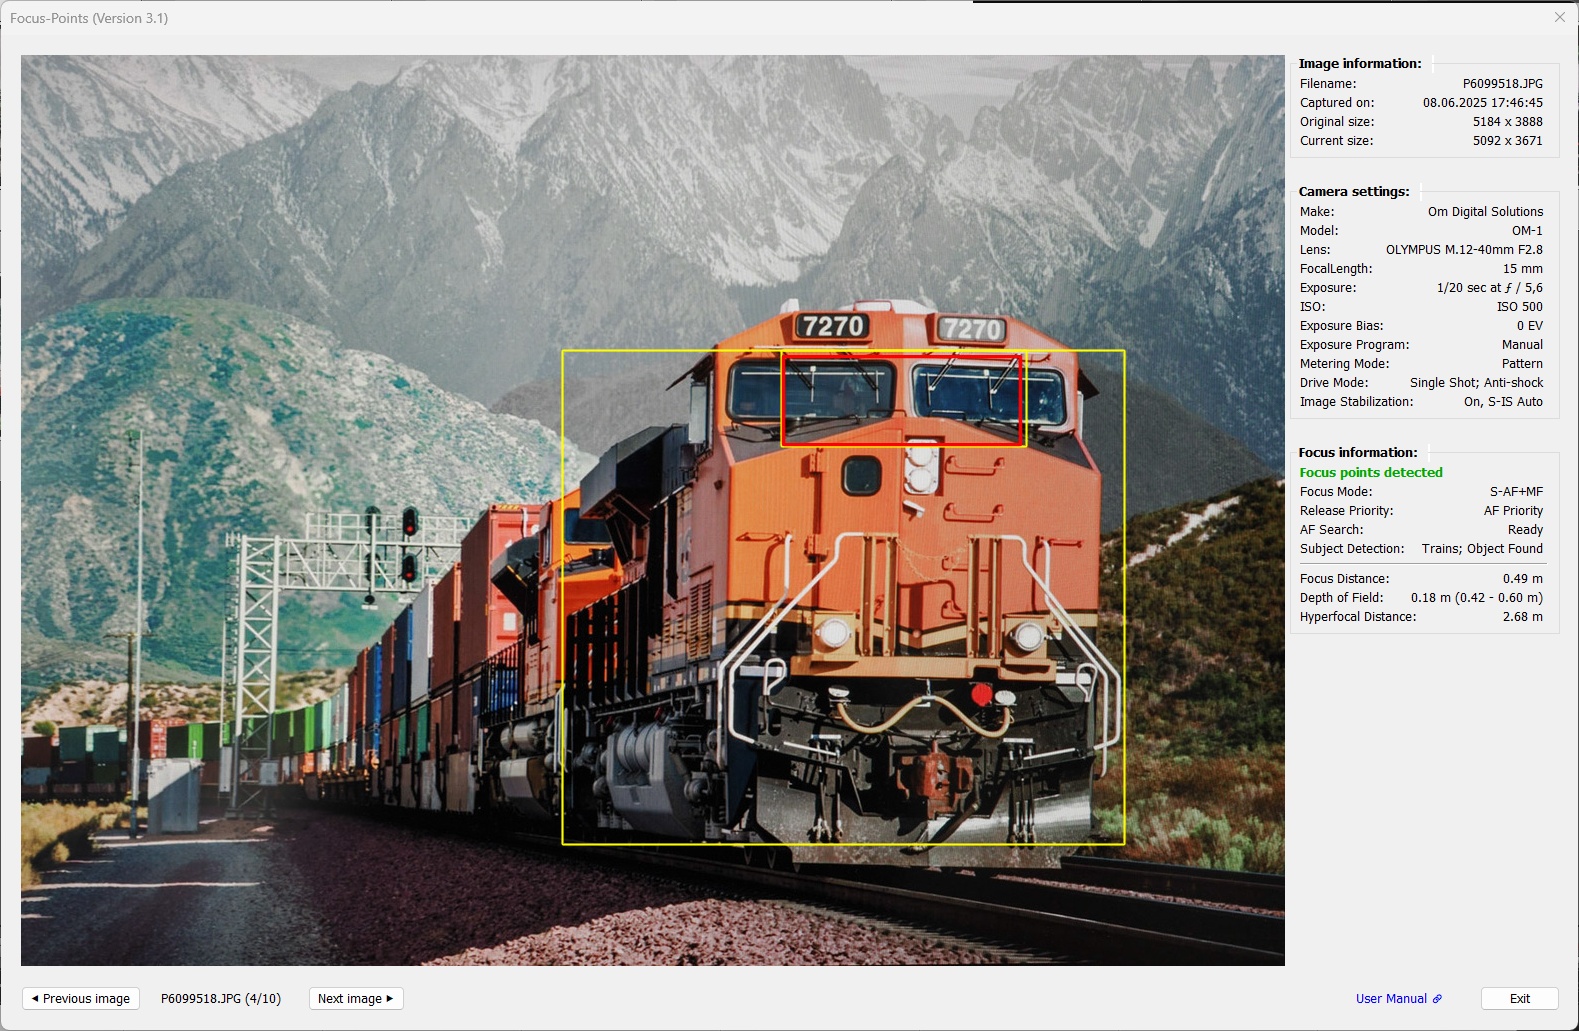
Train and driver compartment detected, focus is on the driver compartment.
Human
3.7 Panasonic
Supported features:
| MAC | WIN | Color | Meaning |
|---|---|---|---|
|
|
red1 | Active AF point. Focus area, dimensions reported by the camera |
|
|
red1,2 | Active AF point. Focus location, pixel coordinates reported by the camera |
|
|
yellow | Face or subject detected by the camera in this area |
1 AF point color can be chosen from red, green, blue in Viewing Options.
2 ‘Focus-pixel’ shape and size can be chosen from different options (small box or medium/large with center dot) in Viewing Options.
Similar to Olympus, Panasonic hasn’t changed the basic logic of focus point data in ages. Since 2008 to be exact. They use the same logic and format in all their cameras. As a result, Panasonic cameras are widely supported across all model lines, from mirrorless to bridge to compact.

While the focus point given by AFPointPosition metadata tag has no dimensions, recent Lumix models support an AFAreaSize tag in addition. This tag gives the size of the area used to find focus in subject detection modes. Whenever AFAreaSize exists, AFPointPosition represents the center of this area.
Panasonic also supports face detection identification in EXIF metadata. This information is available for recent mirrorless models, for compact cameras I have seen an ZS20 (2012 model!) image that used the same logic and notation for face detection frames.
Panasonic doesn’t support a “focus distance” specification in the metadata, so there’s not much to go on other than the focus mode and AF area mode listed in the focus information section.
3.8 Pentax
Supported features:
| MAC | WIN | Color | Meaning |
|---|---|---|---|
|
|
red1 | Active AF point. Focus area, dimensions reported by the camera |
|
|
white | User-selected AF point |
|
|
gray | Inactive AF point. Part of DSLR AF points but not used for the image |
|
|
yellow | Face or eye detected by the camera in this area |
1 AF point color can be chosen from red, green, blue in Viewing Options.
With the release of V3.1, Pentax is not only on par with other camera manufacturers and models in terms of supported features, it is even ahead of the “Big Three”, Canon, Nikon and Sony.
While working on Pentax support, a lot of effort was put into finding and decoding relevant metadata tags for newer models (like the K-3 III) and fixing tags that were already supported by ExifTool but not properly decoded for models like the K-Sx, K-70 and KP.
With the Pentax additions to ExifTool versions 13.30 to 13.34, Pentax metadata now supports visualization of:
- User-selected focus points/areas
- Focus point(s) used by the camera
- Detected faces
- Inactive AF points (to visualize the complete AF layout)
The exact level of support depends on the camera model, as not all models support all features (e.g. face detection is not available on K-5 and even older models)
Here are some examples:
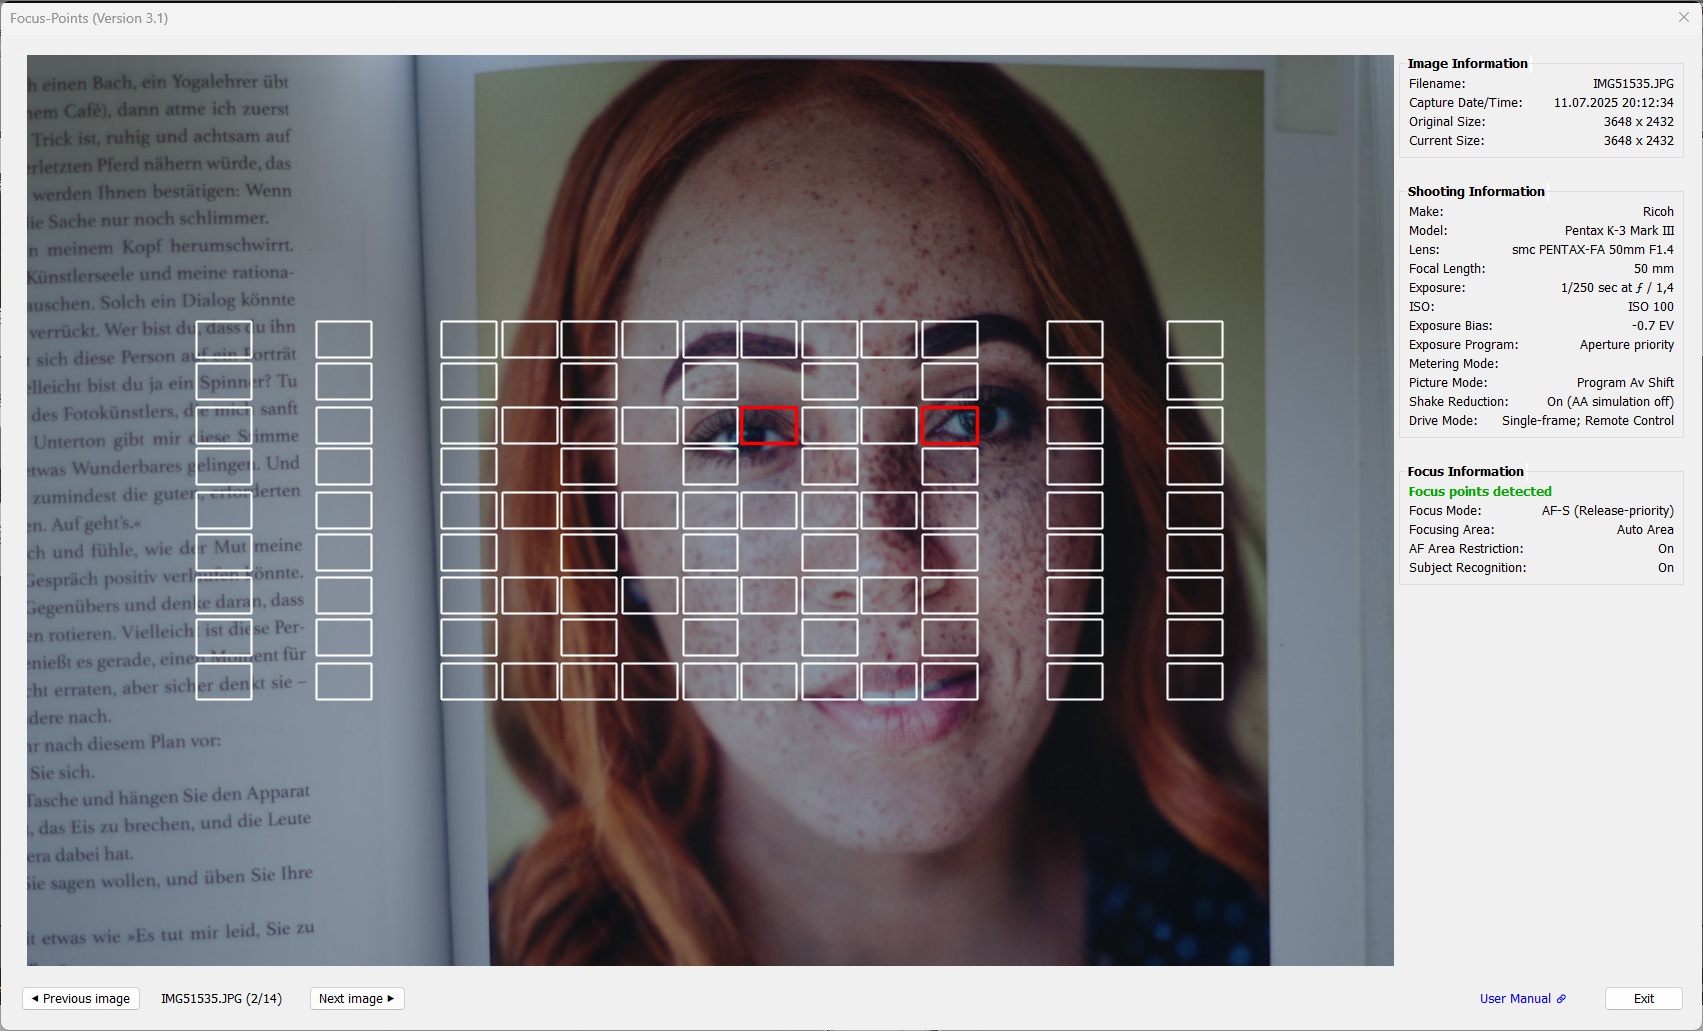
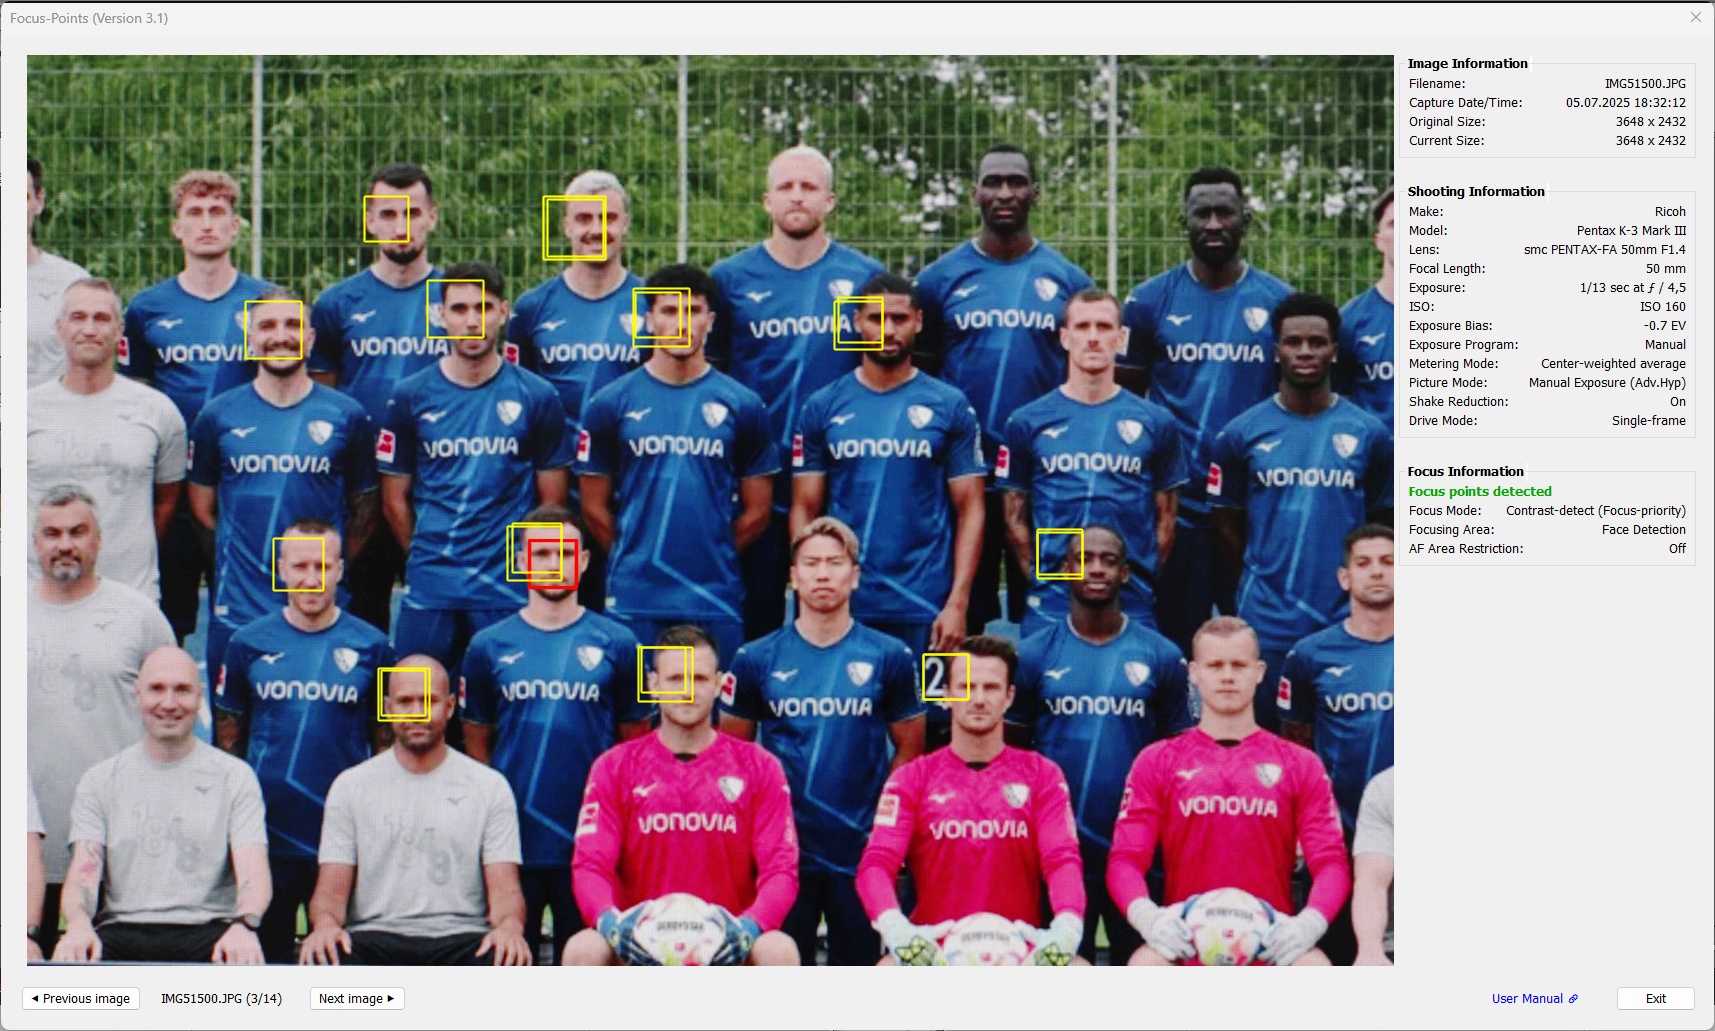
K-3 III image taken with viewfinder, selected focusing area “Auto Area” (all 101 AF points) and “Subject Recognition” on.
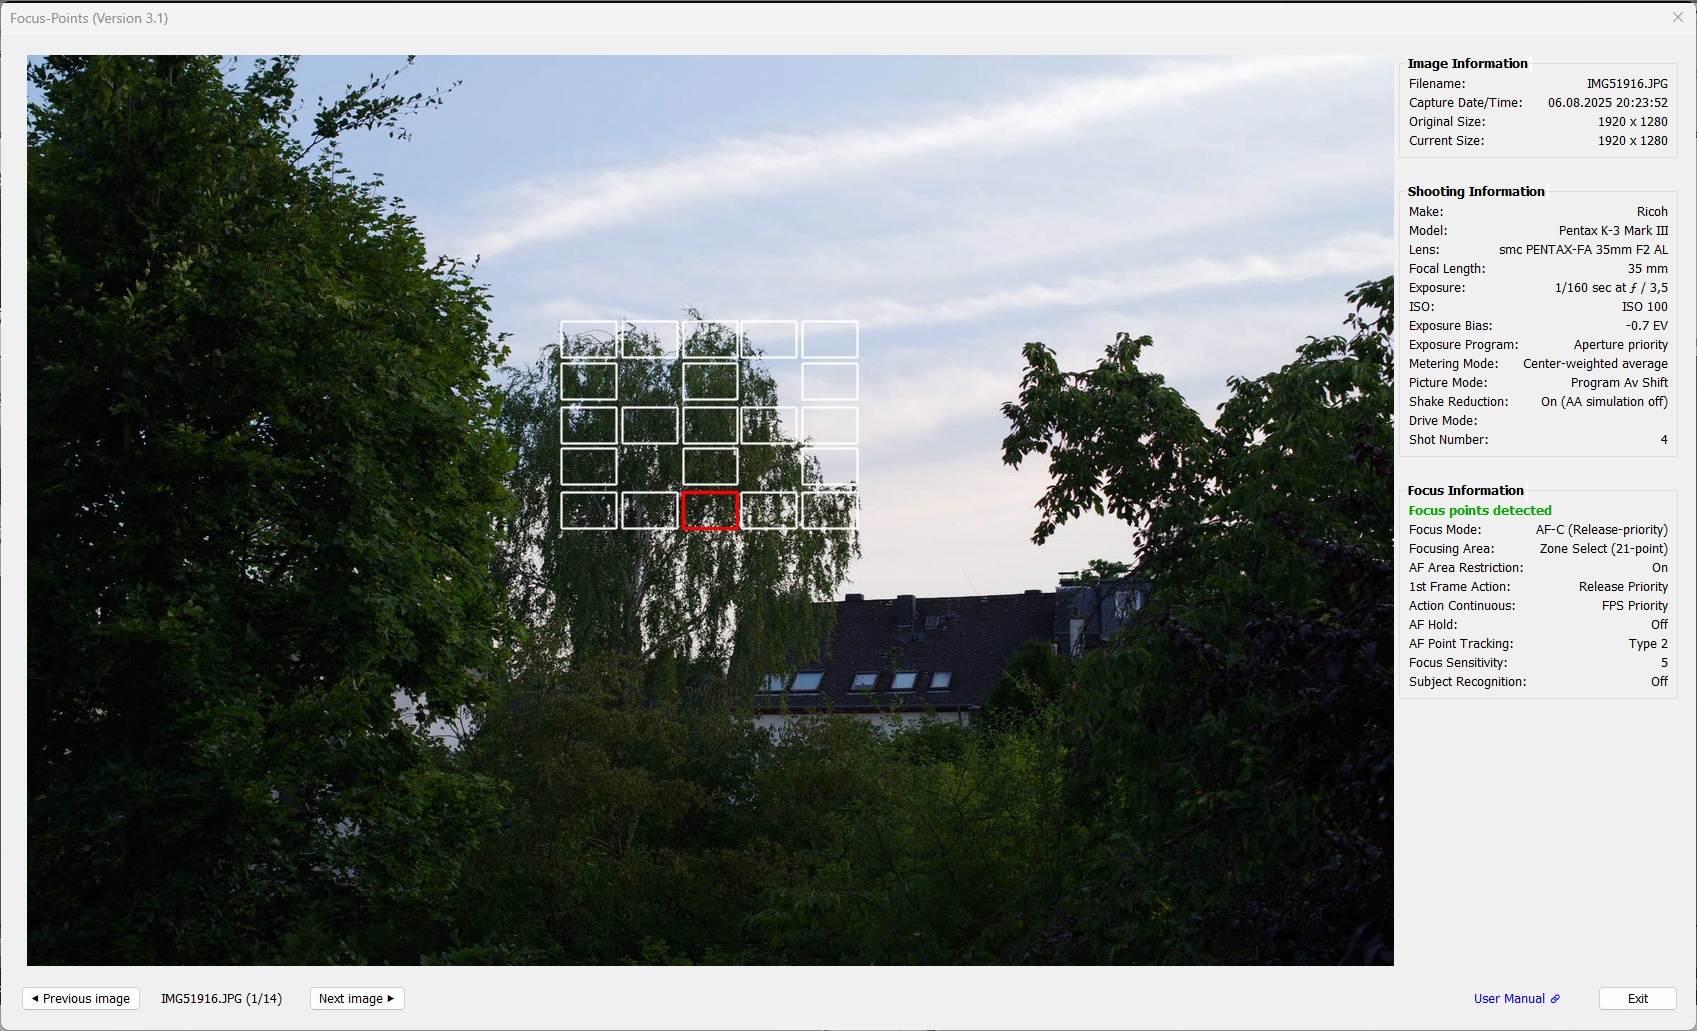
K-3 III image taken with viewfinder, “Zone Select” focus area (21 AF points) selected, AF-C and “Continuous” drive mode. Action settings and AF-C control settings (AF hold, focus sensitivity, point tracking) for the shot are listed in “Focus Information”.
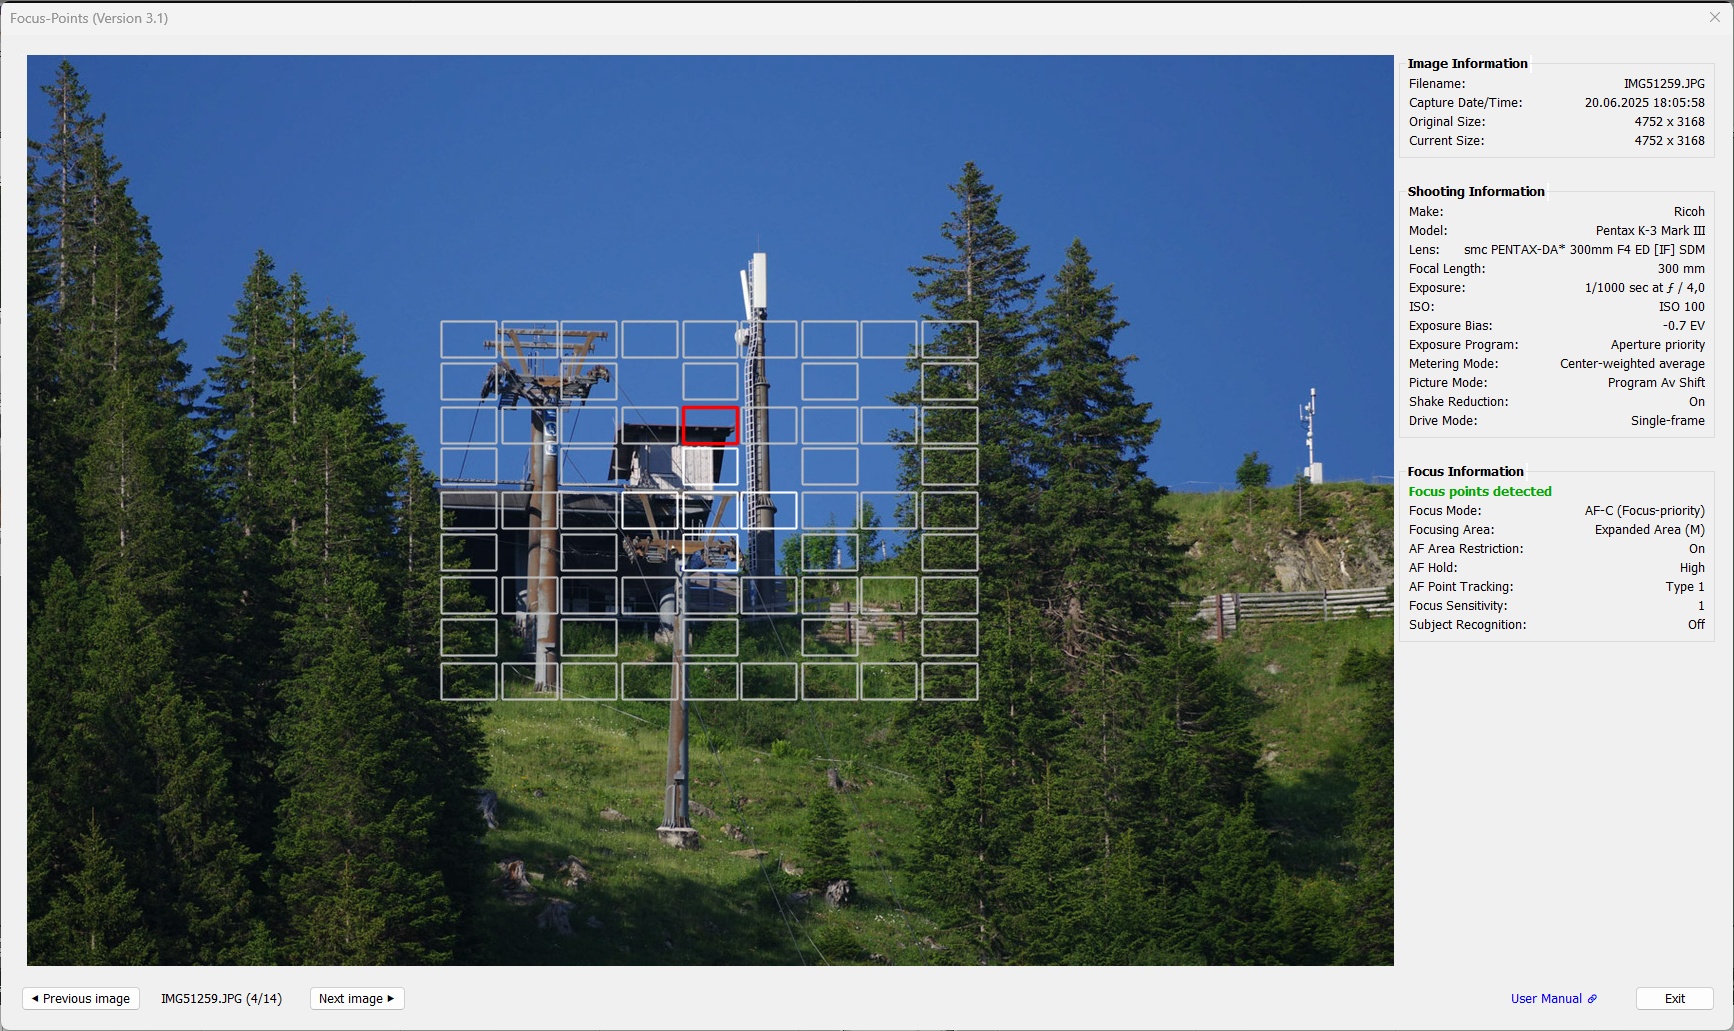
K-3 III image taken with viewfinder using “Expanded Area M” (5 selected AF points plus 60 peripheral AF points). The selected AF points are displayed in white, and the peripheral points are displayed in gray.
K-3 III image taken with Live View using “Auto Area”
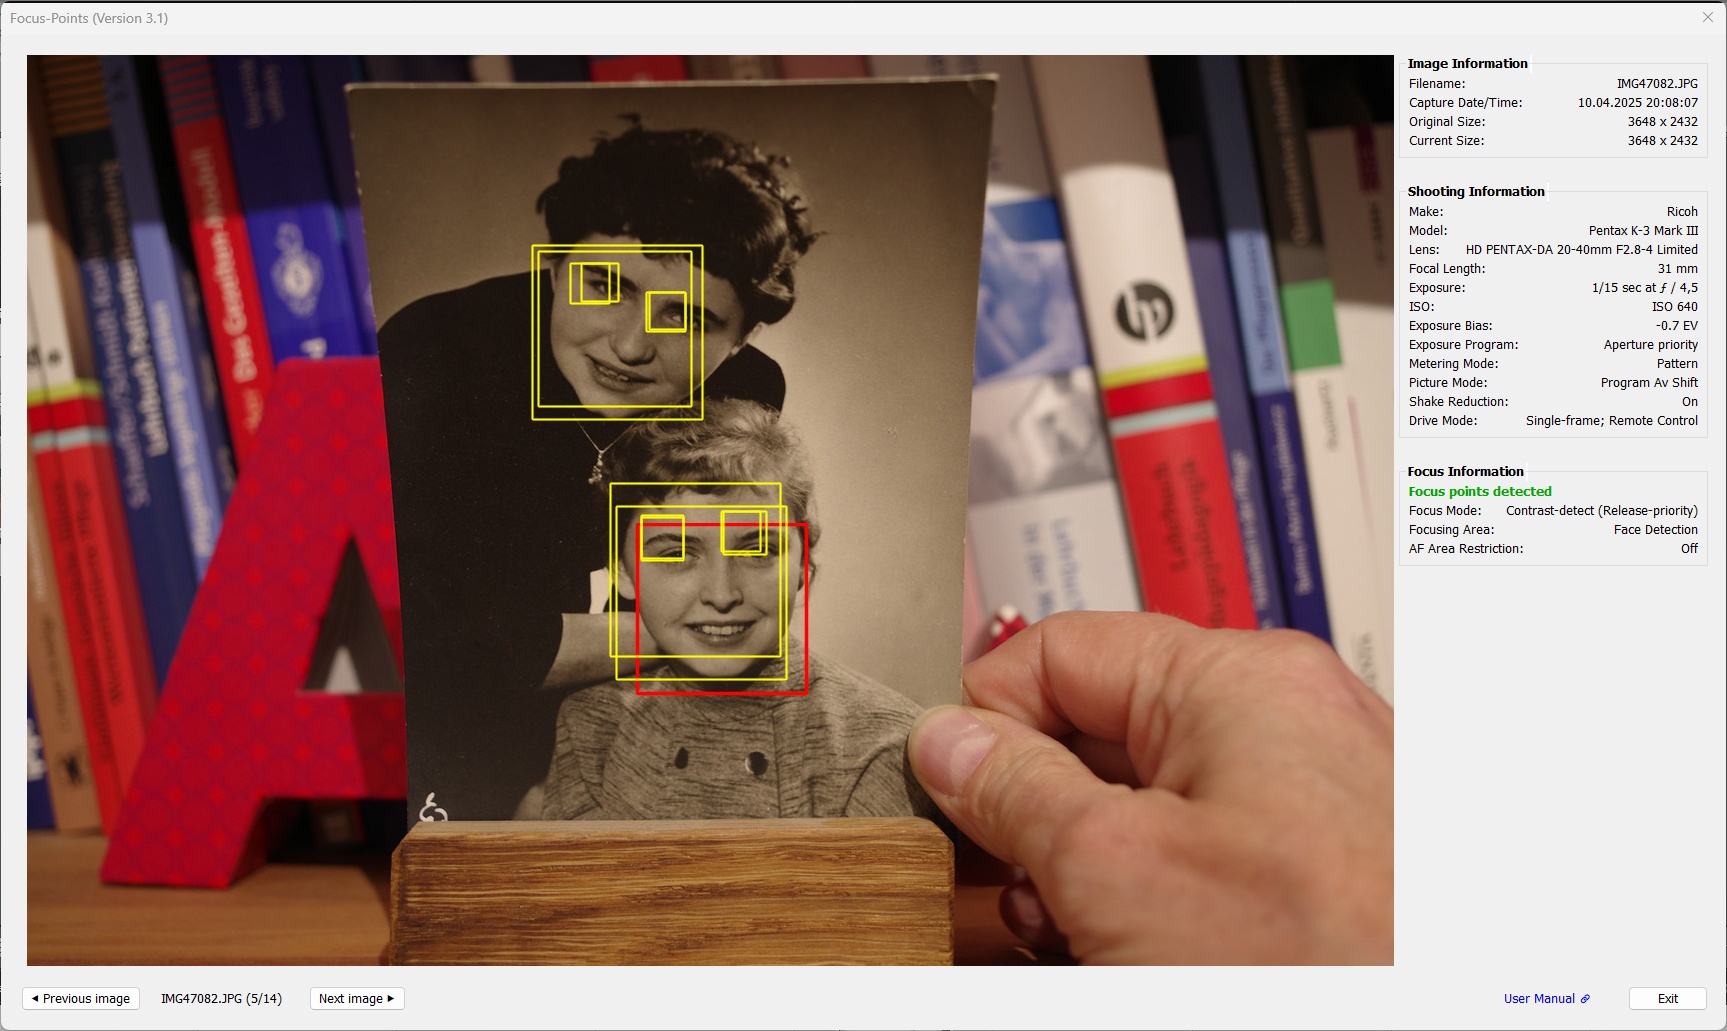
K-3 III image taken with Live View using “Face Detection”. The K-3 III records two sets of face detection information. Since there is no way to decide which set has “better” information, both sets are displayed.
K-3 III image taken with Live View using “Face Detection”. The K-3 III can detect up to 10 faces. Double images occur because two independent sets of face detection information are recorded. In this image, some faces are part of only one set. If more than 4 faces are detected in an image, the plugin will not display the eye information to avoid optical clutter.
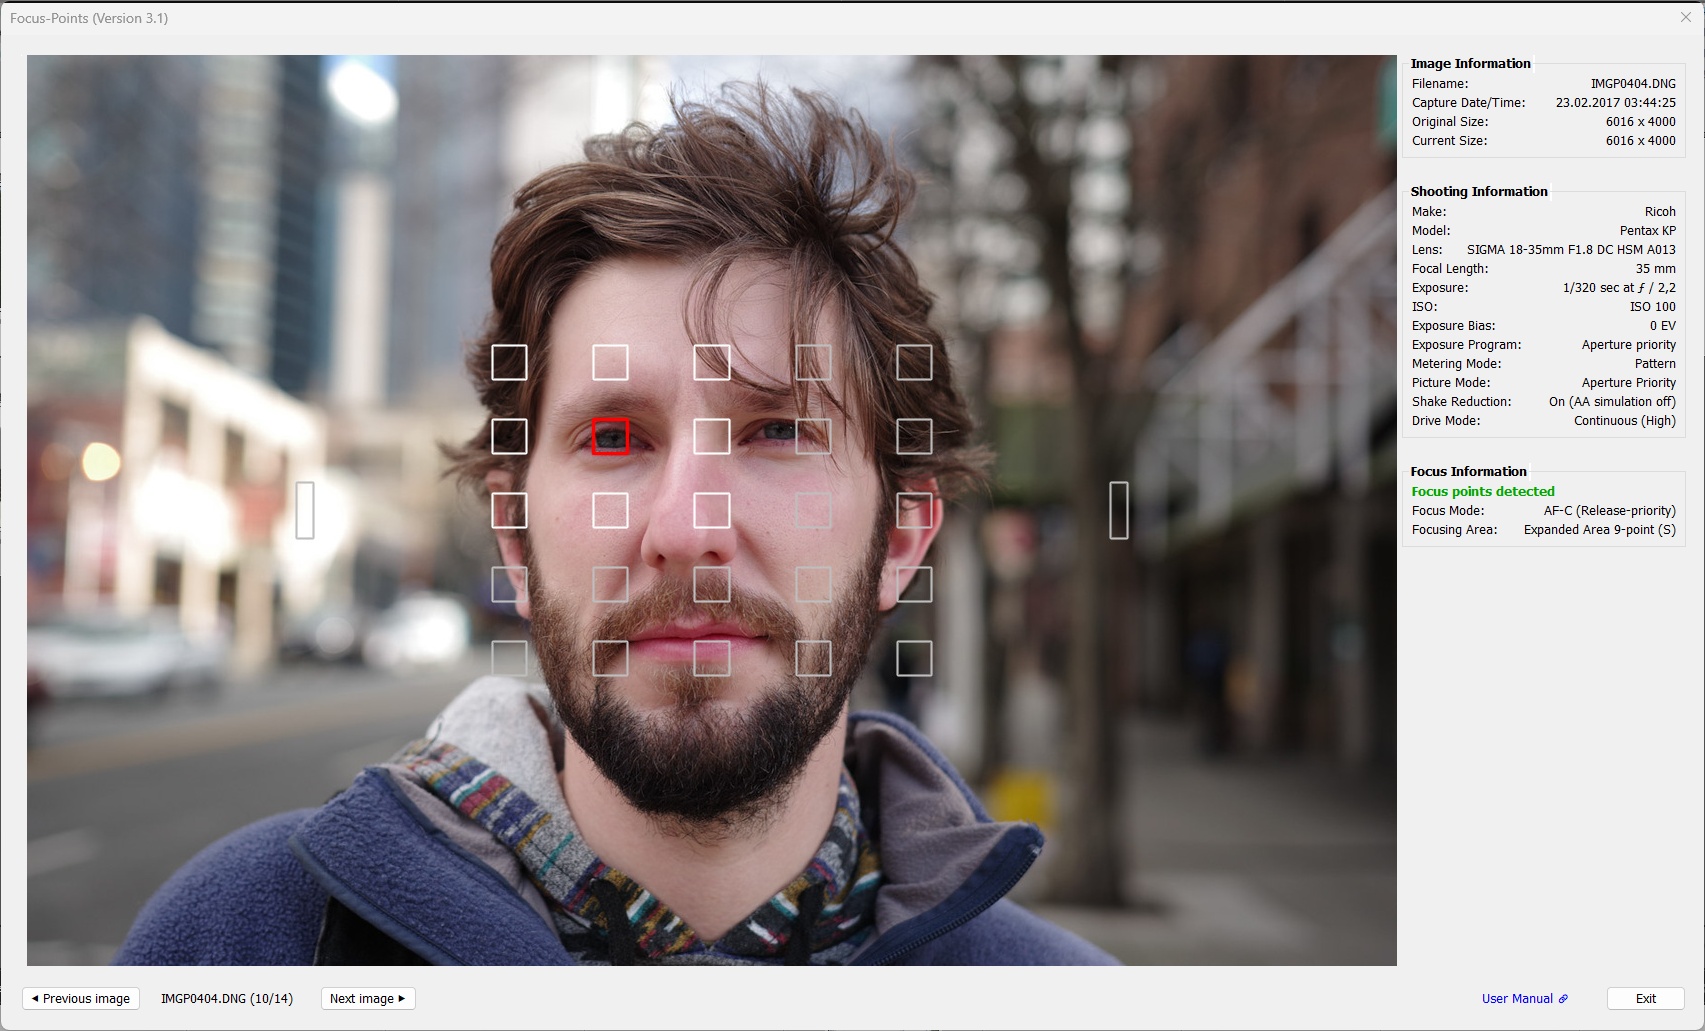
KP image taken with viewfinder using “Expanded Area (S)” (9 AF points). The AF point in focus is displayed in red, the selected AF points are displayed in white, and the remaining (inactive) AF points are displayed in gray.
K-3 image taken with viewfinder using “Expanded Area (S)” (9 AF points). The AF point in focus is displayed in red, the selected AF points are displayed in white.
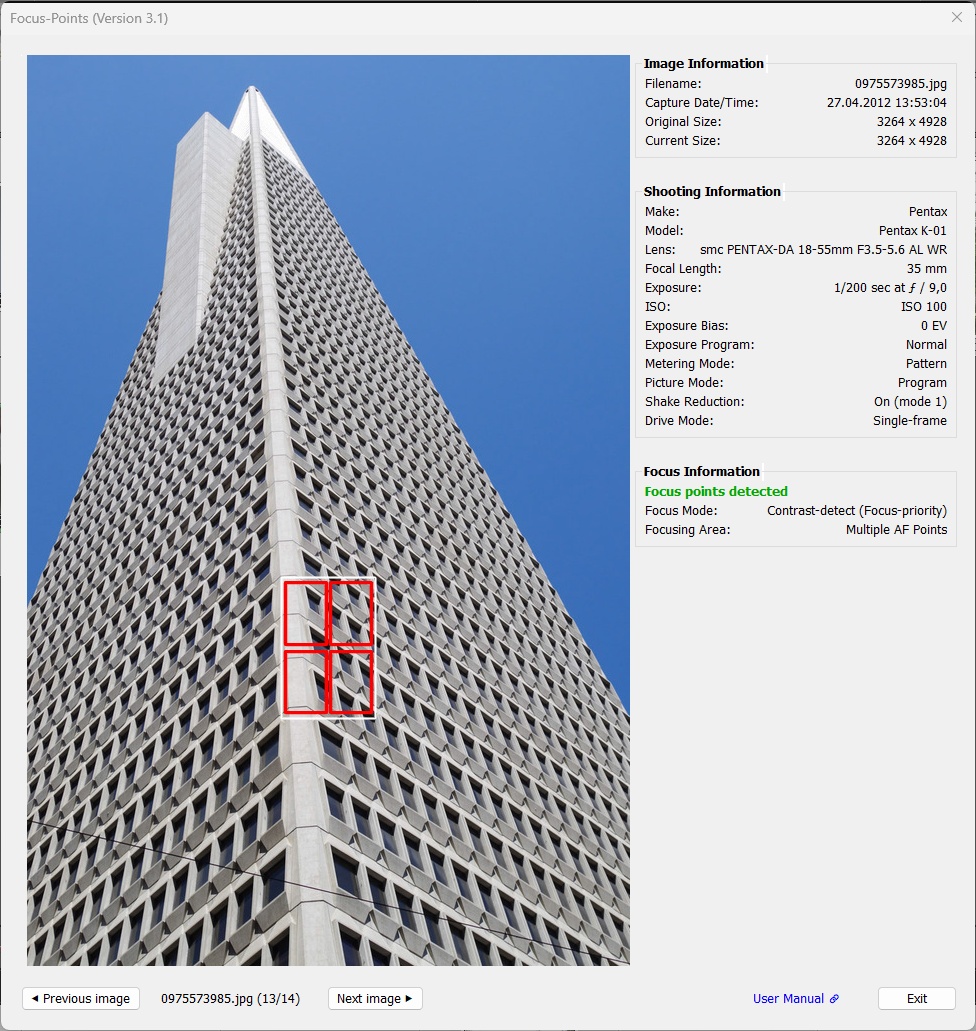
K-01 image taken with viewfinder using “Multiple AF Points”.
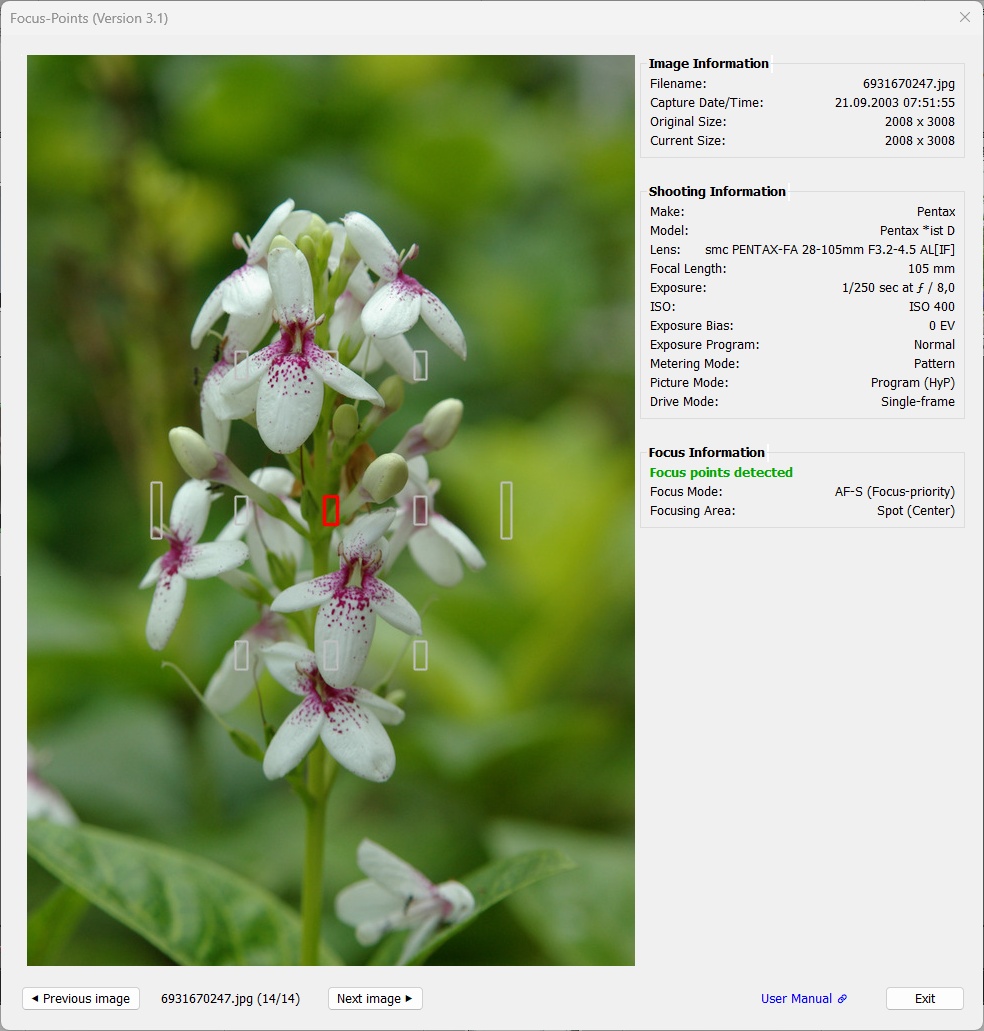
Support for Pentax DSLRs dates back to the *ist D models introduced in 2003. However, due to the established focus-and-pan method on older DSLRs with only a few AF points, the use of the plugin for these cameras will be limited.
3.9 Ricoh
Supported features:
| MAC | WIN | Color | Meaning |
|---|---|---|---|
|
|
red1 | Active AF point. Focus area, dimensions reported by the camera |
|
|
yellow | Face or eye detected by the camera in this area |
1 AF point color can be chosen from red, green, blue in Viewing Options.
Starting with the GR III, Ricoh’s GR models use the same metadata structures as the latest Pentax models (K-3 III), so support for these cameras is a by-product of adding support for the K-3 III.
Examples:
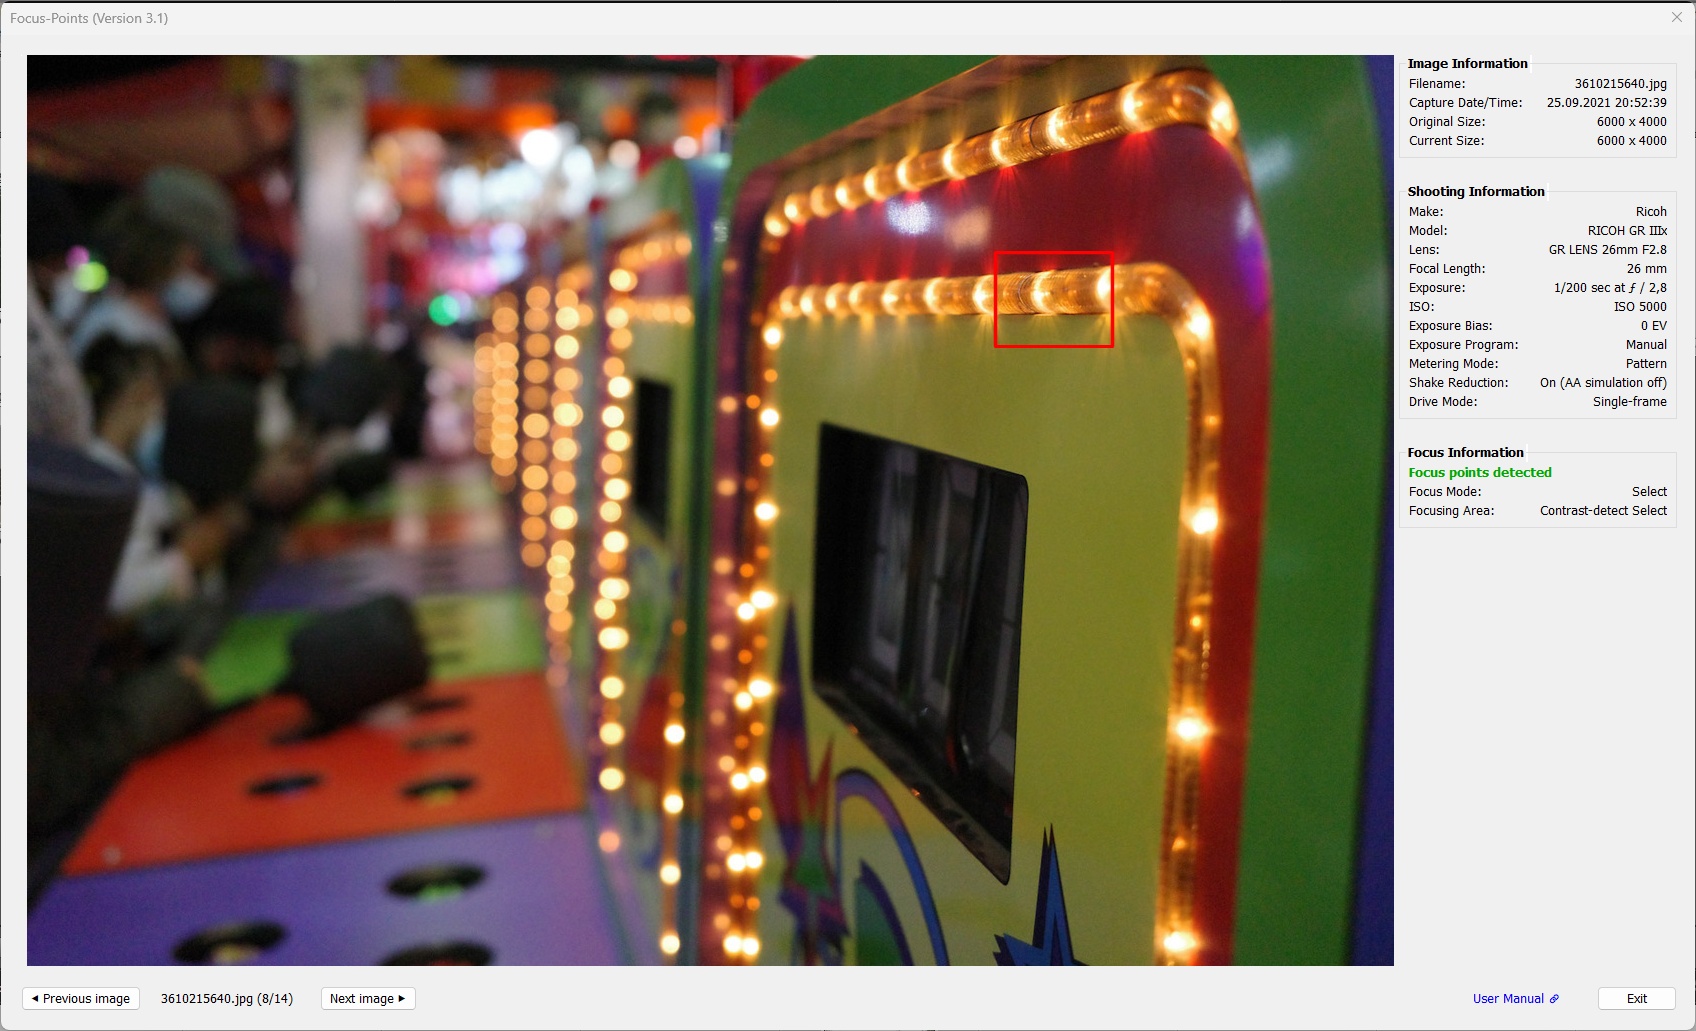
Single focus point selected and used to focus the image.
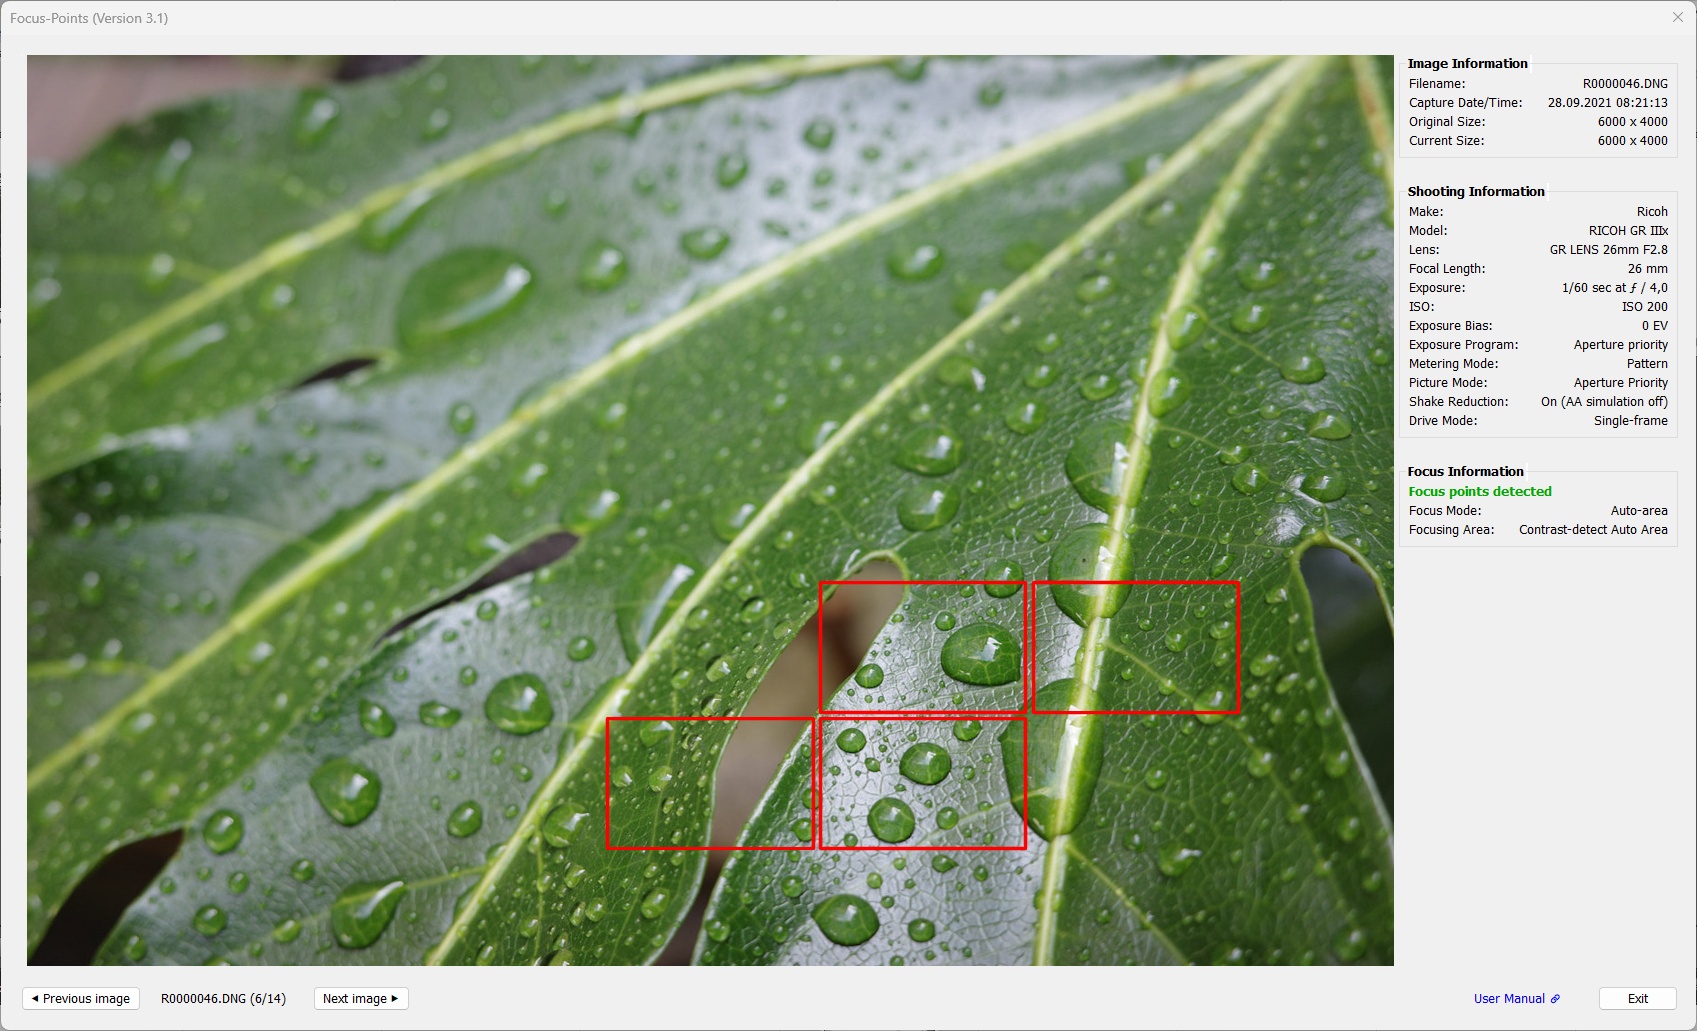
Multiple focus points from “Auto Area” selection used to focus the image.
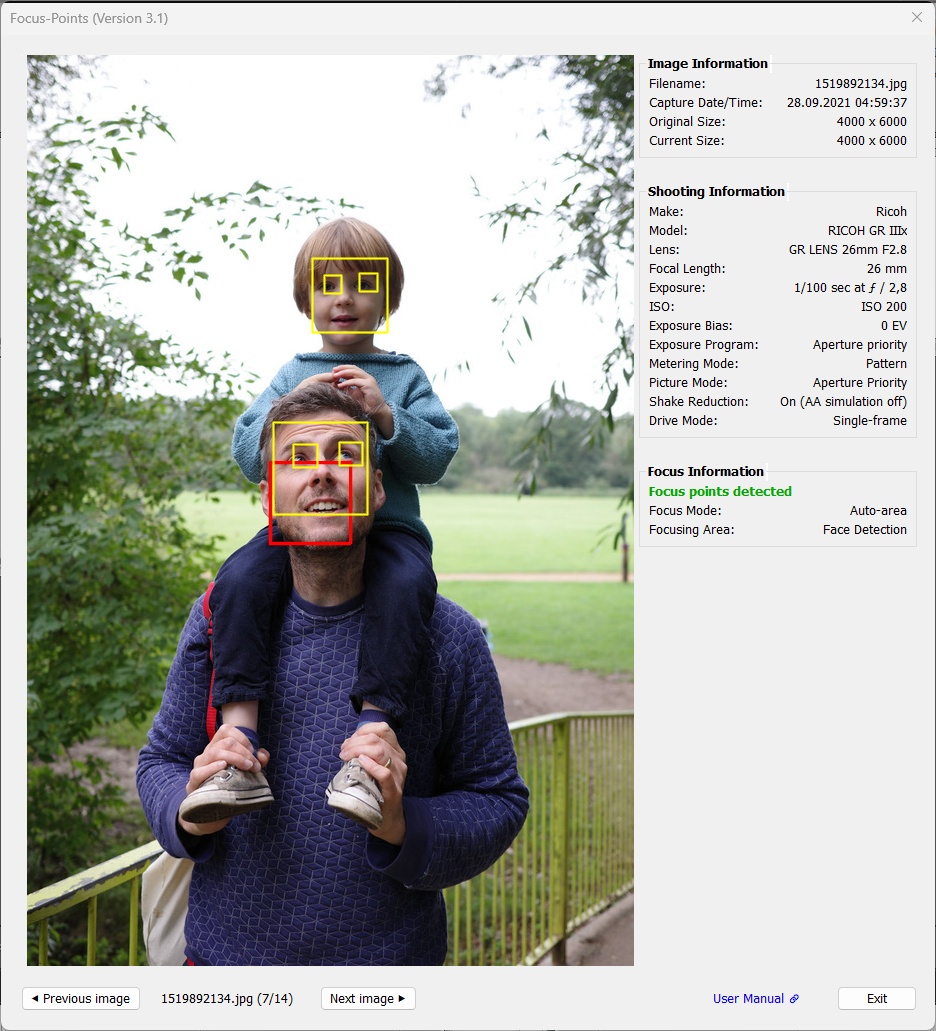
Detection of multiple faces and eyes.
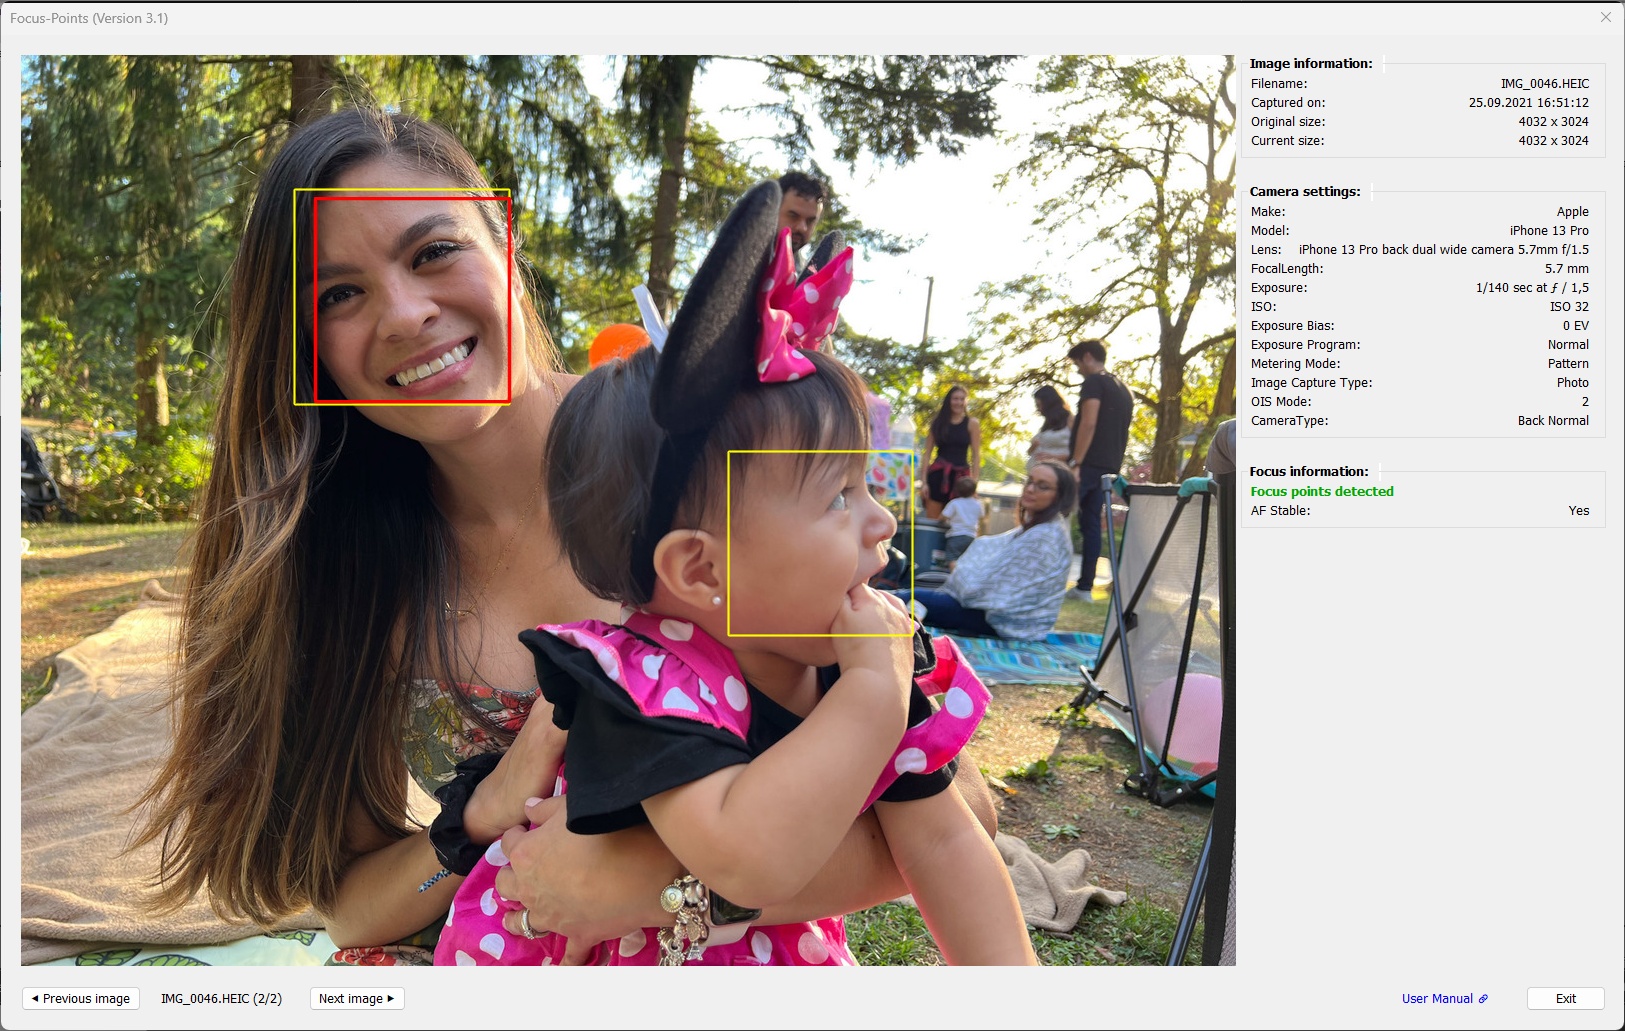
3.10 Apple
Supported features:
| MAC | WIN | Color | Meaning |
|---|---|---|---|
|
|
red1 | Active AF point. Focus area, dimensions reported by the camera |
|
|
yellow | Face detected by the camera2 in this area |
1 AF point color can be chosen from red, green, blue in Viewing Options.
2 Face detection is not done while the shot is being taken, but by Apple’s Photos app.
Apple maintains a very simple logic to store the focused subject areas in EXIF metadata. This hasn’t changed since early models (at least iPhone 5).
The makernotes section is rather short; older models do not even have an “Apple” section. Apart from the focus area, there is no relevant information to be displayed:
For modern Apple devices there are some interesting tags to extend the Shooting information section. However, the number of AF-relevant tags is limited. ExifTool can decode tags like AFPerformance, AFMeasuredDepth or AFConfidence, but their meaning is not documented and therefore the associated values are meaningless.

Face detection for an image exported from Apple Photos:
4 Special Topics
How to use a keyboard shortcut to run the plugin
Although the plugin supports multi-image operation by selecting multiple images in Lightroom before launching the plugin, it can be tedious to navigate Lightroom’s menu structure each time you want to use the plugin. How much more convenient would it be to launch the plugin with the press of a button?
Unfortunately, there is no solution to this problem within Lightroom. Plugins like Any Shortcut or Keyboard Tamer are limited to assigning custom shortcuts to commands that are part of the predefined, static portion of Lightroom’s menus. They do not support assigning shortcuts to commands (menu items) that are part of the menus that Lightroom dynamically creates and maintains based on user-defined additions to Lightroom (e.g. Plug-in Extras, Edit in, Export with Preset). The Focus-Points plugin is one such user-defined extension.
However, at the system level, there are ways to automate the startup of the plugin.
Windows
On Windows, you can use the free AutoHotkey utility together with a small script to assign the command File → Plug-in Extras → Show Focus Point to a key. The same applies to Show Metadata.
The plugin comes with a ready-to-run, compiled Autohotkey script that assigns:
- NumPad * as a shortcut for Show Focus Point
- NumPad / as a shortcut for Show Metadata
-^NumPad - as a shortcut for Straighten Images
The FocusPointsHotkey.exe file (for the English UI) can be found in the ahk folder of the focuspoints.lrplugin file. If you use the German language UI in Lightroom, use FocusPointsHotkey_de.exe instead.
Note: If you are using a perpetual licence version of Lightroom Classic (Lightroom 5 or 6), rather than the subscription version, then you need to select FocusPointsHotkey_LR.exe (or FocusPointsHotkey_LR_de for German UI) from the ahk folder. Separate versions are necessary because the application window title that triggers the keyboard shortcut can differ between LR5/6 and LrC.
To activate the two shortcuts, run the executable file and also drag it to your Windows Startup folder, so that the shortcuts are automatically available each time you start Windows. A green![]() icon in the system tray indicates that the script is active.
icon in the system tray indicates that the script is active.
You can use FocusPointsHotkey.ahk (or the corresponding .ahk file for your setup) as a starting point to create your own shortcuts:
-
Download AutoHotKeys V2 from https://www.autohotkey.com/ and install it on your system.
-
Open the script file FocusPointsHotkey.ahk in a text editor.
-
To define different shortcut keys, you have to replace
NumpadMultandNumpadDivby whatever suits you.
See Hotkeys and List of Keys for hotkey syntax.
E.g. if you want to assign the two plugin functions toWin-FandWin-Myou have to replaceNumpadMultby#fandNumpadDivby#m. If you prefer aCtrl-Shiftcombination instead ofWinthe hotkey names are^+fand^+m.
Save your changes to the file. -
Double-click
FocusPointsHotkey.ahkto run the script. In case you didn’t introduce any errors, a green icon in the system tray indicates that the script is active.
 -
To make the shortcuts available permanently, place
FocusPointsHotkey.ahkin your WindowsStartupfolder.
Please note:
-
Redefining keyboard shortcuts overrides the existing meaning of the corresponding keys in Lightroom. For example, if you set
^f(Ctrl-F) as the keyboard shortcut for the plugin, it will override the ‘Find’ command in the ‘Library’ module. -
The
MenuSelectcommand used in the script uses the exact names of the menu items to identify the command to be run. In cases where these names change from one version of Lightroom to the next (either intentionally or accidentally), the script will need to be adjusted to work.
For example, in LrC 14.5 (German UI) the relevant menu itemZusatzmoduloptionensuddenly appears asPlug-in-Extras(probably a translation error). The script (both .ahk and .exe) has been adapted accordingly. However, if Adobe reverts this change in LrC 14.6 or LrC 15, the script will also need adapting.
macOS
On macOS, you can use the system-wide feature in
System Settings → Keyboard → Keyboard Shortcuts → App Shortcuts
to assign your own shortcut to almost any menu item in any app. Here’s how you can do it for a Lightroom plugin to be added:
Example for:
- F12 as a shortcut for Show Focus Point
- F11 as a shortcut for Show Metadata
Note: NumPad * and NumPad / may not work because macOS sometimes treats NumPad symbols (* / + -) the same as the normal keyboard symbols, so for this example we will use function keys.
Steps:
- Go to Settings → Keyboard → Keyboard Shortcuts → App Shortcuts.
- Click
+.- Application:
Adobe Lightroom Classic - Menu Title: “ Show Focus Point” (with 3 spaces before the actual text!)
- Keyboard Shortcut: Press
F12(or your desired shortcut)
- Application:
- Repeat 2. for
Show MetadataandF11. - Restart Lightroom Classic if the shortcuts don’t show immediately.
Note:
Of course, you can use any other keys you like. Just note, that if you assign the same shortcut to two different items, macOS picks one unpredictably.